Favor Boxes
Favor Boxes can be used for all manner of things and not just kept for weddings. These are a very pretty way to add decoration to your table.
Use the boxes to add a gift for your Bridesmaids, or even pieces of cake for your guests to take home with them for later.
There are many different ways to make them.
In the picture there are three ideas for you to try.
The white box with the single pink Rose (left) is from the
It is made following the instructions for the Wedge Box.
The Pink Rose patterned paper (right) is rolled to create the Cream Carton and you can alter the size of this box to better suit your individual requirements.
But the other box, with the pink bow on the top, is the one featured here.
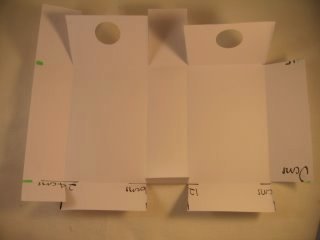
To make this you will need an A4 card (21 x 29.5 cms)to suit the colour scheme.


Step 1
Lay the card flat and it will need to be trimmed to measure
21 x 28 cms
and trim off the excess.
Step 2
Once this is done you will mark the card, lightly at
4, 12,16 and 24 cms
on the long edges.


Step 3
Then down the short edges you will need to mark at
3 and 15 cms.
These are to lines you will score and fold along to make the box.
Step 4
Cut down all the folds from the top down to the 15cms line, and from the bottom to the 3cms line.
Then from one of the sides remove the top and bottom panels as shown in the photograph.
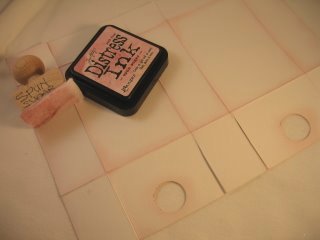
Step 5
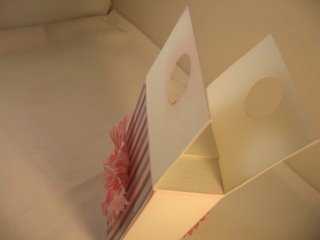
Take out two circles with a punch on each of the 15cms panels to create the handle for the box,
Flip the card over and with some ink and a Blender I have inked all the edges.
Step 6
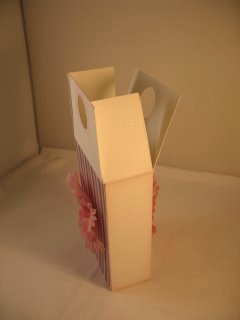
It is easier to decorate the box now while it is flat and you can add any Embellishments you have in your "stash"
I have made two smaller panels to fit the box from some patterned paper and added a silk flower and a pearl brad too.

Step 7
Using some strong glue fold the box up and glue the outer edges together.
Fold in the four panels at the bottom and glue in place.
Step 8
Add your gift to the box when the glue is dry, and fold down the two outer panels at the top, but don't glue these as they will just keep the gift inside.

Return from Favor Boxes to Homepage


Recent Articles
-
Memory Book
Oct 15, 22 09:17 AM
 Make a memory book, fun to make and even lovelier to give.
 -
Die cut letters.
Jul 19, 21 10:12 AM
 Add that personal touch with die cut letters, add names or sentiment as you please.
 -
Diaper Fold Card.
Jul 19, 21 09:34 AM
Create this fun Diaper Fold Card...and no need for a pin!
Search
