Waterfall Cards for you to make.
Waterfall cards may look intricate, but once you get started you will see that they are easy to do.
Search

Here is another card project that you might like to try, and it's not as difficult as you may think.
As always practise on some cheap card until you feel confident enough to work on your good stuff.
Then keep this as your template, for future reference when you want to make some more.
If you prefer to learn by watching then this is where you will find the Video Tutorial.
Step 1
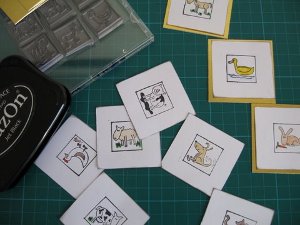
The first thing you will need to do is decide on the image you are going to use on your waterfall.
I chose some animals for mine and I stamped out five onto some white card.
Each of the tiles is 5cms square.
I used a StazOn ink pad, coloured them in and then mounted them onto some gold card that measured 5.5cms.
That will leave a small border around the image.
Keep them to one side while we make the mechanism for the waterfall.
Step 2
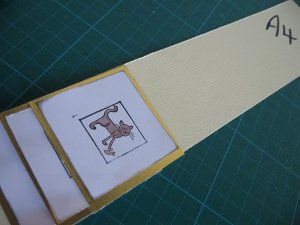
Take an A4 card and cut a panel the length of the card and 5.5cms wide.
Then measure from the bottom up 5.5cms, and this will give you a square.
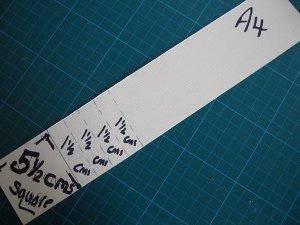
From this 5.5cms line measure up and make a dot every 1.5cms. and score and fold the card on each of the lines.
Step 3
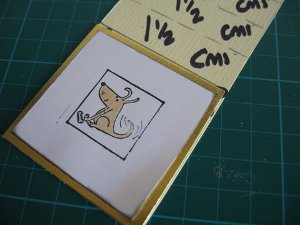
In the 5.5cms square place the first of your chosen tiles.
Glue the back completely and stick down.
Step 4
If you now fold this piece under, you will only glue in the 1.5cms space.
I have used double sided tape and it just holds the top edge of the tile in place.
(It is better to use a wet glue as it holds the card stronger.)
Step 5
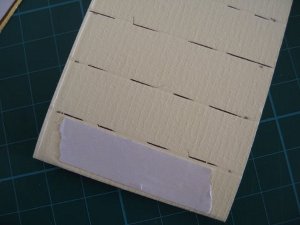
Continue until you have fixed all the tiles in place along the scored lines, only glueing the top edge.
This will allow the waterfall cards action to operate smoothly
Step 6
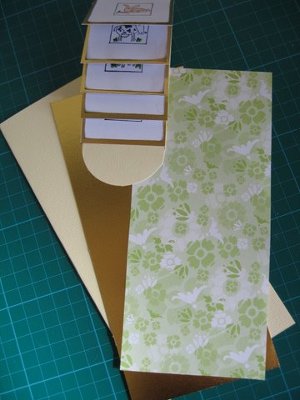
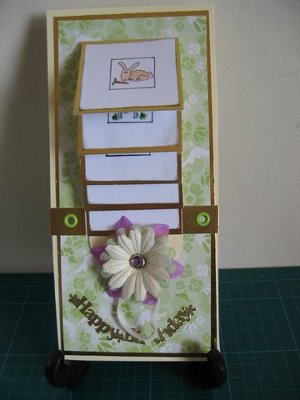
These are the papers I decided to use on my card. I used a plain cream card base, some gold card and I wanted to layer it with the flowery green paper.
I made a Tri fold card for my base, and then cut off one of the panels to make a long thin card.
Each of the other layers for the card are cut slightly smaller to leave a narrow border just visible around the edge.
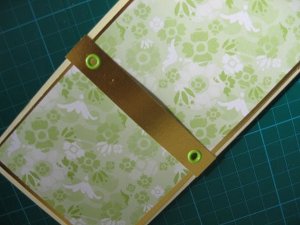
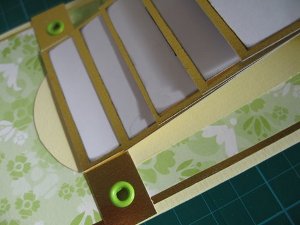
The next step is to add is the bar across the card that will hold every thing in place.
The one in the picture is 1.5 x 10 cms and I have used eyelets on each side to secure it.
You can use brads if you prefer.
I attached mine to the lower third of the card to give the waterfall room to operate.
Step 7
Once this is in place then take the completed waterfall and use double sided tape on to this bar to hold the waterfall in place.
Add the bottom edge of the waterfall to this and make sure it is in the centre. Add it so that all the images are facing you.
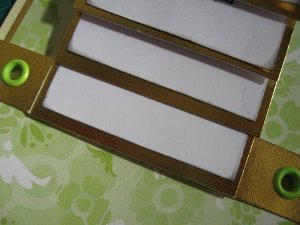
Fold the top part of the strip back and slide it under the holding strip you have just done.
You should now be able to test the waterfall cards mechanism and make any slight adjustments that you need.
To finish the card I stapled some narrow ribbon to the pull tab and then covered the staples with some flowers and a brad.
The "Happy Birthday" sentiment is a peel off, and I think Waterfall Cards are quite a pleasing project to do.
I hope you do too.
Return from Waterfall Cards to Homepage
Search


Recent Articles
-
Memory Book
Oct 15, 22 09:17 AM
 Make a memory book, fun to make and even lovelier to give.
 -
Die cut letters.
Jul 19, 21 10:12 AM
 Add that personal touch with die cut letters, add names or sentiment as you please.
 -
Diaper Fold Card.
Jul 19, 21 09:34 AM
Create this fun Diaper Fold Card...and no need for a pin!
Search