Make a pop out card ...
... a fun way to be different.
Making a pop out card is fun and they aren't difficult to do.
This is a step by step guide on how to achieve the basic card, that you can decorate in anyway you like.
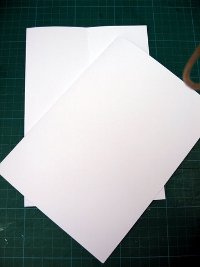
First you will need two identical pieces of card. I used A4 and folded them both in half.
Look on the card blanks page for how to get a good fold in your card.
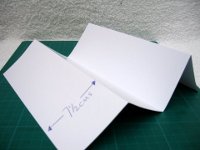
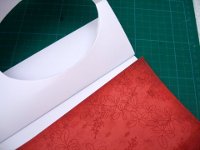
Then you need to take one of them and measure in from one side 7.5cms, turn the card around and measure the same distance from the other side.
You will now have a card in the same shape as the photo.
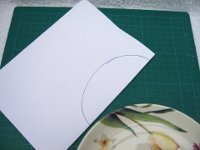
Place the card flat I used a saucer partly on the spine side of the card, and drew lightly round the shape.
Then with a sharp craft knife or scissors cut just outside your line.
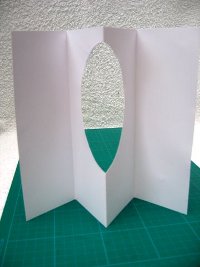
When you stand the open pop out card up it should look like this.
Take the first card and open it out and butt the short edges of the two cards together.
Then using a wet glue, for a strong bond join them up. The wet glue gives you chance to re-align if you haven't got them quite straight.

This is the stage to add any paper for the back of the pop out card, so that when you look into the opening it looks pretty too.
So with the two glued edges on one side, place your backing paper (Approx. 15cms wide) up to the fold and glue in place. But don't stick the other side down yet.
I wanted to add extra interest to my card and this is where you will need to add it if you do too.
I made two matching heart shapes and placed a length of cotton along the centre of one of them. I stuck it in place with double sided tape.
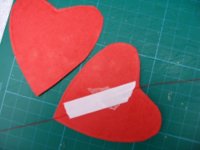
I then placed the two hearts together with the cotton in between them. So now they can be suspended in the opening.
And because it is double it will look just as good from any angle when it spins round.
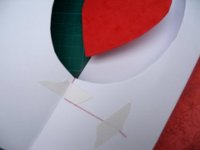
With the card open we can now place the hearts in position in the opening. Run the cotton in the fold at the top of the opening and hold it in place with double sided tape.
Then keeping the bottom piece of cotton tight stick this in place in the bottom fold.
To keep the cotton secure, move it to one side and re-tape, then cut off the excess.
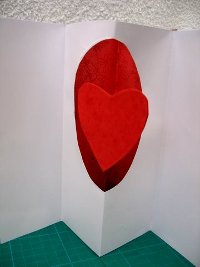
Now is the time to glue down the other side of the pop out card, so butt the edges as you did before and glue in place with the wet glue.
When you stand the card up this time it should look like this.
The hearts in the centre will spin round and the cotton wont be noticeable holding it all together.
It's now ready for you to dress up as you want.
Magic!
Return from Pop Out Cards to Homepage
Search


Recent Articles
-
Memory Book
Oct 15, 22 09:17 AM
 Make a memory book, fun to make and even lovelier to give.
 -
Die cut letters.
Jul 19, 21 10:12 AM
 Add that personal touch with die cut letters, add names or sentiment as you please.
 -
Diaper Fold Card.
Jul 19, 21 09:34 AM
Create this fun Diaper Fold Card...and no need for a pin!
Search