Wedding Fever
by Frances Martin
(Dunoon, Argyll, Scotland)

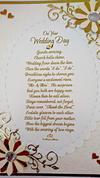
On Your Wedding Day


|


|

|
Here is my second attempt at die cutting.
I wrote this poem and others for family weddings and have been encouraged to sell them on Etsy. Hope it appeals to you and encourages others to put pen to paper.
I used a 5” x 7” white card, layered it with gold mirri and hammered cream card.
Printed my poem from Microsoft Word onto white glossy paper, then die cut it using
Creative Dies Plus - largest oval die.
Punched two gold and two cream flowers, flat glued them together, alternating colours,off setting them and placing crystal gem in the middle. Die cut swirls and love hearts for embellishments.
Used a cream insert, deckle edged it, topped it with smaller oval die cut congratulations sentiment, finishing with swirls and hearts.
I plan to do more in other colour combinations.
Special thanks again to Christina for all her fabulous teaching, inspiration, ideas and never ending encouragement. Lots of Love, Frances xx
Christina says ...
How very pretty is the card and th poem is lovely. I am sure it was well received by your recipient and long may you make many more
Click here to read or post comments
Baby's Message
by Frances Martin
(Dunoon, Argyll, Scotland)

To A Special Grandmother


|


|


|


|
This is my first attempt at using dies. Under the expert guidance of Christina’s video “Spellbinders Heirloom Rectangles”, with only a slight modification, I made the following cards.
Firstly, I took die number 4 i.e. largest die (counting smallest die as 1) and cut 2 pieces of 250 gsm card stock, one
I used GOLD for both, for the Grandmother card, but varied the colours, including tartan, for the others.
Following the video, for portrait style, I took back of card, scored it about half an inch from the top and bent back slightly. Put top and bottom cards to the side for assembly later.
I then took dies 2, 3 and 4, nested them and taped them together, placed on CREAM card and cut to form decorative topper for front of card.
Next I flat glued this to the front base card, before gluing the front and back together at the hinge.
Next, using Microsoft Word for my verse and Congratulations sentiment, printed them on shiny white printer paper, placed die number 3 on top of poem, making sure verse was within the cutting lines and cut.
This fitted exactly into the space left in the topper and therefore I flat glued it into place. I then used die number 1 on top of sentiment and cut to use for inside of card
I finished the card by adding a double bow, “Glitter Girls” sparkle glitter dots and sentiment to inside.
Size of finished card 6.5” x 4.5” approx. Hope you liked it and my variations. You will notice that I changed the verse slightly for each recipient.
I have been making cards for family for some time now, but when a friend asked me to write a poem and make a card for her sister’s new grandchild, she was so pleased that she encouraged me to sell them on Etsy.
Thankfully, I discovered Christina’s website and video tutorials, which I love and adore. They are a joy to watch, so well explained in every detail with no questions left unanswered.
I have learnt so much and through this realised that the Heirloom dies gave me a platform to use my poetry on the front of my cards, instead of being hidden inside.
I am so grateful to Christina for her generosity of sharing, teaching and together with my friend for giving me the confidence to put my work out there.
I do hope that this will encourage others to write their own verses to complement their cards.
Christina says ...
Thanks you so much for adding all these beautiful cards to my website gallery. You have made them really well and if this is your first attempt at die cutting then well done you.
I hope you will add more as you make them and I am not surprised that people think your cards are lovely.
Thanks also for your kind words and I am happy to think that I have helped you in some small way.
Click here to read or post comments
Cinderella Watermelon Coach with Die Cut Parts
by Frances Martin
(Dunoon, Argyll, Scotland)

Coach Part One


|


|


|
As you know, I am new to dies and thought I would share with you a novel way I found of practicing with them. Hope it raises a smile at least.
Some time ago I made a fruit filled watermelon table centrepiece for my youngest grandson’s naming day, similar to the type you see on Pinterest.
It was in the shape of a pram/buggy and everything was made from fruit including the wheels, baby and dummy.
This year I was asked to do something for my latest Granddaughter’s naming day and decided on a watermelon Cinderella-like coach, but because fruit wheels can be tricky, I decided to use my die cuts this time instead and got a bit carried away.
I printed off a picture of Cinderella’s coach for inspiration and began.
If you are interested in how I made it, here are the instructions:
Firstly, on one side of the watermelon I cut a small, very thin slice of rind, without going through to the flesh, just so the melon would lie flat on its side, then on the other side, using Creative Dies Plus Scalloped Stitched Ovals, I placed the largest metal die and traced the inside of die onto the melon.
Next, just SLIGHTLY ABOVE my oval line (approx where the stitch line on die would be) I made an incision right round the oval with a paring knife, cut away the top layer carefully, then using a dessert spoon scooped out all the flesh until only the shell was left.
The reason for cutting slightly above mark is so that your gold die cut will cover the hole).
Moving on to constructing the parts. Using gold card I cut out an oval frame with dies 3 and 4 together, (counting smallest die as number 1) and covered the opening with largest die cut, to resemble coach window, glued it in place, since the shell would not be eaten. Using Spellbinders Heirloom Rectangles Dies.
I cut two gold frames using (dies 2, 3 and 4 together) then on shortest end of cut frame, cut one third down from top and bottom of each rectangle to form the reaches, I think that’s what they are called, i.e. the supports for the wheels, then shaped remaining off-cuts of heirloom dies to make steps (gluing 2 scraps in the middle overlapping slightly to match pattern, bending and shaping as needed), then using another frame, cut one third down from rectangle short end, formed it into a circle folding up long ends for base, glued together to form a beautiful crown for top of coach, further scraps were used for coachman’s seat and footman’s step at rear.
Next using magazine Die Cutting Essentials Issue 21 free Darling Doillies, I cut four large wheels using die 3, and four smaller daisy circle dies using die 2. Take two small wheels, glue back to back, leaving top of each wheel open and unglued, do the same with large wheels before inserting the reaches, just inside, at the top of each wheel and glue together. Repeat for other set of wheels, REMEMBERING to reverse the large and small wheels so that they match on the opposite side.
I then downloaded a free horse image from the internet, printed it, made a template and cut out two horses on double sided glitzy card, (i.e. I glued the card together first), decorated with google eyes, feather plumes, glitzy peel offs for bridle, halter, harness, joined the horses together with another off-cut of heirloom die cut, then cut out two gold cards in shape of saddle blankets and placed monogrammed letter B (first letter of child’s name, using free alphabet/numbers die from Die Cutting Essentials 1st Special Edition issue) and attached them to horses.
Inserted two long kebab sticks into melon and onto inside of each horse. The reins were made by measuring ribbon, attaching middle to coachman’s seat and the other two ends to each horse. Decorated watermelon with bling and child’s name Brea, (Gaelic, pronounced Breeah).
I was tempted to make curtains for it, but I ran out of time. Lastly it can be filled with assortments of fruit, sweets or whatever takes your fancy. I made Cinderella cake slippers (stiletto heels as seen on Pinterest) and other themed goodies to surround the coach.
I had fun, practicing with my dies, the children loved it, as did my daughter-in-law and her guests. Hope you’ll give it a try for the next children’s party. I’m sure you will make a much better attempt and hopefully become even more carried away than I. Enjoy. Lots of Love, Frances xx
Christina says ...
Well what can I say except WOW ... this is absolutely amazing and thank you for such detailed instructions.
I am sure it is going to be treasured for many years to come it is beautiful Cxx
Click here to read or post comments


Recent Articles
-
Memory Book
Oct 15, 22 09:17 AM
 Make a memory book, fun to make and even lovelier to give.
 -
Die cut letters.
Jul 19, 21 10:12 AM
 Add that personal touch with die cut letters, add names or sentiment as you please.
 -
Diaper Fold Card.
Jul 19, 21 09:34 AM
Create this fun Diaper Fold Card...and no need for a pin!
Search
