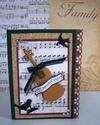
Simply Elegant Sympathy Card
by Donna Chartrand
(Ontario, Canada)

Simply Elegant Sympathy Card & Envelope


|


|
I wanted something simple, elegant, clean lines. This is what I came up with.
It was the first time I worked with a stamped overlay, but found it dressed up my card nicely.
The card is a 4 1/2 inches x 7 inches, finished.
These are some of my 'toys' that helped in the making of this card & envelope.
Embellished with the help from my little Cricut, Story Book cartridge, Sizzix Texture Boutique and a little imagination, a 'With Sympathy' stamp. Glue runner and ribbon. I attached the stamped overlay with two white eyelets.
It's easy to make the matching envelope with my handy Crafter's Companion Envelope Maker.
Inside the card I printed up the poem 'His Journey Has Just Begun' by Ellen Brenneman on the left hand side and pasted another Sympathy Sentiment onto a scalloped edged oval, then flipped it over and cut out the scallopes with a Exacto knife, then embossed with my little Sizzix. Added a white ribbon and Le Voila! My card was made.
Nanny Donna wishing all a scrap-happy day
Christina says ...
Sympathy cards are some thing that none of us ever want to make and yet they are sometimes very much needed and to make one that is tasteful and elegnat is the right way to go.
This is beautifully done and the black and white fit in perfectly for the occasion.
Click here to read or post comments
Friendship Ornament
by Donna Chartrand
(Ontario, Canada)


Hi Christina, after seeing your Spellbinder Square Ornament, I decided to give it a try.
I did not have anything other than a punch to work with for my fancy edging and I have not learned how to go around corners with a regular punch...so needless to say, my edges did not line up.
But all in all, I sill had fun making a Friendship Square Ornament for those friends we 'hang' around with.
Now they will have a little something to 'hang' onto ;)
So enjoy following your blog. It's a constant source of fun projects and information.
Once again, thank you.
Christina says ...
Oh! wow Donna this is gorgeous and I am so pleased that you have given it a try.
It is very easy to do and really pretty in the process and as I say in the video it can be for other occasions too.
Christmas, New Baby, Weddings, Baby Shower and wouldn't it look fabulous for one of those really Special Wedding Anniversaries
I can see it now all decked out in ruby coloured gemstones.... or spakling diamantes... the imagination is now in overdrive.
It is such a privilege for me to display the work that everybody sends in to the Gallery to show me how you have interpreted these ideas.
You will find the video to make this beautiful decoration for your self in the Video Tutorials section in the NavBar to your left.
There are several more ornaments that you might want to try too... and all in time for Christmas.
Click here to read or post comments
Boo! Halloween is around the corner
by Donna Chartrand
(Cornwall, On. Canada)

Halloween Explosion Box - Made with my trusty little Cricut & A Child's Year


|


|


|


|
Hi Christina, thought I'd share a little project that I designed and made for Halloween.
It's an Explosion Box, a Keepsake for our grandchildren...well, actually it is for Nanny and Popo, as I plan on keeping this one and putting pictures of our four grand children in it.
Four Grand children, four 'tabs', one for each!
This was the second explosion box that I made and it took some time coming up with the design and playing around with ideas.
One thing I'm learning very quickly is how important it is to use good quality products, specially which glue or double sided tapes to use on your work.
Nothing more frustrating than spending hours on something only to have it fall apart! Lesson learned.
Christina says ...
This is a really lovely project and a beautiful "Keepsake" for you or any one to treasure.
I love all the diffeerent tabs that you have added to the inside of your box, and I love the bright colours
I know just what you mean about something falling apart ... I learned the same lesson.
And that was why I added a short video on the subject. Cardmaking Adhesives goes some way to explaing the different ways to use them and tells about some of my favorites.
This and many more tutorials are in the Video Tutorials in the NavBar to your left.
Click here to read or post comments
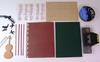
Fun Fold Mini Albums
by Donna Chartrand
(Ontario, Canada)

First Days of School


|


|


|


|
I came across this little fun fold mini album and have been having a blast making a few.
They may be small, but they certainly have loads of room for all those pics! I managed to make 10 pockets to load up, and those 10 tabs can be doubled into 10 photos or add some journaling! I think they are awesome.
You start out with one sheet of double sided 12 x 12 paper. Because of the many folds, cardstock doesn't work as well.
Two sheets of coordinating cardstock for tabs, pull outs, embellishments. I used my scrap pile and did just fine!
You can add as many corner pockets or 'bars' to add to this wonderful little mini.
Brads, ribbon, glue, marker for faux stitching.
I used Dollar store swirly paper clips to close and embellish.
I also used my Cricket to cut out the tabs and some embellishments...but you certainly could make these with just a bone folder for crisp folds, ruler and paper cuter. So easy.
Instructions: First you take your 12 x 12 double sided paper (I actually used two sheets of 12 x 12 that coordinated and glued them together!) and fold it in half.
Open up your sheet, turn paper and fold in half again. So far you have made 4 fold lines when your paper is opened up.
Next, fold edge of paper into the first fold line (which basically you are folding the half into half again). Repeat to other side.
Turn paper and repeat last step. Now you have 12 fold lines on your sheet.
Open your sheet up with wrong side facing up (this will be the inside of your mini or contrast).
Fold each corner into itself to form a triangle in the first 'box'.
With triangles folded, now bring edge of paper to center fold lines on each side (oblong).
You will have an oblong shape with an upside down 'V' at each end.
Flip paper over.
Now fold one end at first fold line, this will make your 'envelope'...
Take the other end of paper with upside down 'V' or 'envelope' and feed it into your top one. Make sure that you push or roll the ends of the paper right into the corners of the 'V' or envelope so that it makes a diamond showing your contrasting paper.
Now all you have to do is fold in half on the center fold line. Hope I haven't confused anyone too much!!
For your tags, cut 10 3" x 4 3/8", you may need to trim these down some depending on your paper thickness and cardstock.
If you want to add corner pockets to the inside of your mini, I cut scraps of the paper into corner triangles, or fun shapes like the heart, or used a scalloped punch and made an 'arm' to hold another tab.
So many ways to embellish as little or as much as you like. Add your own flare and make it your own!
Kind of long winded, perhaps you have better instructions for this great little mini.
ps you can also use this little one page wonder for all those plastic cards, credit cards and whatnot...easy to find in your purse and no more searching at the check out!
Hope everyone is having a fun filled day of crafting ;)
Christina says ...
I wouldn't dream of altering your instructions Donna they are just wonderful and thank you so much for being so precise.
I am sure that many people will want to make this mini album for them selves. It is a lovely project.
If you do make it then please add it to the Gallery and tell Donna that you made it from her instructions
And rememeber that you can now add what you see to Pinterest by clicking the button under any photos that you like in any of those in the Gallery.
Click here to read or post comments
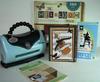
Mini Desk Calendar & Pen/Pencil Holder
by Donna Chartrand
(Ontario, Canada)


I thought I'd share something that was fun to make.
My husband is retiring this year and good to his word, he had said that he probably wouldn't be there to enjoy the remodeled office with new air conditioning!
But low and behold, the school board managed to find it in their budget to make over the central office for the staff.
Now he has a new much larger desk, in the corner by the windows and for a few months he got to enjoy the new ac.
After receiving the Score, Fold, Create magazine, I found the perfect little desk calendar, pen/pencil holder.
I love this magazine, as it has a lot of cute new projects for me to play at!
I used camping/outdoorsy paper because we plan on enjoying the great outdoors once he has more time on his hands...the clock is for the time put in at work, behind the clock tab there is a key, signifying key to freedom and happiness...and naturally the calendar for the final countdown.
Very useful little gadget, if I may say so myself.
He certainly has had compliments on it at work...which put a smile on my face for sure!
I would recommend this wonderful fun packed book.
Hope you are having a wonderful fun filled day!
Christina says ...
Thank you for this wonderful project and the story behind it all. I hope your husband enjoys his retirement and after a while he will probably wonder how he ever had the time to go to work.
Life is great in Retirement Land
The magazine you mention is not one that we have in the UK .... well not as far as I know .... but if you know diferent then please let us know.
Click here to read or post comments
Masculine Birthday Card
by Donna Chartrand
(Cornwall, Ontario, Canada)


|

|

|
When it comes to making cards for men, I find it a little more of a challenge. So used to making girly cards with frills, lace, bling, flowers ... but for guys???
This is what I came up with for my son who loves his guitar and music. Got creative and used A Child's First Year Cricut cartridge, the violin and Le Voila! A guitar...
Material List
Green card stock for card base
Beige patterned cardstock
Burgundy paper
Burgundy cardstock
Beige cardstock
Black cardstock
Black Ribbon
Music Note Paper - from Michael's Craft Store - Recollection
Cricut Cartridge - A Child's First Year
Sizzix Embossing Boutique and small dot embossing folder
Happy Birthday to you stamp - Fiskars Birthday Type
Ponderosa Pine Ink - close to my heart
White cardstock
EK Success Edger Punch - Fancy Flight
Dimensional stickers
glue runner
6 clear 'bling' dots
Dollar Store 'charm'
Green Cardstock: 10" x 7" for card base, fold in half to make 5" x 7" card.
Beige 'basketweave' paper: cut 6 5/8" x 4 3/8"
Music Note paper: cut 3 6/8" x 5 7/8"
Burgundy cardstock: cut four 1/8" strips for framing music note paper
Cricut Cartridge A Child's First Year: cut violin out in beige and one in black, both same size 3 1/2 ". Glue beige on top of black violin, leaving just enough of black to make 'shadow' effect. Emboss.
Birds: cut two small birds, 1/4 to 1/2 " - whichever size you like and emboss.
Assembling Card:
Center music note paper over beige basket-weave and glue in place.
Using the four thin strips of burgundy cardstock, 'frame' around the music note paper. Glue in place.
Apply dimensional stickers to back of violin, place on card front. Attach black bow and dollar store 'charm'.
Glue birds onto card front.
Stamp Happy birthday onto white cardstock, layer over burgundy cardstock and trim. Roll Happy Birthday banner on your fingers, over, under to make 'wave'. Attach two small dimensional stickers and place over violin.
Attach 'diamond, clear' bling, three in corner and opposite bottom corner.
With EK Success edger, make boarder and attach to card edge.
Cut burgundy paper to fit inside of card for your sentiment and finish up your card...and once again, le voila, another one of Nanny Donna's creations.
From Nanny Donna's Corner, have a scrap-happy day!
Christina says ...
WOW!! thank you so much for the very detailed information on how to create this card.
It is fantastic and I am sure your son loved it and I agree with you about making male cards. It seems to be a subject we all struggle with and much prefer all the pretty stuff that can be used on "Girly" cards.
Click here to read or post comments


Recent Articles
-
Memory Book
Oct 15, 22 09:17 AM
 Make a memory book, fun to make and even lovelier to give.
 -
Die cut letters.
Jul 19, 21 10:12 AM
 Add that personal touch with die cut letters, add names or sentiment as you please.
 -
Diaper Fold Card.
Jul 19, 21 09:34 AM
Create this fun Diaper Fold Card...and no need for a pin!
Search
