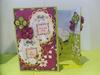
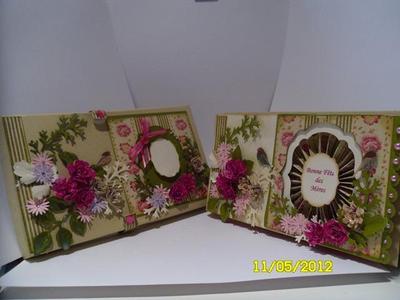
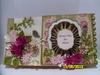
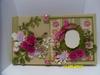
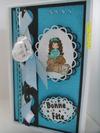
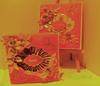
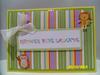
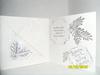
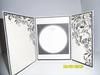
Mother's day card and box
by Danielle Roy
(Gatineau (Québec) Canada)

I am from Canada and since I discovered Card Making Magic and all your videos I made pleasure to make cards! I don't understand English very much but with you Christina I haven't difficulty to understand you because you don't speak fast and with the videos it's easier for me!!
This card was made for the Mother's day! A good friend of mine loves all my cards and when she have a special occasion, I make cards for her!
I took the idea in your video and I loved to make this card with bookmark, flowers that I made with Spellbinders, I love it!!
My website is on Facebook and the name you can find me is: Des occasions à la carte
Thank you Christina
Christina says ...
This is a beautiful card Danielle and I am sure that your mum was highly delighted with it on Mothers' Day.
Adding in the box always makes a card even more special and will protect the card as a treasure for years to come.
The colours you have chosen are so bright and cheerful and I love the very pretty flowers too.
Adding in the bookmark makes it an ideal mini gift and every time it is used it will remind the recipient of the sender.
Click here to read or post comments
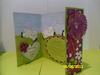
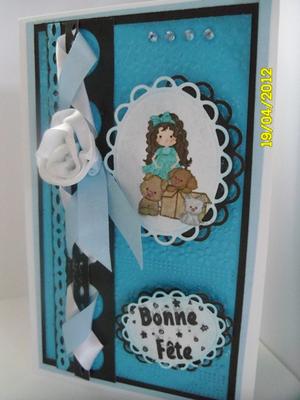
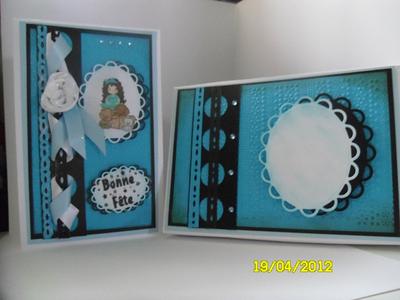
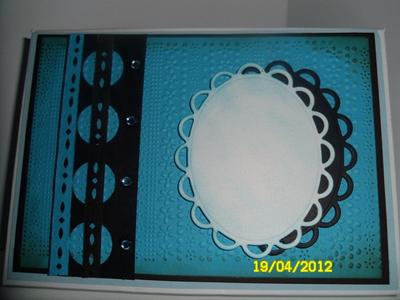
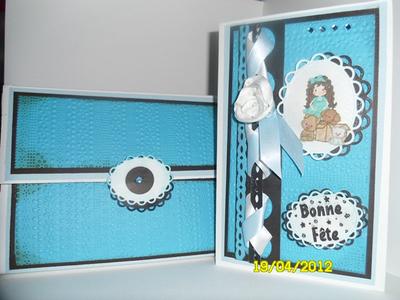
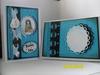
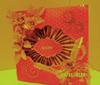
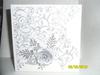
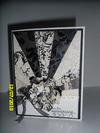
Ladycard for a Birthday
by Danielle Roy
(Gatineau (Quebec) Canada)


I'm from Canada and I don't speak English very much and I hope you will not have problems to understand me! :)
I start to make cards from one and half year and since I discoverded Card Making Magic, I was so excited to find the kind of cards, I love it!!! It's very different of what I made before! I want to make all of them! :)
The Ladycard and the box matching I made for a good friend for her Birthday. It was amusing to make and not too difficult and it was very appreciated!!!
You can see my creations on my page on Facebook: Des occasions à la carte
Thank you for all you do! It's gorgeous, very beautiful!!
Christina says ...
This card is just perfect for girly cards and the instructions to make it can be found in "Red Hat Card" in the Novelty Cards section.
It is fun and easy to do and so simple to create your own template to vary the style of hat that you may want to add.
Click here to read or post comments
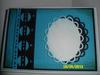
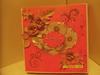
Double Tag Card
by Danielle Roy
(Gaineau (Quebec) Canada)


Coming back to share a Double Tag Card I made!
A good friend of mine asked me to make a Birthday card and this is the one that I made! It was very appreciated.
I take 2 days to made this card and I am really satisfied with the result! I assembled all I need to make this card, choose the colour paper, die template and make flowers to coordinate all things!
It was so amazing and easy to work with video and your good explains!
Christina says ...
The colours on this card are lovely and adding Spellbinders shapes to any card makes it look extra special.
The use of the Parisian Motif is well placed and I also like the flourish and the flowers.
This Double Tag Card is such an easy card to do and you will find the instructions in video format on how to make it for yourself.
There is a whole series on choosing which dies to buy and it starts with "Starting Your Spellbinder Collection" and then takes you through different designs you can create from the same set of dies.
Click here to read or post comments
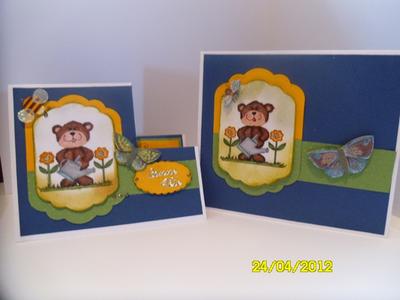
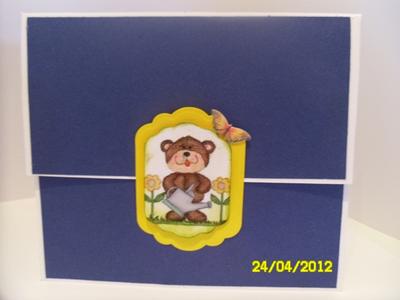
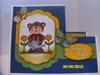
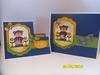
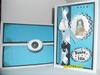
Easel Card for a new Baby
by Danielle Roy
(Gatineau (Quebec) Canada)


|


|


|
An another card that was amusing for me to do!
You can see the card and I coordinate front of the enveloppe and the back with same embellishment and I put Glossy accents on the half moon!
Christina says ...
The Easel Card is so easy to do and yet so pretty once it is done... and matching the envelope to the card is an added treat.
This is so pretty and I love the blue.
There are many Video Tutorials for all the different styles of Easel Cards and you will find them in the NavBar to your left.
Try the more adventurous ones like the Triple and Quad Easel Cards and add them to the Gallery as Danielle has done .... but please tell us something about the card ... the size and what you used to make it.
Click here to read or post comments
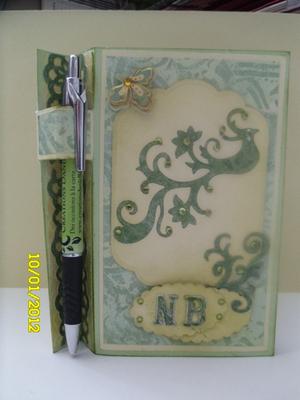
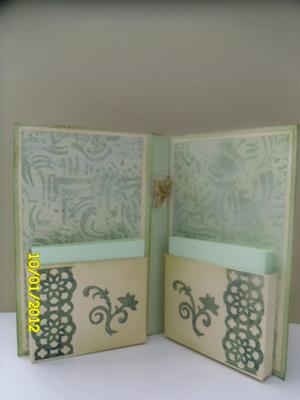
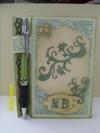
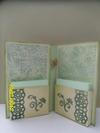
Personal gift with pencil and pop-up notes
by Danielle
(Gatineau (Quebec) Canada)


|


|

|

|
These are good ideas to offer for gift!
You can personalise them, mine I put initial on and add a pencil with my personnal name of my creations!
Inside, I made two pocket to put adhesive pop-up notes!
It's a practical gift to put near the telephone....you have all you need to write a message!!
I used punch and Spellbinders Bird flourishes...very interesting!
Thank you to giving me the chance to show my creations!
Christina says ...
These are indeed a very pretty gift to give to someone and would be ideal as a little extra at Christmas ... which is coming around very quickly.
The instructions to make this for your self can be found in Papercrafts and it is the Writing Set and then how you dress it up can make it suitable for any of your friends and family.
Click here to read or post comments
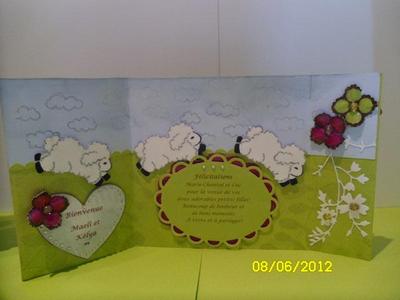
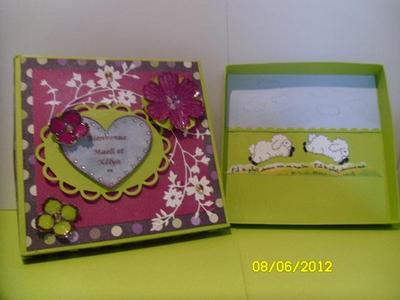
Newborn card for twin girls
by Danielle Roy
(Gatineau (Quebec) Canada)


|

|


|


|
A friend of mine asked me to make a Newborn card for twin girls and she just told me the card must have sheep and also the colour should be in apple green, fuchia pink and sky blue!!
I search images on the web and I found sheep that I printed on a white cardstock and I cut every sheep.
For the cloud I have a stamp to make it.
I took Lacey Ovales Spellbinders for the sentiment.
For the embellishment I put pearls, flowers that I made and a branch of flowers from Stampin Up, cut and emboss with the BigShot.
I made the box to match with the card.
It was amazing to make it!!
Christina says ...
What a lovely fun card and the images are delightful.
The colour scheme is perfect and I am sure that your friends is so pleased with the result.
Beautiful job and thank you so much for adding in how you made the card.
Click here to read or post comments
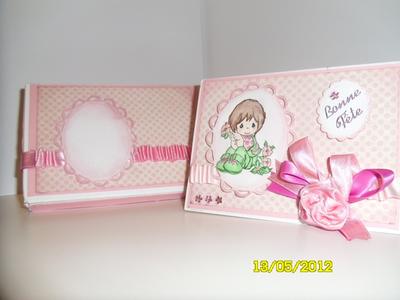
Anniversary card for a future mother and Box
by Danielle
(Gatineau (Quebec) Canada)


|


|


|
This card was made to a pregnant woman for her birthday!
This card mesure 6X6 inches.
Cut cardstock 12X6 inches in white and score at 6''
Cut another cardstock, rose fushia at 5 3/4 X 5 3/4 inches
Cut cardstock 5 1/2 X 5 1/2 inches different color of peas and glue on the fushia cardstock
I cut with the BigShot a decorative insert (Spellbinders Edgeabilities # E8-014)in pink colour and glue it and
Glue a fushia and green ruban
Cut with the BigShot 2 round scallop in green (#1 and #3)
Cut 1 round spellbinder in fushia(#2)
Cut round spellbinder in white and print my image on it!
Pop-up the first round scallop
Glue the fushia on the first, pop-up the other round scallop and glue the round with image on top.
Made flowers with my punch and added flower brad on the center
Cut oval punch for the sentiment.
Put some flowers that I made with punches, add some leaves and glitters!
Enjoy it everybody!
Christina says ...
Waht a lovely card and the colours go really well with each other. I love the matching box and it really makes this a gift and not just a card.
If you would like to make cards as pretty as Danielles' then please look at the Making a Card Tutorial in the Video Tutorials section and that will show you how to get the look inside and out for a beautiful result.
Side Step Card and envelope
by Danielle
(Gatineau (Quebec) Canada)


|

|

|
A card to a young boy!
The card is 5 X 6 inches
I cut a white cardstock 10 X 6, score at 5 inches and cut 2 inches from the right side when the card is close. I turn down this part inside the card....an the result give one side step.
I cut marine cardstock 4 3/4 X 5 3/4 and glue on the front, 1 the other side.
Print my image on white cardstock and coloured it.
Cut with spellbinder.
Cut an another piece whith yellow cardstock with a larger spellbinder and I cut a part of the bottom.
With green cardstock, I take CuttlerBug little peas impression (from StampinUp)
Take my spellbinder (same for the yellow one) and I take just a part of the bottom and glue on the yellow
Cut a stripe 3 X 1 inch in green
Punch scallop oval for the sentiment
Pop-up my image, add butterfly and bug and make the envelope to fit with the card!
Christina says ...
What a really special card for any small boy and the bold primary colours are just what children like.
The matching envelope really finishes off this project and I am sure that it will be treasured for quite some time.
Click here to read or post comments
Happy Birthay for a little girl
by Danielle
(Gatineau (Quebec) Canada)

The card mesuring 4 X 5 1/2 inches
Cut a white cardstock 8 X 5 1/2 inches
Cut another cardstock pink 4 3/4 X 5 1/4 inches
Cut another cardstock pink peas printed on a pale beige
I print an image and colored it.
Cut with Lacey Oval Spellbinder on white cardstock and embossed with pink.
Made a little Lacey oval for the sentiment and embossed with pink.
Cut a piece of ribbon, put super strong tape two faces on the ribbon and pleat on the card.
Pop-up the Lacey Oval on the card
Make a ribbon flower and a bow to glue on the pleat ruban.
Add some glitters and that's it for the card!!
Make a box to fit with the card and add two colour of ribbon to close the box.
Christina says ...
Very pretty and one little girl is going to be deligthed with this card.
The effect with the ribbon can be found in the Ruffled Ribbon Tutorials and you will find other ideas on how to get more from your ribbons in that section too.
These are such an inexpensive way to add decoration to any project that they must be considered as part of your "Stash"
Click here to read or post comments
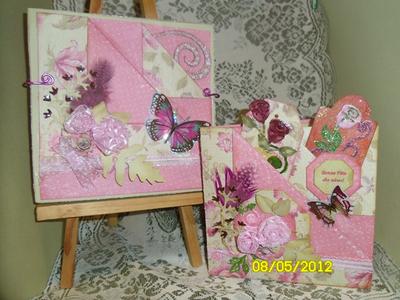
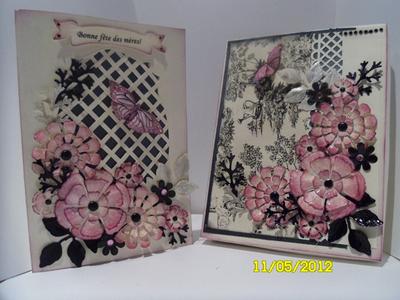
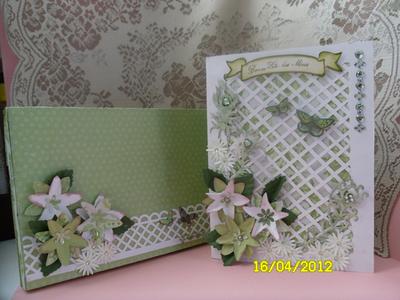
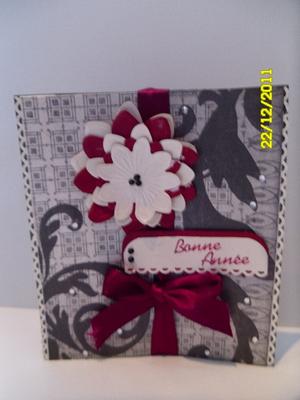
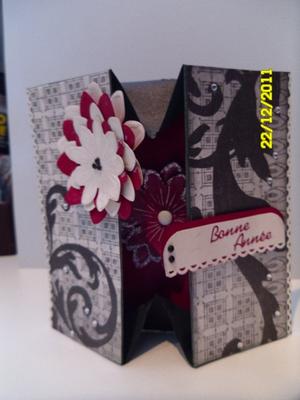
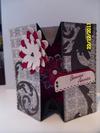
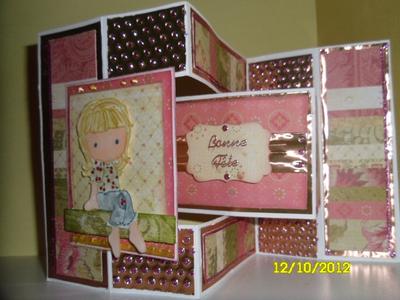
Trellis Cards for Mother Day
by Danielle's Designs
(Gatineau (Quebec) Canada)


|


|
It was very amazing for me to make those Trellis Cards!
I watched your video Christina and I loved it so much and it's never difficult to understand your explanations!! Thanks a lot!
For one, I take black and white papers and I made my flowers in pink!
The other one in pale green, it's soft!
For the explanation for those cards, we can find on video tutorial for "Trellis Card'" made by Christina!
Christina says ...
What a beautiful interpretaion Danielle and these cards are both gorgeous. I am so glad that you found the instructions easy to follow as that is what I strive for each and every time I make one.
My favorite one is the Pink flowerered card and it is perfect for anyone to send for any special occasion.
The boxes are exactly right to compliment the cards and I am sure that the recipients will be delighted with their handmade creations.
The instructions for the Trellis Card can be found in the Video Tutorials in the NavBar to your left and I hope you are as pleased with your results as Danilelle is with hers.
Click here to read or post comments
Pleated Card and the box
by Danielle Designs
(Gatineau (Quebec) Canada)


|

|


|
When I made this Pleated Card, I was determined.
I realised this card not too easy to make! I looked at the video many times before I was ready and understood it correctly. I decide to do it!
For the explanation, I follow the video "Pleated Card with Spellbinders" and for the flowers, leaves, I was ok to made it!
I made the box to go with it and I'm very satisfied of the result!
Christina says ...
What a beautiful job you have done with this card Danielle it is just stunning and I am sure that you are delighted with the result.
I try to keep the instructions easy to understand but I do appreciate that they are not all simple.
But that is the challenge ... so that as new cardmakers progress they can come up with something that is really special as they learn.
And once you get started then you realise that it is not as hard as you first thought.
Don't be afraid to try the more adventurous cards and then you too will be able to create designs as beautiful as Danielles'
You will find the video tutorial for this and many more in the Video Tutorials section in the NavBar to your left.
Click here to read or post comments
Just in case I never told you
by Danielle Designs
(Gatineau (Quebec) Canada)


|


|
For this project, I take 4 1/8 X 9 5/8 inches kraft envelope
I covered flap side of envelope leaving narrow borders uncovered.
Added a panel and print "MOM" on it, distress and glue on the envelope
Mini card stock tag I made with beautiful stash paper and a message on each one! Decorated each side of the stripes!
Stickers, distress ink.
Buttons to close the envelope with a string.
Made little pink roses, add ribbon.
I hope you'll enjoy my project that I want to share with each other!
Christina says ...
What a lovely project and such a special way to tell your mum that you care.
The colours are very pretty and I am sure that any recipient would be delighted with something like this.
Click here to read or post comments
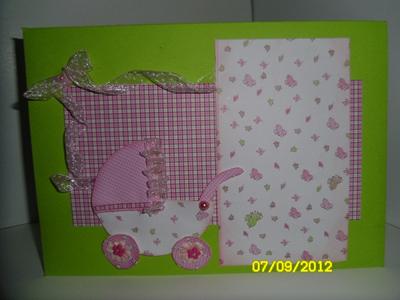
Baby Pram Card
by Danielle Designs
(Gatineau (Quebec) Canada)


|

|

|
Thank you Christina for this lovely idea to make another card for a new baby!
I follow the instructions on your video "Baby Pram Card" and I found this amazing to make this card! I made an envelope to match and made a little pram on the envelope.
I choose lime cardstock for the base of my card and found matching paper and it's what is done!! I'm proud of the result and it will be appreciate for the parents who will receive this card for their new baby girl!
Christina says ...
A new arrival is always a really good excuse to make a card .... not that we need an excuse!
But they are some of the cards that can get the imagination going and where you can add all the frilly bits in your "Stash" to the little girl cards.
This one is so delightful and I am sure that the parents will love it and treasure it for a long time.
The pram is gorgeous and I just love pink at any time for any card.
Click here to read or post comments
Double Easel Card
by Danielle Designs
(Gatineau (Quebec) Canada)


|

|

|
This is an A4 card and I choose white for the base of my card and turquoise, brown colors for the panels of this easel card. I used a beautiful cardstock I have.
For the left side, I embossed turquoise paper and add lightly brown. The other side, I made a pocket and added a panel to write a message.
Decorated with butterfly die cut, flowers and leaves, sprinkle and turquoise Stickles.
You can see the video of Christinas' "Double Easel Card"
Christina says ...
This is a very pretty card and I love the brown and tutrquoiese colour scheme.
Easel cards are very easy to make and the beauty of them is that they will fold flat to go into a standard sized envelope if you keep the dimension low on the front.
There are many variations on this card and you will find them in the Tutorials
From the single Easel Card that can then be Twisted and the Double and Triples all the way up to the Quad Easel Card that will always get the comments.
All are easy to do and I am sure that you will have fun making these cards for yourself.
Click here to read or post comments
Plaited Ribbon Card
by Danielle Designs
(Gatineau (Quebec) Canada)

|

|

|

|
For this card I uses turquoise cardstock and dark brown. I followed Christina's Video Tutorial for Plaited Ribbon Card and I'm satisfied with the result!
I embossed turquoise cardstock with cuttlebug design, put turquoise stickers!
It's a big card and I made a box to go with!
You can see the card, card with front of the box, front box and other side of the box with card!
Christina says ...
This Plaited Ribbon effect is very pretty and so easy to do.
The tutorial will take you step by step through the process so that you too can make cards as pretty as Danielle.
I love the colour scheme on this card and making a box to match the design gives it that extra special touch.
There are lots of Tutorials on ways to make ribbons look really good and they are a cheap and easy way to embellish any of your cards.
Try Ruffling them or making them into Roses... or how about Braiding them into a wreath shape and adding them to the front of your designs for a really beautiful look.
Click here to read or post comments
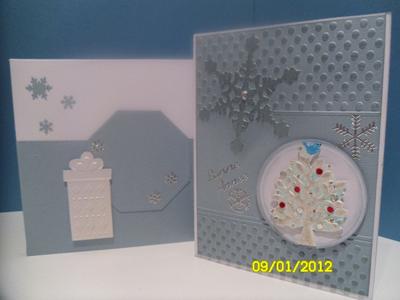
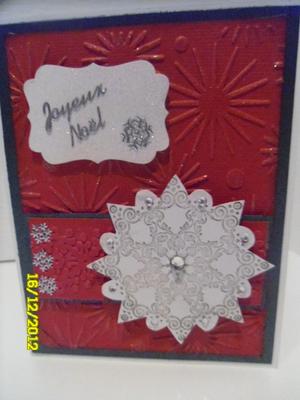
Christmas Cards
by Danielle Designs
(Gatineau (Quebec) Canada)


|

|


|


|
I made those cards last year for Christmas...at this time I didn't know Christina!!
I'm proud of that today when I look at them because I was learning to made cards and let work my imagination!
I used Spellbinder for the blue one to make gifts, snowflake and tree.
I used Cuttlebug to embossed card stock and add little glitters!
Made an envelop to match with the card.
The second one is a card like a box when you open! I made this one for my mother in law and she adores it!
Christina has a video for this special card!
The third one is Origami tree. For the base of the card I cut a cardstock mesuring 15 X 30 cm and score in the middle.
I will explain the best that I can how I made branches.
I cut 5 squares with the paper of my choice.
(1 of 8,9 cm), (1 of 7,5 cm), (1 of 6,3 cm), (1 of 5 cm), (1 of 3,8 cm).
Fold each square in two vertically and horizontally. After fold in the two diagonals.
Fold each square along the horizontal line and back side inside.... you obtain 2 double triangle. Place the triangle point on the top, fold the right side of the superior triangle in the middle and make same thing with the left side.
Made that for each square!
Fit each branch into beginning with the large one. Glue on your card!
I hope that is not to complicated and you understand the way to do branches with origami method! Thank you!
Christina says ...
Origami is very popular and it is the Japanese art of paper folding. The tree looks lovely on your card and makes a very special Christmas card.
Thank you for telling us how you did the folds.
Click here to read or post comments
Screenfold Card
by Danielle Designs
(Gatineau (Quebec) Canada)


I made Oriental theme for this Screenfold!
Put 3D Japonese images that I cut each pieces and pop up each one. It was long to doo but I love the result!
I follow step by step Christina's explanations and loved to make this one and I will make others with differents themes.
It's a very good idea to offer and we can decorate this according to the person we offer it!
Thanks Christina! I love it!
Christina says...
Lovely result to this simple to create card and the Oriental theme is perfect for it.
There is no difficult measuring to do for this card ... in fact all you need is something round to create the shape for the top.
You will find the instructions in the Easy Projects section to your left and then you can make one as pretty as Danielles.
Click here to read or post comments
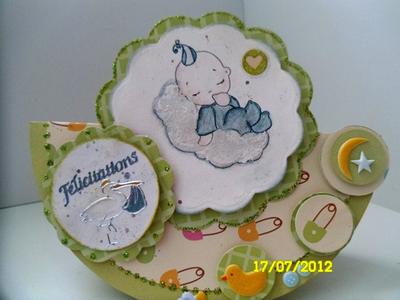
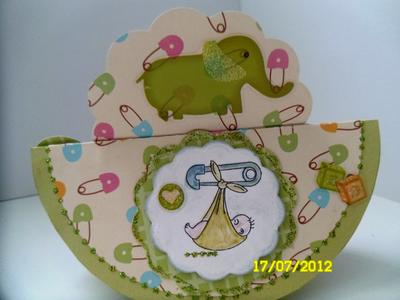
Rocking card
by Danielle Designs
(Gatineau (Quebec) Canada)


|

|


|


|
I made two Rocking Cards ... one for a little girl and one for a boy!
I love these cards, the way to do them and we can decorate in many ways with differents themes! Very good ideas this Rocking card!
I watch Christinas' videos to make my cards that you can find on videos tutorials.
Thanks for all you show us Christina, you make very good cards and we are inspirated by all you have done!
Chrisitna says ...
These cards are very pretty and I love the choice of colours that you have used Danielle.... especially the one for the little girl.
The instructions can be found in Card-making Tutorials and are easy to follow... so if you want to get the look as Danielle has done here then watch the Rocking Card tutorial and try it for yourself.
Click here to read or post comments
Shutter Card
by Danielle Designs
(Gatineau (Quebec) Canada)

I take an A4 card, measuring 15cms and cut on the bit at the bottom.
I follow all Christinas' explanations ... cut, fold, decorated all the panels, used gold foil and embossed then to finish my card.
I sat Cherry Emma on a border to the front of the card. Added Happy Birthay (in French) sentiment to the inside and add round gliter pink peel off on each hole on my gold foil and stripes of glitter pink around some panels!
That's the result of my Shutter Card!
Hope you will love it!
Christina says ...
What an excellent result for this unusual folded to make card... and although it looks intricate it is very easy to do for your self.
If you would like to make one as Danielle has done then take a look at the Shutter Card instructions in the Kinetic Cards section to your left.
Click here to read or post comments
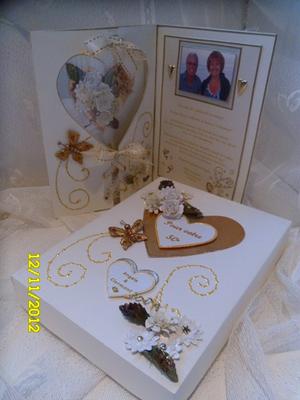
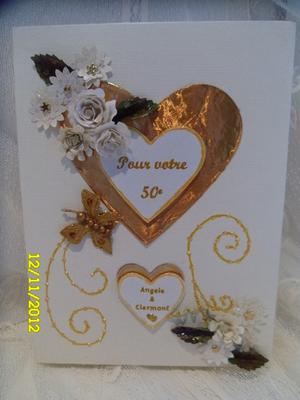
Bow Front Card for a 50th Wedding Anniversary
by Danielle Designs
(Gatineau (Quebec) Canada)


|


|


|
I chose to make this card for a 50th Wedding Anniversary
I follow template instructions of Christina.
To make a little difference, I add a A4 card and I glue the first panel back to the Bow Front card.
On the other part I add a message for the occasion, this part closes at the back!
When my husband saw the finish card, he told me: It's a work of art!
I'm very proud of the result and the friend who ask me to make a card for a 50th Wedding Anniversary is totally satisfy of that and haste to give it to her friends who will receive this special Bow front card.
Thank's Christina for all! You're an inspiration for me!
Christina says ...
It is always lovely to see other peoples interpretation of a card and there is always some new twist that can be added.
This is beautiful and I am sure that the recipients will treasure it for a long time.
If you would like to make this Bow Front Card as Danielle has done then you will find the instructions in the Projects section in the NavBar to your left.
Click here to read or post comments
Tangerine Pleated Card and the box!
by Danielle Designs
(Gatineau (Quebec) Canada)


|

|

|
I made this Tangerine Pleated Card and the box to go whith for a good friend of mine!
I choose those colours and I'm very proud of the result!
It's my second Pleated card that I made and I love this kind of card that you made on the video "Pleated Card"
It's a very pretty card for many occasions and I'm sure it will be appreciated by my friend and she will keep this card for many years!
Thank you Christina to give us a chance to make lovely cards!!
Christina says...
This is really a stunning creation and the colour is fantastic.... I love it, and I am sure your friend will be so pleased with it.
I know it's a bit fiddly to make but when the result is as good as this who cares... it's
well worth the effort.
The instructions to make the card like Danielle has done are in the Video Tutorials section and you will need to scroll to the Pleated Card with Spellbinders
Have a look at the NavBar to your left for Videos on lots of different ideas and techniques.
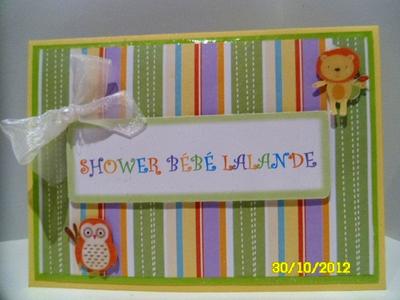
Waterfall Card for a Shower
by Danielle Designs
(Gatineau (Quebec) Canada)


|

|

|


|
I like to make this project and it's was not too difficult to make....love it!
I post photos of the card, inside of the card, the envelope and the other side of the envelope!
A lady ask me to make a card for a shower and she didn't know if this is a boy or a girl! and I had to mix colours for the occasion!
One thing that I don't know is I choose the right colours, the lady told me that the future father had paint the room for their new baby the same colours of the card!
It's so amazing!
To make the card, I follow step by step all instructions and it's go very well!
I love this card and I will make others with differents images and colours!
Thank you very much Christina!
Christina says...
This is such a bright and cheerful card and one I am sure will be treasured for quite some time. The colours will suit either boy or girl.
If you would like to make a card as pretty as Danielle then take a look in Kinetic Cards in the NavBar to your left.
You will find all the instructions for this and many other cards that are all easy to follow.
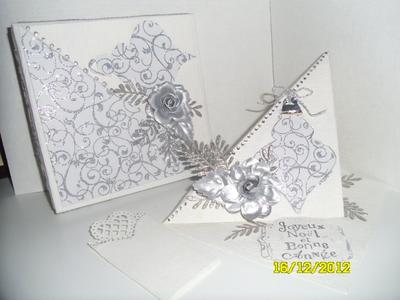
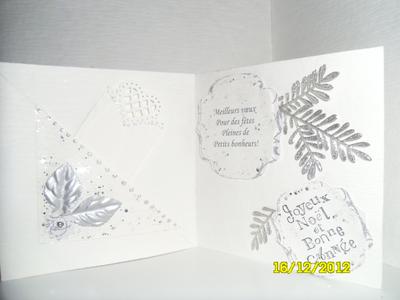
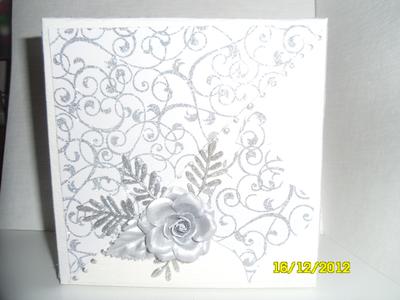
Twist Easel Card for Christmas and New Year!
by Danielle Designs
(Gatineau (Qc) Canada)


|

|

|
I made this Twist Easel Card specially for my mother in law who is 86 years old and she always appreciates what I do for her!!!
I made a little different from the video of Christina "Twist Easel card". I didn't add the panel front the card!
I choose silver for the flowers and special cardstock white with silver. I cut a bell with Spellbinder to make a look for Christmas.
The card is a 6" X 6" and I made the box to go with!!
I hope you'll enjoy!
Thank you!
Christina says ...
This card is beautiful and I always love the white theme ... it looks so clean and fresh for any occasion.
I am sure that your Mum-in-law will be delighted with it. I hope you all have a really good Christmas and thank you for sending in your work to the Gallery page.
Click here to read or post comments
Some Cards for Christmas
by Danielle Designs
(Gatineau (Qc) Canada)


|


|


|


|
I made some cards to give to my family for Christmas time!
For all those cards, I cut a cardstock 9" X 5½" and fold in half!
For some I take special paper with designs of Christmas...other I take Sizzix Dies for Gifts, little tree and for one with a Star on it.
I take a stamp that I embossed with Holographic powder..... and for an another one, I print and cut images that I coloured and embossed!
It's the results of my labour! :)
Thank's and I hope you will appreciate my "little simple cards" !!
Christina says ...
As always Danielle your cards are delightful and I wish I was on your Christmas Card list.
I would be hard pressed to pick a favorite as they are all pretty and I always appreciate what you ... and everybody else sends into the Gallery page.
Merry Christmas xx
Click here to read or post comments
St-Valentine card
by Danielle Designs
(Gatineau (Quebec) Canada)


|


|


|
I made this card for a good friend who asked me to make one for his wife for Valentine day.
The card mesuring 6X8 inches.
For the base I took white cardstock.
I cut pink cardstock 5¾ X 7¾
Then I cut white cardstock mesuring 5½ X 7½
I take framelits Hearts collection #1,#3 and #5
I place the heart #3 on the center pink cardstock and the heart #1 on the center of #3 and cut with the bigshot.
Whit the white cardstock, I place the heart #5 on the center and cut whit the bigshot, on the top I cut a border whit heart punch of Martha Stewart and the bottom cut a border whit waves scissor. Place a pink ribbon on the bottom.
I pop up pink and white cardstock and put on the base card.
Made flowers, some foliage and add glitter.
Make a box to coordinate whit the card.
I hope you enjoy this card and Christina I wish you a Happy Valentine Day!
Thank you to give us a chance to share all we made!
Christina says ...
It is my pleasure to a accept these cards into the Gallery as there are so many beautiful ones from all you talented people.
And this one is no exception... it is gorgeous and I am sure that your friend and his wife will love it when the Day arrives.
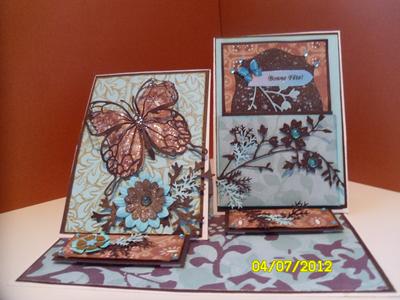
Turquoise Mothers' Day Card
by Danielle Designs
(Gatineau, QC, Cananda)


|


|


|
This card is mesuring 6 X 8 inches and I choose beautiful paper to match all colours.
I take Spellbinders Parisian Motifs, made flowers with a punch and put embellishments like Edgeabilities Insert A, some turquoise feathers, Butterflys and glitter to decorate my card!
I hope you didn't have to much difficulty to understand me because I'm french people and it's hard for me to explain how I made my cards!
Thank you Christina for all!
Christina says ...
I think the beauty of your cards Danielle says it all in any language as they are all gorgeous.
I love the colour you have used on this one and it would truly be a Keepsake for any mum that was to get one like it.
Mosaic card....for Happy Mother's Day and the matching box!
by Danielle Designs
(Gatineau, QC, Cananda)


|


|


|


|
This mosaic card is measuring 6-½ X 6½ inches
To make the mosaic effect I take double side adhesive sheets.
I choose two color of paper and cut some strips and place on the adhesive sheet like you see on the card and brushed Gilding flakes in between the gaps.
I love the effect, it's different of other card!
Cut Daisy flowers with templates, add feathers and shapeabilities.
Made the same for the matching box!
Hope you will love it! Thank you Christina!
Christina says ...
I do love it Danielle and it is a real credit to you. I am sure that the recipient will love it too.
The matching box adds a real luxury touch and is a beautiful way to send any card.
If you would like to know how to make the same cards as Danielle then you will find a Video Tutorial in the NavBar to your left.
The Mosaic Card can be done with Glitter, Pan Pastels or Cosmic Shimmer Powders as well as Gilding Flakes and they will all give a lovely effect to the card.
Try other products that you have in your "stash" and see what you can come up with
Happy Birthday Card for my Daughter in law
by Danielle Designs
(Gatineau, QC, Cananda)


|


|


|
This card mesuring 4¼ X 11 inches and I fold at 5½ inches.
I made the background paper with differents stamps and choose colors to match with my card (turquoise, brown and shabby shutters).
I made the same for the envelope to match with the card.
Christina says ...
Another beautiful example of your work Danielle and this one is another in one of my favorite colours.
I love the matching envelope as this always add the personal touch and makes the finished design look so much richer.
Click here to read or post comments
Danielles' Design
by Danielle Roy
(Gatineau (Quebec) Canada)


|

|


|
I have one collection of beautiful paper black and white with different design and I create this card with!
For the base of the card, I cut a cardstock measuring 11¾" X 5¾" and score at 4¼" and 8¾"
Cut 3 black cardstock measuring 4 3/8" X 5 7/8" (one for the front of the card and 2 for the inside)
Cut 2 black cardstock measuring 2 3/4" X 5 7/8" (for the little side part of the card)
I choose another design paper to put on the black one in the inside and inside of the little part!
I cut 10 stripe of 4½" X 1½" of different designs.
After, I cut each stripe diagonally to have tip.
I place the first tip in the middle of the front card and continue to put the others tips each side until I had a straight line. I made same thing on the little side part of the card but on opposite way.
Place a ribbon along the straight line, put a flower that I made with my collection design and decorate with a bow and glitter!
I try to explain all the processes that I take to made this card and hope you will enjoy it!!
Christina says...
Black and white always produce a very striking look and this card is lovely. The sunray effect to the front is very clever and looks wonderful with the flower centre.
Card For You - Pour toi (in french)
by Danielle's Designs
(Gatineau (QC) Canada)


|


|
I haven't posted cards for a long time, but it's not because I stopped making them!!
I was very busy with many things and did some cards between this busy time!
This one I made to use my stash...I cut many square with different pattern of paper.
Each square measuring 1½ X 1½ inches and I glue each square on a pink card base measuring 5 X 5 inches.
I put a heart, decorated with flowers, glitter and note for the occasion!
I made a matching box to go with it!
I hope you will enjoy this card!
Thank you!
Christina says ...
The card is very pretty and the patchwork design is very up to date.
I love the pearl flourish that you have used as this just adds that extra touch and of couscous the matching ox is the luxury element that makes it extra special
There is tutorial in the Easy Cardmaking section on creating a Patchwork card and it takes you step by step through what you need to do to get a card similar to Danielles'
Click here to read or post comments


Recent Articles
-
Memory Book
Oct 15, 22 09:17 AM
 Make a memory book, fun to make and even lovelier to give.
 -
Die cut letters.
Jul 19, 21 10:12 AM
 Add that personal touch with die cut letters, add names or sentiment as you please.
 -
Diaper Fold Card.
Jul 19, 21 09:34 AM
Create this fun Diaper Fold Card...and no need for a pin!
Search
