Vintage Car
by Emlie
(USA)
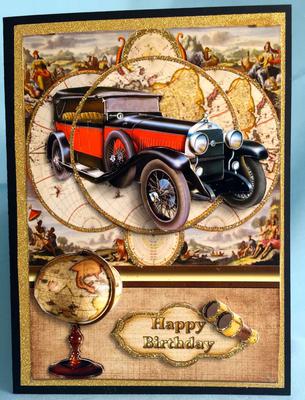
I wanted to make a special card for my husband’s birthday.
I purchased the mini kit for this card from craftsuprint card-making mini-kits
You will work with 1 page at a time. I wanted my finished size to measure 4 ¾” x 6 ½”.
I reduced all of the graphic sheets 75% before I ran them on photo paper.
Starting with PAGE 1, this is how I reduced the graphics: File Print - Paper size: US Letter Borderless – Scale 75%. Run all of the pages at 75% on Glossy Photo Paper and let Dry. Make a copy of the extra car with the circles so you can add it to the card inside.
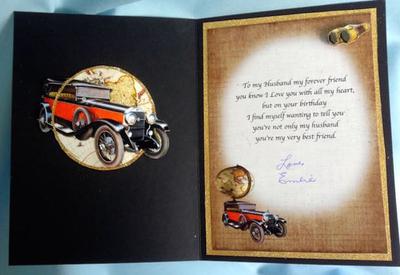
Before running PAGE 2, you MUST duplicate the entire page. I typed my verse right onto the picture before running Page 2.
Once you type on the picture and close it you can’t delete the words. That’s why you must duplicate it before you write on it.
To add a verse to the inside piece: Go to the Tools Menu and drag down to Annotate-Text. I used Font-Apple Chancery and Size 22.
Keep in mind that you’re going to reduce this page and the words will also be reduced; so make your words larger than you think. Run a sample on printer paper before using good cardstock.
Then select File – Print; in the print window select Paper Size – US Letter Borderless, Scale 75% and click Print. I am using a Mac Computer so these directions might be different for other computers.
Go over the gold circles around the cars using a “Sakura Quickie Glue Pen with a Pinpoint Roller” and glitter in fine gold.
On the Birthday plaque with the Binoculars you cut out, add glitter around the outside edge and around the binoculars.
For the card base cut Black cardstock 9 ½” x 6 3/8”, score at 4 ¾” and fold. Cut 2 pieces of Gold Glitter Paper 6 1/8” x 4 ½” for the Card Front and the Inside words.
Adhere to the front and the right inside of the card. Use glue to adhere the front and inside pieces to the glitter paper.
Adhere the car base to card front using ATG Tape. Use Dimensionals to telescope all of the car pieces, the globe, the Birthday Greeting and extra binoculars you cut out.
On the left inside add the extra car you made using Dimensionals. Add a pair of binoculars to the inside words.
Christina says ...
Thank you for such detailed instructions on the making of this card and I am sure that your husband was delighted with it.
It is a real "Keepsake" card and is sure to go in his box of treasured memories.


 Make a memory book, fun to make and even lovelier to give.
 Add that personal touch with die cut letters, add names or sentiment as you please.