The Grand 'Mistake'
by Vee StJohn-Byles
(Scotland UK)
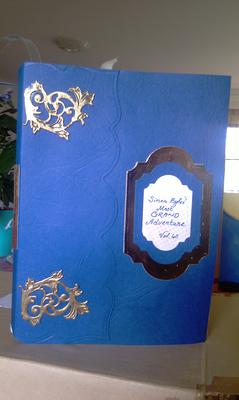
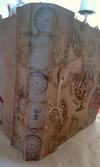
The Book Card Cover'
Hello everyone, I was endeavouring to create a masterpiece of a 'card' for our son's 40th birthday.
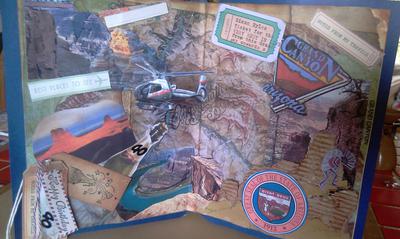
His wife was taking him to Las Vegas and we had paid for a trip over the Grand Canyon in a helicopter with champagne lunch for them both.
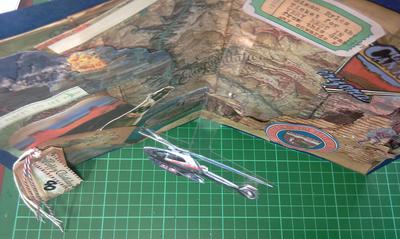
So I thought I would make a 'card' that would have these elements in it. I had time! Well I feverishly looked for images. I could not draw helicopters nor a grand canyon.
So I thought I would use cut out photos I could 'scavenge' off the internet, corrugated cardboard and sandpaper. I would add little facts and figures about Arizona and Nevada.
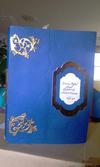
Well very long story short - I ran out of time, I wanted the 'card' to look like a book, I managed to create a 'cover' and added Spellbinders gold dies to create embellishments and I had created the middle, but I had made many pages! 16 pages that were the 'card' but had not been finished.
So I made up a lovely box and sent the 'book-card' for the actual day and then when I knew they were home I sent the rest.
It had turned out to be a rather GRAND adventure for me also as the whole thing took a fortnight to make - the actual 'book card' had the helicopter swinging over the Grand Canyon so it fit the day!
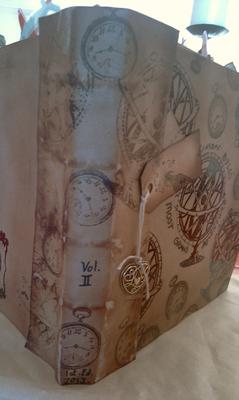
The rest turned into another book (complete with a 'spine' and cover made from kraft envelopes, glue and string) and this part of the 'creation
contained all the build up from leaving home to getting the flight, to getting up early for the helicopter ride, and then a certificate to prove he did it.
Then all things about both the Grand Canyon and Las Vegas in an even bigger book, a journal of memories. A family heirloom.
He absolutely loved it and told me he was literally 'blown away :0) So my mistake was not really a mistake after all, and I learned a lot as well.
Christina says ...
What a mammoth task you set for yourself but what a truly memorable gift. I am not surprised it was received and will be treasured for a long time.
I too have done that trip down the Grand Canyon in a helicopter and it is amazing. And your son will be taken back to these memories every time he looks at he book. Wonderful creation
Click here to read or post comments
First ever card using a broken watch
by Vee StJohn-Byles
(Scotland, UK)
I just did not know what to do for a card.
Then I found a really nice embossing folder called replacements.
I then thought what can I do with it though as I wanted a card that was about loving my husband and saying something about the time we have shared and really giving the card some meaning about us being together all the years we have, through thick and thin.
I love Ebay. So I trawled through page after page, and basically spoent a whole day looking to get ideas of what to put on the card I had in mind to embellish it.
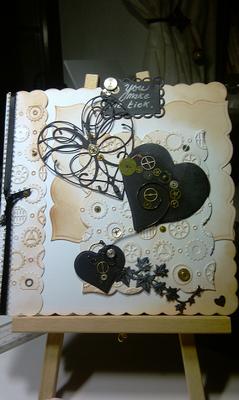
Then it struck me - excuse the pun! Watch pieces, broken watch pieces. Instead of making a male card and adding beads, add bits and pieces from a real old broken up watch.
So I chose beige card, added hearts using a Nellie Snellen die and also Memory Box ones and link the three (meaning for us) I love you - then join them using the watch pieces and embellish with the cogs wheels and whatever as well as a sentiment.
I then 'antiqued' it up using a distress ink and also rubbed it over the embossed part lightly plus smudged it around part of the card to add depth and interest.
My lovely husband loves it - he loves the ideas, the colour and the textures. Most of all he loves the fact I took 'time' to create a 'timepiece' capturing what he means to me and our relationship on Valentines day even after all these years (he is 69 and me going on 62 this year.
Hope you like it too. I had real fun making it.
Christina says ...
What a lovely story and an even more lovely card. So very inventive and I am not surprised that your husband loved it.
It is truly unique and shows how you care and took the time to make this very special card ... just for him.
Click here to read or post comments
Misty Pines
by Vee StJohn-Byles
(Scotland, UK)
I have never stamped anything,let alone created a picture using stamps and inks!
But as I have recently bought some lovely stamps - especially as I adore trees, I decided to jump in and have a go.
Two pine stamps, one grasses one and a bushes one were used in this card topper (which I actually ended up putting in a frame, as it looked rather like a miniature painting by the time I finished it)
I used Tim Holtz distressing inks for the background - tea dye, the walnut one, plus a honey coloured one and the broken china one, the dusty concord (lilac colour)blending tools (home made ones) and the addition of the blending foam pads.
I blended these into what would be the sky - not too much blue - mainly at the outer right edges and swept across.
I had cut a circle out of a post it note and that created a kind of mask, as I wanted a brilliant 'moon' or sun to stand out in the dusk.
I worked down until I got to the shapes for the hills and mountains, and tore strips of paper which I basically laid across the piece where I wanted the hills/mountains to be and then started with the lightest warm colours right down to the bottom where I then had the black in the foreground.
Remember the most detail or the darkest brightest colours are right in the immedate FOREGROUND.
On top of these colours I literally stamped using the stamps I have mentioned, the biggest tree I took a lot of ink off, to give a 'faded misty' look, then the other trees and then bushes and grass were gradually dark browns into black inks.
I feel it worked quite well - my first ever stamped picture and I framed it for my husband. Took me around 45 minutes.
Christina says ...
Well what can I say except "WOW" this is absolutely stunning.
I think it is something that will be treasured for years to come and it looks wonderful in the frame.
It looks so professional and it reminds me of the "Bob Ross" paintings that he did live on the TV. His paintings were fabulous but sadly he is no longer with us.
Keep up the good work Vee this is gorgeous.
Click here to read or post comments
Not only our nails have nail polish!
by Vee StJohn-Byles
(Scotland UK)
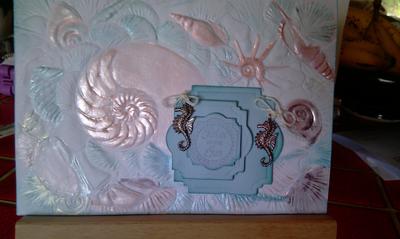
I had a Spellbinders embossing folder I thought I would use, but having tried it a couple of times I found it crinkled. After many months I decided to get it out of the drawer and have another go.
Basically with these deep 3-D design ones, you need to spray lightly with water to soften the paper fibres, then it will come out of the Grand Calibur or Big Shot (or other die cutter)without being screwed up or wrinkled.
So after embossing it in the Grand Calibur, I then hand painted it with a water colour brush and some different coloured mica pearls. I was pretty happy with it, but then decided it needed something more, even though it was lovely and subtle. So I painted some of the shells with pale pink pearl NAIL POLISH! It was a bit of a dare and risk but I think it worked.
I then ran some card through the Calibur with labels No.20 and put a pink sentiment on there and it is quite enough without having a large image.
I really love the shells, as they look so real now. Hope you like it too.
Christina says ...
What a fantastic card this is and thank you for sharing the tip with nail polish. I can see very body running to their cupboards now looking for some that they can use on their cards.
The effect is really good and the sentiment is just enough to finish the card off.
Click here to read or post comments
Flutterby n flowers
by Vee StJohn-Byles
(Scotland UK)
I had a piece of pre-cut white card hanging around and thought I'd make something with it. I did so as I have to go to hospital tomorrow and so I was trying to take my mind off it.
The card was a plain white base, I added a pink mat cut to show a little white background, then I added pale pink polkadot from my stash.
With the left-over pink card I ran it through my Calibur using labels Spellbinders 20 and die cut the pink card and the polkadot paper (Largest die and second one in)
I looked out some ribbon and threaded a pearl buckle on it and attached it with double sided tape.
Stamped and punched out the flowers using stampin' up mixed bunch and the punch to fit. The pink card topper was added to the pink polkadot base using foam dots to raise it, and the middle flower on the left also was raised by using a foam glue dot. The other two flowers were stuck straight onto the polkadot base using double sided tape.
I then created the 'flutterby' using 3mm quilling papers - purple, lavender, pink and another pale pink/white.
The head and body was made by using gold 3mm quilling paper rolled tightly and glued. The last (or end) of the body I made smaller than the rest. The feelers were made by tearing a one inch piece of the gold quilling paper, folded in half and wrapped then glued from around the back of the -head- tight coil.
I added 6 different marquise shape qulled pieces to fill in the bits on the butterfly wings. Once I assembled the butterfly, I lightly glued the back of it using a needle tool (from quilled creations.com)
Lastly I touched it lightly with stickles icicle glitter glue and added the pearls as you can see.
I enjoyed doing it all and it took my mind of my imminent hospital visit.
Christina says ...
How beautiful is this butterfly ? And so neatly put together. It graces the card perfectly and the matches the flowers.
A lovely card and one anybody would be delighted to receive.
Click here to read or post comments
Deckchair on the beach
by Vee StJohn-Byles
(Scotland UK)
I was struggling with what type of card to make for a male friend. He did not want to be reminded of his 'age' so I was trying hard to think up a theme that would suit him. Then it hit me.
He loves the beach. He loves to chill, and he (like I) absolutely adores the seaside.
I set about making a card to reflect these things. An inviting seaside theme with the sea and sand taking pride of place.
Firstly I tore two strips of white paper. Each paper width was the same as the base card (8 inches) and each of the pieces of paper were slightly deeper than the other.
I blended blue distress inks to create a sky straight onto the card itself. I drew a pencil line where I wanted the 'horizon line' and then I inked up the two pieces of paper the deepest one, I inked lightest, and shorter one (depth not width) I inked quite dark.
I then glued the deepest piece first and matched it up to the horizon line and followed this by the other one finishing with the shortest (in depth) I left it to dry. Then once dry, I went back and 'roughed-up' the edges of each of the two pieces of paper to create 'the illusion' of waves.
I created the -sand- look by sponging around the page with Tim Holtz distress ink called antique linen - putting more ink randomly but closer to the 'waves' to look like damp sand.
I added a die cut umbrella and deckchair (which I had bought) to which I then cut to fit cocktail sticks to add realism, to look like wooden frame pieces around the chair. For the illusion of seagulls, I drew 'ticks' in black Biro.
Then I added little embellishments, - the garden string along the side, the little charms, and dotted the shells around and finally the sentiment in Stazon ink
My friend adores his 'special' birthday card! I'm happy with it too as it is a happy seaside card.
Christina says ...
What an inventive card this is and I am not surprised your friend liked it. It is so very much in keeping with all the things you said he liked.
This is going to be one for the "Keepsake Box" to be treasured for years to come
Click here to read or post comments
Halloween Hoot
by Vee StJohn-Byles
(Stranraer, Scotland UK)
I have been out of hospital only three days and thought I'd try to make a Halloween card for my sister.
I managed it! I took a place ready made 8x8 inch white card and used several different rubber and cling stamps.
I cannot remember all the names of the brands, but you can look on Ebay and find most.
I used a spiderweb (studio G clear stamp cling) tree branch (Stampin up ) the set also called The 13th Hour clear cling, and Stampin up's gorgeous grunge set.
I used classic grey Stampin up ink and basic black as well as Tim Holtz's Soot distress ink.
I punched out the owl and I had googly eyes in my stash. I made the tombstone on the right myself and wrote in black biro "Here I am neatly lacquered, dead, carked it - completely knackered'
I used another punch for the other tombstone (label for the sentiment) real estate agent label by EK Success.
I basically, inked with the grey ink all around, then gradually went darker, blending with Holtz's blending pads.
I stamped all stamps using basic black. The torn paper stamp was stamped top right, and then I added on a slant the clock stamp and then I highlighted and put shadows around the 'torn' paper stamp.
I used Martha stewart fence punch, and tore two pieces from the strip I punched, this was to make it look like a hilly cemetery.
I made the bat by cutting the shape, added two tiny white circles from Stampin Up owl punch and then used a black marker for the pupils.
The mesh was from the Kaisercraft 13th Hour stamp set set, as was the clock and I used the mesh stamp in grey and then black ink at the bottom right and top left corners.
I then inked all over the place with the ink spot stamp/and two others from the gorgeous grunge set.
Stamped the branches (from the Stampin up set called Take Care) I drew the spider and embossed it with embossing powder, stamped the spider's web and heat set to make it shiny, I drew bits to the web.
Finally I added the sentiment (tombstone) and hand scribbled the words with a black marker.
Well I thought it was a real bit of fun, and it took my mind off my pain for a couple or so hours too.
Christina says ...
What a fabulous card and such fun to make. Lots of ideas and techniques all used together and the result is wonderful.
And I really love the handwritten sentiment ...
Click here to read or post comments
Card for a child using punches and inking
by Vee StJohn-Byles
(Stranraer, Scotland)
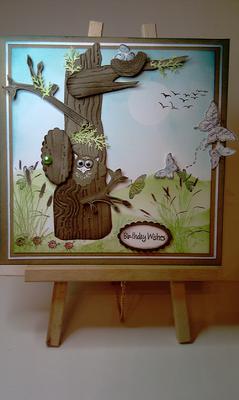
I wanted to make something with a bit of humour for my grandson, so decided on using the stampin up owl punch.
Also the set of stamps with the tree branch and an embossing folder that mimics wood. I started with a basic white 8x8 inch white card.
Began by cutting a large circle from a post-it note and using as a mask on the sky area, then carried on inking the sky using distress ink with a blender tool, and the grass by using (card shapes)masking to create the hills and inking these to look like grass.
Then stamped the branches using chocolate chip (dark brown ink) onto scrap card which I then cut out. Punched the owl from scrap card, and set these aside.
I stamped the bird nest and eggs onto scrap card in chocolate chip, cut the 'nest' into two and set that aside
Then I punched out an oval of the card I had run through the Calibur with the wood grain embossing folder - which was then cut to a tree shape, plus an off-cut for a large thicker branch.
I assembled all the parts as you can see onto the card with dimensionals (double sided glue pads) and used a blue ink on the 'eggs' using a dauber.
I finally stamped the grasses, dragonfly, punched out some butterflies and inked them, then added those.
I used the punch from making the tree hollow as the 'door' and added a bead. Then the sentiment completed this card which I love.
My daughter just LOVED the card for her son. I enjoyed making it.
Christina says ...
Enjoying your card making and having fun is what it should all be about and we can see from this card that Vee had a ball.
It is lovely and I am not surprised it was well received by everyone.
Brilliant idea and thank you for sharing it with us all on how you made it.
Click here to read or post comments
Cinderella will go to the Ball
by Vee StJohn-Byles
(Stranraer, Scotland)

Shoe
I made this shoe, and everything else here totally from scratch.
I wanted something shocking pink and shockingly different. I made it two years ago for my granddaughter - who was left, er - rather speechless.
The shoe I made from a cereal box, ribbon and black and gold card. I had NO pattern, and basically considered how a shoe would be made and set about cutting our a rough shape for the sole.
This was my starting point. I nudged it into shape by coaxing the beds between my fingers and hands and the edge of a bull nosed kitchen unit edge.
I lined it and put in the gold where one would see the golden inserts in a real show after I had fitted the ribbon straps into place. After that I added the heel.
That was difficult. I basically made a fat cone shape that was lower toward the ball of the foot and higher to the back of the heel. Again coaxing it into shape carefull before gluing it.
Finally I added the 'black rubber' to the heel and the rhinestones and the pretend CC I found on ebay -
The box I made (never ever made a box either) and I thought 'glass sides and top (acetate) to show off the shoe!
Christina says ...
Now that is truly amazing and what a lot of work. I can imagine the look on your grand daughters face when you gave her the shoe.
It is real credit to you Vee and one I am sure you are rightly very proud of. It is a real credit to you and your wonderful talents.
Click here to read or post comments

Recent Articles
-
Memory Book
Oct 15, 22 09:17 AM
Make a memory book, fun to make and even lovelier to give. -
Die cut letters.
Jul 19, 21 10:12 AM
Add that personal touch with die cut letters, add names or sentiment as you please. -
Diaper Fold Card.
Jul 19, 21 09:34 AM
Create this fun Diaper Fold Card...and no need for a pin!
Search

