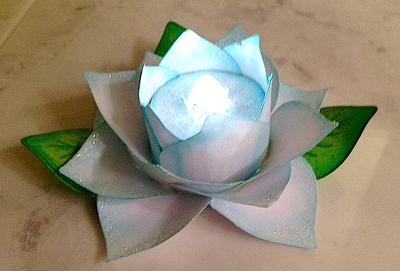
Tea Light Rose
by Emlie
(U.S.A.)

|

|

|
I saw the “Tea Light” candle so I made my own with the supplies I had.
I have added pictures for the each of the steps so it would make sense to you.
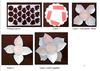
To make the rose petals and leaves, I used Spellbinders Nested Hearts Dies – S4-296 Die #1; Heartfelt Creations Distressed Leaves PreCut Set HCPC 3376 Die #3; and Shapeabilities Nested Leaves S4-321 Die #3.
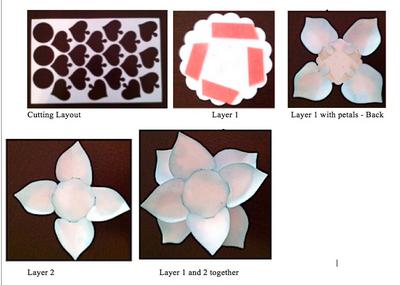
A ½ sheet of white cardstock will make enough flower petals for 1 Tea Light. Using ”White cardstock” Punch the 3 circles: 2 – 1 3/8” plain circles and 1-1 ½” scalloped circle.
Then, cut 18 “Nested Hearts” for the flower out of the same White Cardstock. Sponge the edges of all of the pieces in a color of your choice, glitter and set aside
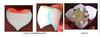
Punch another 1 3/8” circle out of scrap paper for a template to go over the flame. Fold it in 4ths, open and cut a ½” circle out of the center.
Lay this template over the back of one the 1 3/8” circles and trace the ½” center circle from the template onto the back of the circle.
Remove template and use an X-acto knife to cut slits in the ½” circle. The slits will allow the ½” circle to go over the light.
Layer 1: Roll the all the petals and leaves up using a stylus or brush handle to give them dimension.
Place red line tape on each 4th of the scalloped circle and lay the tabs of 4 petals along the outside edge
Layer 2: Take 1 of the 1 3/8” circles, turn sponged side face down and place “Red Line Tape” at each 4th.
Turn circle face up and adhere 4 petals so the rounded end is on the bottom and the petals sit on the top edge of the circle.
Push the petals up more than the layer 1. Adhere Layer 1 and 2 together.
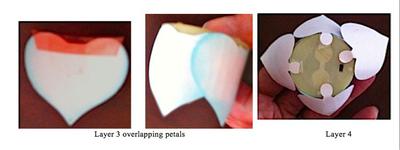
Layer 3: Take 6 petals: Cut off the small rounded end. Roll these petals around a pencil so they will curve around the tea light base.
Add Red line tape to the bottom of the edges. Adhere the petals so that the bottom edges are not below the base of the light.
The sides of the petals will overlap and stand straight up.
Layer 4: Curve 4 petals around stylus. Add red line tape on the right side of the petal as shown in pictures for Layers 4-5.
Adhere evenly to the bottom of the Tea Light. Be sure not to cover the switch on the bottom of the light.
Layer 5: Cut 4 nested leaves using Die #3. Shape leaves. Adhere around the bottom of the light as shown.
Christina says ...
This would make a lovely table decoration and just in time for Christmas too
Comments for Tea Light Rose
|
||
|
||
|
||
|
||
|
||


Recent Articles
-
Memory Book
Oct 15, 22 09:17 AM
 Make a memory book, fun to make and even lovelier to give.
 -
Die cut letters.
Jul 19, 21 10:12 AM
 Add that personal touch with die cut letters, add names or sentiment as you please.
 -
Diaper Fold Card.
Jul 19, 21 09:34 AM
Create this fun Diaper Fold Card...and no need for a pin!
Search
