My Flip card with Spellbinders
by Lindsay
(Perth, Western Australia)
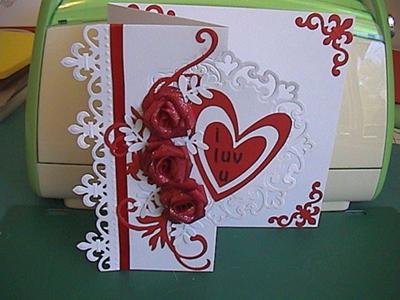

I wanted to try Christina's Flip Card with Spellbinders.
I have not used any embossing folders so it is not as fancy and it was a test run which turned out quite well.
I had to cut my card down to 6" square as I only have a cuttlebug.
I also do not have the complete set of Parisian Motifs and Accents so I have used one Parisian and one Fleur de Lis (as I also only have the one Fleur de Lis)
The flourishes are Spellbinders and the leaves a punch.
The roses are from Christina's Paper Roses video.
The hearts came with my Cuttlebug so I think it is a Provo die.
This card has ended up as a challenge card on COC
Christina says ...
What a beautiful card this is and the colours are just perfect. I love it Lindsay and I am sure you are pleased with the result.
You have proved my point that any Spellbinder will go with any other and the effect is gorgeous which ever you use.
Now you just watch the comments come in about this.
The thing is to experiment with what you have.
If you are new to Spellbinders then try the Starting your Spellbinder Collection and progress from there.
You too will soon be making cards as gorgeous as Lindsays and you will not be disapointed with what you can do.
Click here to read or post comments
A Single Rose
by Lindsay
(Perth Western Australia)
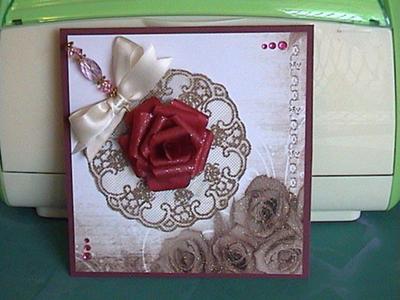

I have been a bit slack with showing my cards. I have had family from overseas and it has been quite hectic. This card is not a very intricate one so the desciption is very simple.
My card measures 6" x 6".
The paper is from a pack called 'Vintage Rose'.
The doily is an old one I had at home.
The rose is from Christina's tutorial as well as the hat pin.
Not sure how long it took me. I had the rose in my stash but had to make the hat pin - maybe 3/4 hr.
Christina says ...
The Hat pin is such a wondereful item to add to all your girly cards and they are so easy to create. You can even use up beads from jewellery that you no longer wear.
I use Hat pins with end protectors on them and I always make sure that they can be removed from the card.
That way the recipient has a gift as well as a card and it can be worn in a jacket lapel.
Tutorial for both the Roses and the Hat pins are in the Tutorials in the NavBar to your left.
This is a lovely and delictae card and I am sure it was well received.
Click here to read or post comments
Mosaic Xmas Card
by Lindsay
(Perth Western Australia)
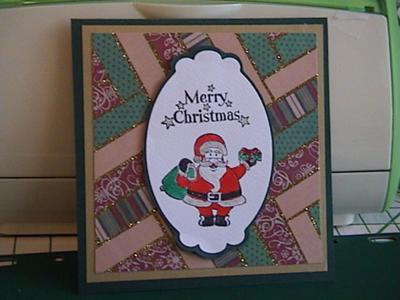

I made this yesterday. The background I made with a pack of Xmas paper which came in a magazine, the stamps too.
I followed Christina's video on Mosaic but my pattern is a Herringbone one.
I stamped the Santa onto watercolour card and coloured him in with Promarker pens.
Christina says ...
Mosaic cards always look very different for just a little bit of effort and this one is lovely.
Yow will find the technique that Lindsay has used in the Video Tutorials section and it is very easy to do.
Christmas cards look excellent when kept to the traditional colours of red, green and gold .... but try the modern take as well and make them in lilacs, pinks, blues and pale turquoise for another slant on things.
The use of the Spellbinders for the Santa brings him to the foreground and some of the shapes of these dies are fabulous.
Thye are a considered buy but they are so well worth the expense as the things you can do with them are numerous.
Click here to read or post comments
Iris fold card with flocked background
by Lindsay
(Perth, Western Australia)

Firstly a thank you to Edith for the Iris Fold pattern.
My card measurers 6" x 5".
The background paper is 2 sizes of double sided tape angled on a green piece of card. The narrow strip covering is removed first and the flocking added (similar to using glitter)
Once this is done then the larger strips can be done. I added some ribbon and a bow and some diamantes.
Unfortunately the colours are a bit dull on the photo.
This was not made for any special person and will be kept in my folder as a sample.
Christina says ...
This is a neat technique to create and gives such a different look to your cards.
It is very similar to the Mosaic Card and that is explained fully in the Tutorials section.
To give you a another idea take a look at Glitter Ribbons in the same section as both of these will give you the grounding to re-create the same idea as Lindsay.
Then you too will be able to make cards as beautiful as hers.
Click here to read or post comments
Spellbinders cards.
by Lindsay
(Perth Western australia)

Birthday Card for Carla


|


|


|
I wanted to try Christina's Spellbinders cards. The first is approximately 6" sq. I used the spellbinders label 14 (the second largest size) instead of the labels 20 (which I do not have)
I also used the 'flourishers' as I do not have the 'leaves'. The friend I made it for was thrilled with it.
Her husbands birthday is on the same day and their anniversary is the following day so there were 3 cards all in all.
For their anniversary card I decided to use the red & white card I showed previous, took the 'I luv u' stickers off, added wedding rings and on the inside added 'Happy Anniversary'.
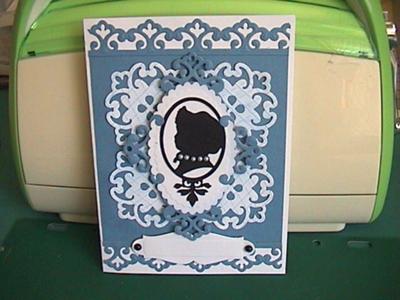
The husband'S card I embossed with the 'Cogs' folder and then rubbed it over with distress ink. My friend has a cricut machine and cut out the penny farthing and the cameo.
Christina says ...
Oh how very beautiful are ALL these cards and it is amazing what can be done with these dies. As they all mix and match then you will have no trouble creating the best cards ever.
I love the red and white one Lindsay it is just fabulous.
I know they are a considered purchase but when you consider also what you can do with them they are well worth the cost.
There have been three videos added to the Tutorials and all are made to help you through the minefield of gorgeous dies that are Spellbinders
It is my idea of the sort of dies that will help you to make your mind up from creating the textured base to the very edges of the card.
But make the most of the sets that you have as Lindsay has done here and you will not be disapointed with what you come up with.
Click here to read or post comments
Another spellbinders card
by Lindsay
(Perth, Western Australia)

Another card using spellbinders. This was an experiment which turned out quite well. The card is approx. 6" square.
The lacy background I used some card on which I had scored diagonal 1/4" lines and used a distress ink to show up the diagonals.
The cameo is cut on my friends cricut machine. I used the small scalloped die cut and added pearls around the neck. The tag is a grommet tag.
Christina says ...
Amazing ... and do you know how many different ways you can use just one set of dies?????
Limitless if you get your imagination working. This is another gorgeous card Lindsay and I love the colours.
Those Parisian dies create the wonderful scroll effects that Lindsay has used around the centre piece.
If you are thinking of buying some of these dies then please watch the three videos in the Tutorials section about Spellbinders and maybe it will help you with your selection when you go shopping.
Make a note of the numbers of the sets with you and then you will be able to see the dies in the packets before you purchase them.
Enjoy these dies and look after them and they will give you a lifetime of good service.
Click here to read or post comments
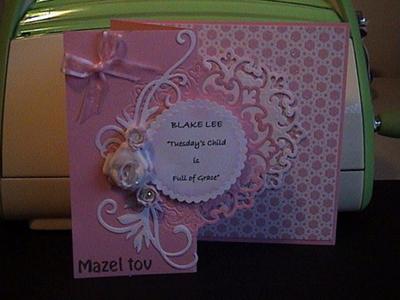
Two Baby cards for a friend
by Lindsay
(Perth, W. Australia)


|

|
A friend asked me to make these cards for her.
The little girl (pink) one is a take on Christina's Spellbinders Flip Card and measures 6" x 51/2". My friend wanted the names and verses on the cards.
The blue card for a boy ... I made a frame with the Spellbinders dies. The little elephant I cut 2 from a patterened paper and layered them and added a punched red heart.
Christina says ...
Well my first reaction to these cards was "WoW" ... they are both just gorgeous Lindsay and I am sure that your friend will have been delighted with them both.
The pink one (love pink) is my favorite it is beautiful, and the white background panel is just gorgeous... and those Parisian Motifs are so versatile for any kind of card.
I like the addition of the names for the children to the card as that makes it very personal and I am sure that these will be "Keepsakes" for years to come.
I am amazed at the response those Spellbinder videos have had. I have had so many emails about them it has been overwhelming.
If you are wondering which dies to buy from Spellbinders vast and wonderful choice then take a look at the Video Starting your Spellbinder Collection
It tries to help you through the choices you will be faced with when you go out with your saved up pennies to buy some.
The suggested ones will give you a good starter kit for all your projects, and you will find them in Video Tutorials in the NavBar to your left.
Click here to read or post comments
Balloon Lady
by Lindsay
(Perth, Western Australia)
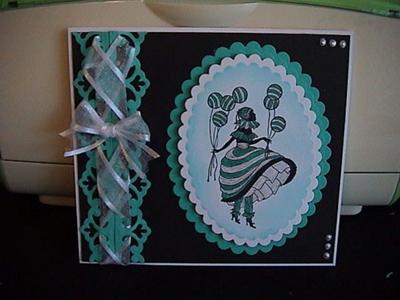

This card is 6" x 6". The image is stamped and then coloured with Tom Bow Teal pen and then gone over with Sakura Aqualip pen in a similar colour.
The white stripes are done with a sakura gelly roll pen. Unfortunately the shine does not show up much on the photo.
The ribbon on the side is from Christina's video. I must say I struggled a bit with it. The stamp is a GinaK stamp.
Christina says ...
Another beautiful card Lindsay and I just love the colour.
Those Spellbinder Parisian dies are really being put to some good use and the plaited ribbon looks wonderful.... was it not worth the struggle???
If you would like to make a card as lovely as Lindsay and you aren't sure which Spellbinders to buy then why not watch the video "Starting Your Spellbinder Collection" for some ideas on where to start.
You will find that, and other videos for more cards to make with the same collection in the Video Tutorials in the NavBar to your left.
Click here to read or post comments
Different Techniques
by Lindsay
(Perth Australia)

Spring Wishes


|


|


|


|
These cards were all made for specific challenges. They are all approximately 5.5" x 5"
The 1st one was a 3x 3x 3x and for Spring.
What I did was 3 layers, 3 colours & 3 butterflies. The stamps are actually 4 so I haven't counted them. The stamps are all from GinaK designs.
The 'Hawthorn' I coloured with Tom Bow pens on watercolour paper. The butterflies are 3D Stickers. This card has won me a bag of stamps from GinaK Designs!
The second card was a 'Sponging' challenge and I used Tim Holtz Distress Inks. The little flowers are 2 of the Petit Scallop Round dies (Spellbinders) which were cut out in one piece. The circle was then cut and the strip rolled up to form the flower.
The 3rd card was another I made for the 'Sponging' technique, but this time I tried to give the impression of the Lady being inside with the window in the background.
The 4th card is a quilting card. Instead of putting the paper directly onto the card & stitched it. I have used little squares of thin cardboard topped with fine foam and covered with Washi (Japanese) paper. I used 4 different papers and arranged them in a quilt fashion.
Christina says ...
What a fabulous group of cards Lindsay ... I love them all and would be so happy to receive any one of them.
But I have to admit that my favourite one is the amazing quilted one. It look just fabulous and would be suitable for any body, anywhere, any time and any occasion.
Click here to read or post comments
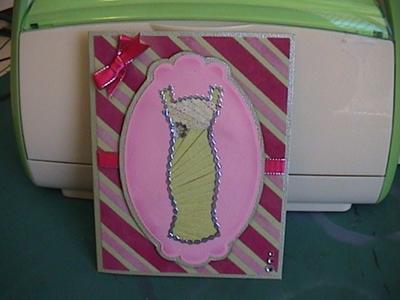
A few different cards
by Lindsay
(Perth, W. Australia)

Spellbinders - Get Better Soon


|


|


|


|
The 1st card was made for a Challenge. The theme was 'Get Well Soon' My card is approx 6" square.
I have used the Spellbinders Fleur d'Lis Accents and Motifs. A couple of the dies I have embossed with silver. Added a bow and a 3D silver butterfly.
My 2nd card is my first attempt at a Bargello card. The instructions for this can be seen on Split Coast Stampers.
My 3rd card is an Iris Fold card challenge of 'In the Garden' It is a bird house. The pattern is one of BobbiLynn's at COC.
My 4th card is a 6"square card I made for friends who have been in Australia for 10 years now.
The only Aussie stamp I have is of the gum leaves and flowers. I used this stamp to make the background paper by stamping it with Versa mark and embossing in white, then distressing it with Tea Dye & Weathered Wood distress inks.
I coloured the image on water paper with Tom Bow pens. My friends loved the card.
Christina says...
All beautiful techniques Lindsay and I am sure that they were all well received by each of your recipients.
My personal favorite is the first one with the Spellbinders as I just love the effect these dies can give a card each and every time they are used.
The colours on this are beautiful too and I really love the silver effect you have given to the butterfly.
But they are all superbly done and thank you for sending them in.
Click here to read or post comments
Birthday Card for a Music teacher & Wedding Card
by Lindsay
(Perth W Australia)

Birthday card for a Music Teacher


|


|
A friend asked me to make her a birthday card for a 70 year old music teacher who is her sons MIL.
The card is 5 1/2" by 5".
The music I stamped and embossed in white and then distressed with Tea Dye, Weathered Wood and Wild Honey inks, layered on brown. I added a cream ribbon and rose (see Christina's video on Paper Roses) and Spellbinders flourishes and tag. My friend loved it.
The Wedding card was also an order from another friend. This one I used the colours from the Wedding invitation which also had swirls
on it.
I embossed the card with the swirls embossing folder and distressed it with Spun Sugar distress ink. I added their names to the cut out hearts. The rose and flourishes are Spellbinder dies.
Christina says ...
Both of the cards are lovely Lindsay and I am sure that your friends were delighted with them.
The colours on both are very subtle and I especailly like the pink wedding card. Those Roses really set them off and they are so easy to make.
If you would like to make Paper Roses as pretty as the one that Lindsay has on her cream card then you will find the instructions in the Video Tutorials in the NavBar to your left.
Once you have the basic flower created then take it to the next level and watch the Enamelled Rose and make them appear glasslike.
It is an excellent way to use up the smaller pieces of paper that you have left in your "Stash" that you just can't bear to throw away.
Click here to read or post comments
White Embossing
by Lindsay
(Perth Australia)


White embossing
This card was made for a challenge on another site.
The base card (red) is 5 1/2 x 4 3/4. The white card is 5 1/4 x 4 1/2. Another piece of white card (5 x 4 1/4) has been embossed with white embossing powder and then been rubbed over with Distress Ink (Barn Door).
A piece of Bakers twine has been wrapped around and a button added.
The same technique has been done to the focal image.
Christina says ...
Lovely technique and it really makes the flower image stand out from the card.
Love the colours
and that Bakers Twine is such a useful addition to any card.
Hope you won the challnege
Cute Animals
by Lindsay
(Perth, Western Australia)

Cute Animals


|

|
This card was made for a challenge on another site.
The base card (white) is approx. 6" square, the brown layer is approx., 5 1/2" square. The embossed layer is 1/4" less all around and has been rubbed over with 3 distress inks.
Embossing folder used is Cuttlebug Mini Mosaics and the card stock has been partially embossed leaving a plain strip for the sentiment to be stamped on.
The images have been stamped in the same 3 distress inks on white card stock and then mounted on the same coloured card stock as the images.
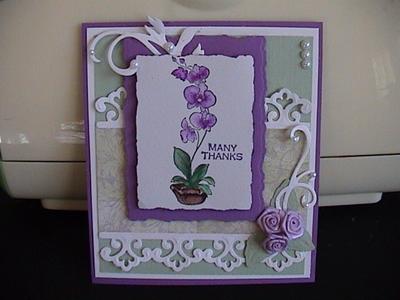
Purple Orchids
This card is approx. 5 1/2 x 4 3/4" Base card purple
White layer 1/4" less all round. Spellbinders used.
Focal image stamped and coloured with water pencils.
Christina says ...
Very pretty cards and my favorite one is the Purple Orchids as it looks so delicate.
I love the flowers and water colouring is one of my personal favorites as I find it so relaxing and the results are always so pleasing.
If you are new to watercolouring did you know that you can use your Distress Inks to get wonderful results ????
You will find Videos Tutorials on colouring with this medium in the NavBar to your left and they cover Skin, Hair and Clothes
Click here to read or post comments
Wishes
by Lindsay
(Perth W.Australia)
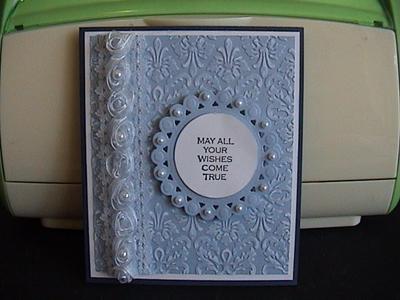

This card measures 5 1/2" x 4 3/4"
Embossed blue card with white core and sanded to pop the white. Lace added down the side and pearls added to the sentiment. This is a very quick and simple card to do and I think quite effective.
Most of my cards are created for challenges and made as a hobby.
Christina says ...
Oh this is so elegant and I love the pale blue colour scheme.
The embossing shows up really well once the card has been sanded and the lace along the edge is beautiful.
Who wouldn't be pleased to get a card like this whatever the occasion and it could be for any with just the alteration of the sentiment.
Buying card that is already embossed can be quite expensive but using embossing folders can give you the look every time for a fraction of the cost and the folders will take all different kinds of cardstock.
Try using Gold or Silver Mirror card, or Glitter card for another look... as well as the Colour Core card that Lindsay has used for hers.
And even running patterned papers through can still add texture to your cards easily.
Click here to read or post comments
Celebrate in Style
by Lindsay
(Perth W Australia)
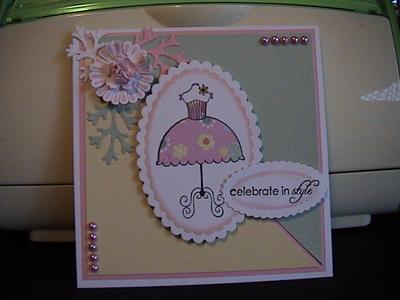

White card stock measures 5 1/2" sq
Pink card stock measures 5 1/4" sq
green & yellow card stock measures 5" sq cut in half diagonally.
Image has been stamped on white card stock and again on patterned paper which has been cut out and pieced onto the white card.
Spellbinders Ovals and leaves and handmade flower.
Pearls added.
Christina says ...
Beautiful colour scheme for this card and it sets off the stamped design perfectly. A really pretty, girly card that anyone would be pleased to receive.
The Paper Piecing Technique that Lindsay has used is explained fully in the Techniques Section in the NavBar to your left.
It is super easy to do but very effective on your cards so why don't you give it a try and see what you can come up with.
Click here to read or post comments
Black & White Birthday Card.
by Lindsay
(Perth W. Australia)
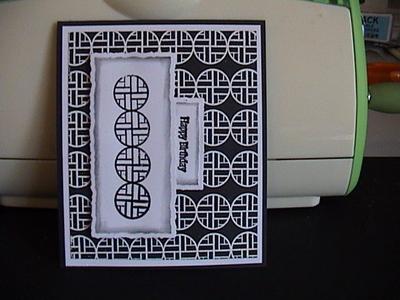

Card size 5 1/2" x 4 3/4" - black card stock.
Stamped with Versa mark on black and embossed with white.
Stamped with Versa mark on white card and embossed with black.
Also a very simple card to do.
Christina says...
A very simple card but Oh! so striking in it's simplicity. I love the black and white and cards can look amazing in with this monochromatic scheme.
Using the embossing powder has given you a spectaular look Lindsay and it would suit male or female and for any ocassion.
Which just goes to prove that you don't need fancy equipemnt or expensive products to get a card that looks really special.
Click here to read or post comments
Marvelous Squares Card.
by Lindsay
(Perth, Western Australia)

Marvelous Squares


|


|
I bought the 2 new Spellbinders dies - Marvelous Squares and Exquisite Circles and was looking on the web to get some ideas.
This card is just too difficult to explain so you can see the tutorial on Beccastamps blog. Hope you don't mind Christina.
I still haven't found a nice explanation on how to do the circles though and Christina wouldn't I just love you to come up with something!
My card is a virtual copy of Becca's.
In the Fall Friends Card I have used one of the dies as a frame (White) The image is a solid stamp which I have coloured with Tombows before stamping. The bow is a Cheaters Bow and can be seen on Stamptv.
Christina says ...
Spellbinders are fabulous dies and they make spectacular cards. I haven't met a Spellbinder yet that I don't like.
And wouldn't you just know it ...but I have bought the very same dies (along with Asian Accents and Motifs) and as yet have not had time to play ... but once I do I will see what I can come up with.
They are very pretty shapes and they look absolutely fantastic on your cards. I tried the link you mentioned but I couldn't get to the blog post.
Click here to read or post comments


Recent Articles
-
Memory Book
Oct 15, 22 09:17 AM
 Make a memory book, fun to make and even lovelier to give.
 -
Die cut letters.
Jul 19, 21 10:12 AM
 Add that personal touch with die cut letters, add names or sentiment as you please.
 -
Diaper Fold Card.
Jul 19, 21 09:34 AM
Create this fun Diaper Fold Card...and no need for a pin!
Search
