Make this Kimono Card...
...with just a few simple measurements.
This unusual Kimono Card is easy to make, just a few easy steps and the job is done!
This is a lovely project to do and the steps are easy to follow.
This kind of card would cost quite a bit of money in the shops, but this is the way to produce your own cards, whenever you need them.
Use papers that are in keeping with the Oriental theme and the card will be really authentic.
The first thing you need to do is make a template.
This saves any marks going onto your "Best" cardstock, and helps with your confidence too.
Far better to make any mistakes on some cheap card, than ruin your favourite piece of card or paper.
Step 1
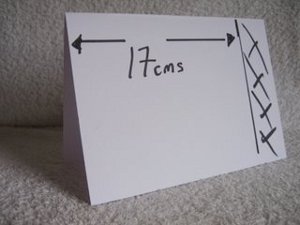
Take an A4 card and fold it in half to A5 size.
Keep the closed spine of the card at the top and from the side edge measure in 17cms.
Trim off the surplus, as shown in the photo.

Step 2
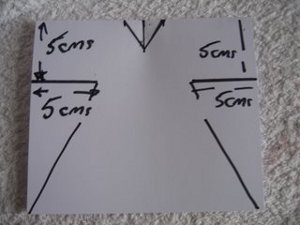
Working on this piece, which measures 17x15cms, we need to find the center, and make a mark.
(Mine are bold to show you what to do, and remember this is only the template we are making.)
Measure 2.5cms down from that mark, and 1.5cms to either side.
Join the marks up lightly and you should have the triangle shape shown.
This is the neck area of the Kimono. Still with me? Oh! good!
Step 3
From the top, closed spine of the card measure down 5cms, and from each outside edge measure in 5cms.
From that inner mark draw a line out towards the outer bottom edge of the card.
(Look at the diagram to see the lines)
Step 4
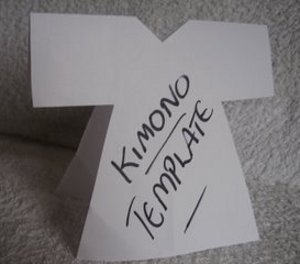
Cut away the outer triangles to leave the template as it is in the photo, and this is how your finished card will stand.
Lay the Kimono card template onto your card and draw very lightly in pencil around it, the marks can be erased after you have cut the shape out.
Keep the shoulder parts on the folded spine otherwise you card will be in two bits....uh!uh!
Step 5
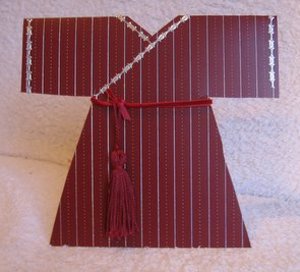
I placed my template directly onto some patterned card that I had.
And I have finished the front with some silver peel offs to edge the neck area.
Place one from the top right shoulder down to the inside, bottom edge of the left sleeve.
Lay a shorter one to edge the left side of the neck.
And edge the sleeves if you wish.
I added velvet ribbon and a tassell around the waist of the kimono.
A sentiment can be added to either the front of the card or the inside if you prefer...the choice is yours.
You can also make the Kimono with pretty flowered papers, and in that case you may find it easier to make the kimono shape in two seperate pieces and add them seperately to the folded card. Gemstones or Lotus Blossom flowers to keep it very feminine.
But the Kimono Card is easy to do and open to any interpretation you want to apply to it. Have fun!
Return from Kimono Card to Homepage


Recent Articles
-
Memory Book
Oct 15, 22 09:17 AM
 Make a memory book, fun to make and even lovelier to give.
 -
Die cut letters.
Jul 19, 21 10:12 AM
 Add that personal touch with die cut letters, add names or sentiment as you please.
 -
Diaper Fold Card.
Jul 19, 21 09:34 AM
Create this fun Diaper Fold Card...and no need for a pin!
Search
