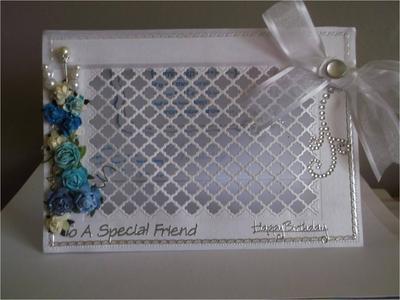
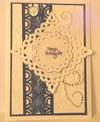
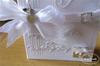
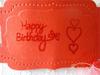
Happy Birthday to a Special Friend
by Jennifer Swandells
(Renfrew, Scotland)

I made this card for a friend's birthday and she absolutely loved it when she got it.
She has told me that she is going to frame the card and hang it in her bedroom, so that she can see it every day.
I thought that this was a lovely gesture from her to me.
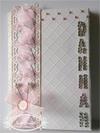
The card was started off with one A4 sheet of paper, scored in two then cut in half.
I then created another long piece of paper to fit across the top of the halved A4 paper (about 2 inches in size) this was to create a hinge to put at the top of both sides of the card. (with the help of card-making-magic)
Before I attached the hinge to attach both sides together, I die cut one side of the card with the trellis die and then attached both sides together with the little hinge piece of paper.
Inside the card I covered over the hinge paper with another piece of card, so you wouldn't be able to see the workings of the card. I also printed a very personal message to my friend inside the card.
On the outside of the card, I then positioned quite a few flowers at the bottom left hand side, some coloured with blue Promarkers.
I then attached a white piece of ribbon across the top of the card and then tied a ribbon (with the help of card-making-magic) to put on the right hand corner of the card, the ribbon had a gem placed over the top, there was a crystal swirl put underneath the ribbon.
I then added 2 silver stickers which said To A Special Friend and Happy Birthday.
This is the first card that I have posted on this site and I hope to post more.
I took up card making in November 2011 and still consider myself to be a 'newbie' as I am learning more and more new things every single day.
This site is the first place I come to, to learn new things and new techniques and I cannot thank Christina enough for taking the time to post all that she does.
I love trying out new techniques, and if I don't have something that I need I go and buy it as soon as I can, so that I can try it out properly.
The only thing that I have real difficulty with is colouring in, I really am not getting anywhere with that.
I have found various sites that gives me tutorials etc, so I am trying to work my way through them.
Thanks for looking. Jen :-)
Christina says ...
The card is really lovely Jen and I am not surprised that your friend was pleased with it. I really like white cards as they always look so clean and fresh.
If you would like to make the Trellis Card and the Hinged Card there are full instructions in the Video Tutorials section in the NavBar to your left.
You will also find many many tutorials on Colouring In in that section too and they will help you with many mediums from Spectrum Noir Pens to Water Colouring with Distress Inks.
For other mediums take a look at Colouring In in the NavBar to your left
Click here to read or post comments
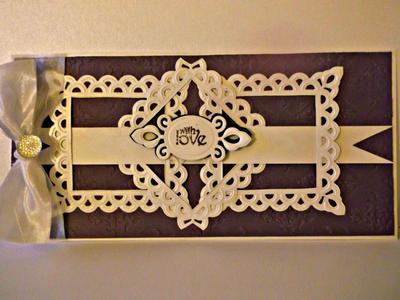
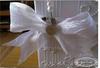
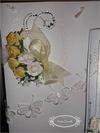
Anniversary
by Jennifer Swandells
(Renfrew, Scotland)


|

|


|

|
I created this card based on a card that I saw over at Card-Making-Magic.com - Acetate Front Card Tutorial
I have made another card like this one, but I was pleased with the way this one turned out as I got the acetate properly fitted on this one, so it didn't bend the way the other one did.
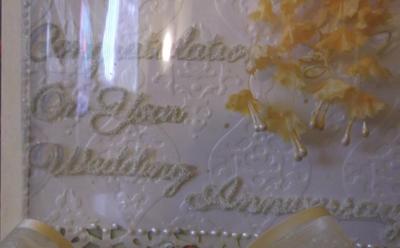
I started this card with a 20cm x 13.5cm card, which I then embossed using the Craftwell eBossing Folder, once this was done I then punched the bottom of a card using a Martha Stewart punch.
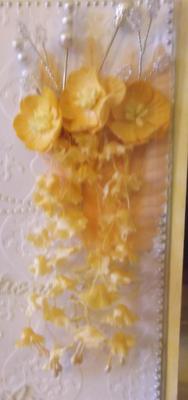
I created a flower corsage made up with flowers from Wild Orchid Crafts. I used Handmade Mulberry Paper Stem Flowers and another flower from my stash (sorry I don't know where I got this one from)
It is a hanging flower with many small blooms attached along the stem. They were all initially pink flowers and I coloured them with yellow Promarkers which then turned them a lovely shade of peach. I then used Decorative Pins and Decorative Crown Pins both from Wild Orchard Crafts.
I put in a couple of crystal stems - again from Wild Orchid Crafts (which are no longer available). Once the flowers were finished I put on a pearl swirl coming from the flowers.
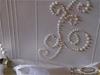
I then die-cut the words "Congratulations On Your Wedding Anniversary", I sprinkled very fine white glitter over the words and to finish off the main part of the card, I used Liquid Pearls - Silver Pearl round the outside of the card.
I created the main card to put the embellished card onto, before attaching the embellished card to the main card, I attached my acetate to cover the card completely.
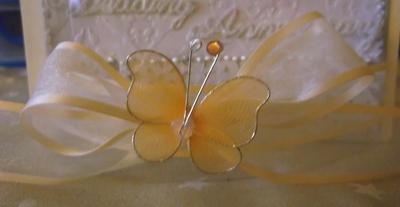
Before I stuck down the acetate, I attached a piece of ribbon round the bottom of the acetate, sticking it behind the acetate. I then created a ribbon and put a peach net butterfly on top to finish off the ribbon.
I do hope that you like my card.
Christina says ...
This card is beautiful and one I am sure you are very proud of. The recipient is going to be thrilled with it and I know it will be a "Keepsake" to be treasured.
The colour is lovely and those flowers make it really special. Love it !!
Whatever occasion this card is made for it is always spectacular and if you would like to make one as beautiful as Jennifers' then you will find the detailed instructions in a video in the Video Tutorials NavBar to your left
Click here to read or post comments
Special Card Box
by Jen (Jennifer Swandells)
(Renfrew, Scotland)

I decided to make an addition to the card by making a special card box in which to put the card in, as a normal sized envelope wouldn't have worked.
So I made this following the instructions over on Card-Making-Magic.com
The instructions were very easy to follow (which is why I am not putting the instructions in as you will be able to see them online here)
I only made a couple of changes to the card box by adding additional card to the sides and the bottom of the box in order to facilitate the size of the acetate.
I also put in an oval shape in the centre and covered the outside of the oval with some flowers to make it co-ordinate with the card.
It worked out quite well, and you will be able to see that the box follows the same type of pattern as the card.
Christina says ...
Adding in a box always makes the card into something special and it means that you can accommodate all the flowers that you may add to the card front ... especially if you are like me and add lots.
Click here to read or post comments
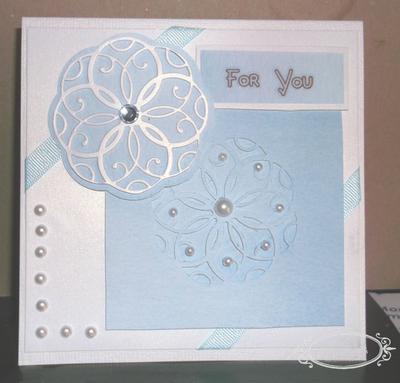
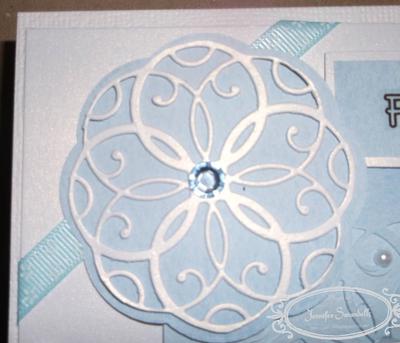
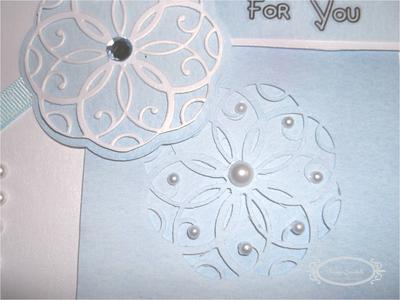
Wedding Day
by Jen (Jennifer Swandells)
(Renfrew, Scotland)

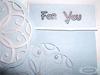
For You


|


|


|


|
I have made this card to give to my neighbours who are getting married on the 14th June, so they haven't been given the card yet. I will tell you all what they say about it when they are given it.
I pierced the outside of the main card, this is the first time that I have done this correctly. I didn't know that there was a ruler that you could use in order to do this.
Once I found out, I bought the Tim Holtz Idea-ology Design Ruler 12inch I used to wonder how people got the edges so straight and now I know.
Anyway, back onto the card. I then cut a piece of card 13cm x 20cm to do all the workings of the card onto.
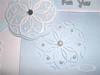
I embossed the card with an embossing folder (unsure of the name), die-cut a Spellbinders Floral Oval - the largest size.
I then die-cut Spellbinders Medallion One and I took the smallest die from Spellbinders Resplendent Rectangles I used foam pads to stick on the Floral Oval, the Medallion One and the small label from the Resplendent Rectangles.
I then die-cut the words For You which are from Tattered Lace Interlocking Dies.
Once all this was completed, I then put a piece of Guipure Lace purchased from Wild Orchid Crafts I then decorated the card with gems from my stash and a couple of swirls to finish the card off.
Once I had looked at the card I then die-cut the words On Your Wedding Day and attached this to the card with Pinflair Glue.
I do hope that you like my card.
Christina says ...
Oh My!! the card is just gorgeous and your friends are going to be delighted with it.
White on white is always beautiful and a real stunner for a Wedding Card ... you just can't go wrong with that choice.
I love the use of the Spellbinders and that lace is a winner too.
There is a video on Pierced Edges and you will find it in the Video Tutorials section in the NavBar to your left.
Look in the Spellbinders Section and it shows you how to get the best from the Piercing Ruler that Jennifer talks about.
Click here to read or post comments
Plaited Ribbon Card
by Jen (Jennifer Swandells)
(Renfrew, Scotland)


|


|

|
I created this card with the help of the new venture that Christina is taking part in The Art Studio - Create Beautiful cards with Spellbinders Dies
You register and pay a small amount to take part in the classes that Christina does.
In the first class you make 3 cards, at the moment I have attempted 2 of these cards which I will show you and hope that you like.
As this is my first attempt, there are a couple of things that I am not happy with, so I will create them again until I am happy with what I produce.
This card is going to be given to a friend who's birthday it is in August, so I don't know what her reaction will be when she receives it, I will let you all know in time.
I hope that you all like my card and once I do another one, I will post it online and you will be able to see whether or not I have improved upon it.
Christina says ...
This card is truly pretty Jen and I am so glad that you are enjoying my new class with "The Art Studio"
My thanks go out to you and many more who have already joined the class and it is wonderful to see what you produce.
Your friend is going to be delighted with the card when she is given it in August, and I am sure that you will create many more in the future.
The class is available Online at "The Art Studio" and you will find all the details about it in My Card Class in the NavBar to your left.
It is a paid for class but the price is very reasonable and so I hope you will come along and join, as Jen has done, and learn lots of ways to get the best from your collection of Spellbinders.
Click here to read or post comments
Buckle Card
by Jen (Jennifer Swandells)
(Renfrew, Scotland)

This is my second card that I have created with the help of Christina at The Art Studio - Create Beautiful cards with Spellbinders
This card will be given to another friend who's birthday it is in October, so will have to let you know later what her reaction is to this card.
This is just my first attempt at making it and I am not happy with the heat embossing and a couple of other different aspects of the card, so I will be trying it out again.
I do hope that you like my first attempt at this card.
Christina says ...
This card is lovely Jen and you are too hard on yourself. The friend who will get it for her birthday is sure to be delighted with it.
I always say we are our own worst critics and never seem to be happy with what we design.
But just ask your friends and they will give you their opinion and they will think that the card is simply perfect.
If you would like to join the class that Jen refers too then please take a look at My Card Class page in the NavBar to your left.
There you will find all the details, and the link to the class for you to join, and learn how to get the best from the Spellbinders that you have been collecting and wondering how to use them.
On Your Anniversary
by Jen (Jennifer Swandells)
(Renfrew, Scotland)
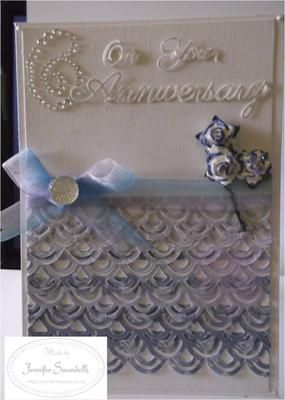

Here is the third card that I completed with the assistance of Christina on her new venture.
I hope that you like this design, it was so very simple to do and you can obviously use any type of card/paper to create the borders along the card.
I have thoroughly enjoyed these classes that I have taken part in and you should try them out too, as you do pick up many hints and tips.
You will enjoy these classes as it makes you feel as if you have Christina all to yourself.
Christina says ...
This is a lovely card and you have done your self really proud in making it. Thank you for taking part.
I am so relieved to hear that people have enjoyed my first class with The Art Studioand are taking the trouble to let me know.
And what's more they are waiting for the next one.
It was very well received and I too can't wait to do the next one.
If you would like to join Jen and myself ... and many more on this new Class then you will find more information in the NavBar to your left
Just click the page that says My Card Class and there you will find everything you need and the link to join this paid for class.
Click here to read or post comments
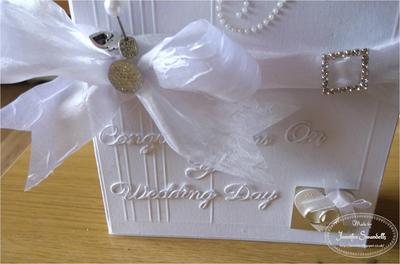
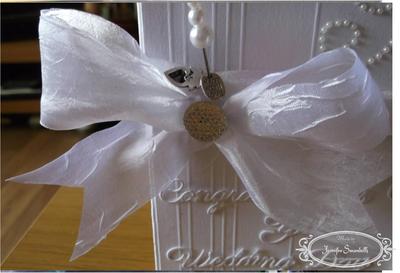
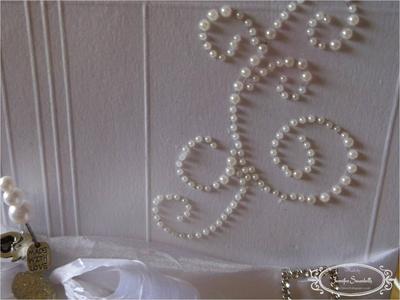
Wedding Day
by Jen (Jennifer Swandells)
(Renfrew, Scotland)


|

|

|

|
This is a Wedding Card that I have made for yet another friend who is getting married.
It is never me, I am not even the bridesmaid. lol Anyway, onto the card.
The card is made with white pearlescent card, which was from Craft World. I first of all created a panel on which to work on.
All I did was line off the card with my Hougie Board, then put on a 'crinkly' ribbon with a square slider to the right hand side of the card. The size of the card is 21cm x 14.5cm.
I then put on pearl swirls at the top right hand side of the card and at the bottom right hand side of the card I used an ivory heart shape mounted onto silver card with a small white ribbon and two wedding bands. All embellishments were from Hobby House.
I die-cut the words, 'Congratulations on Your Wedding Day' and used Pinflair Glue Gel to secure the words onto the card. (I would appreciate any help with this bit, as I am not very good at getting the glue on the backs of the words, so any hints/tips would be gratefully received)
On the ribbon, I tied a bigger bow, put a dazzler on to hide the knot then inserted a stick pin with 2 charms, heart and made with love to finish it off.
Once I had completed the panel, I then stuck it onto the actual card and voila we have a finished card.
I do hope that you like my card.
Christina says ...
Oh my what a beautiful card and your friend is going to be delighted with this on her Special day.
White in white never fails to look classy and I love the embellishments that you have added to the card.
You ask about ways to add the letters and words to card.... you could go over the back of each word with a Glue pen and wait until the glue is tacky and then add them .... or you could use spray adhesive ... or run them words through a Xyron machine to add the glue to the backs.
I usually use a glue pen on mine as it is controllable. It goes on blue but dries clear very quickly.
Click here to read or post comments
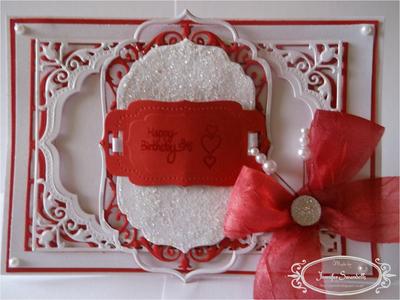
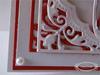
In the Red
by Jen (Jennifer Swandells)
(Renfrew, Scotland)

|

|

|

|
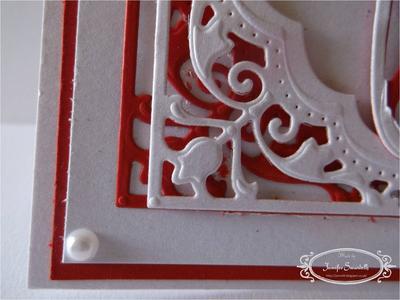
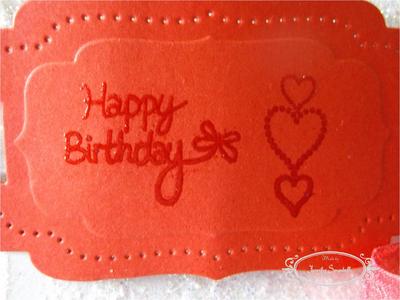
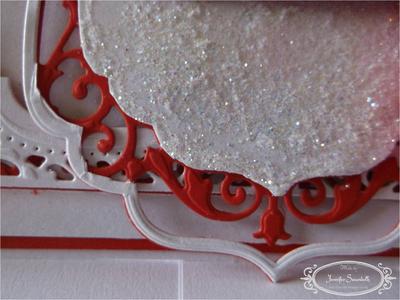
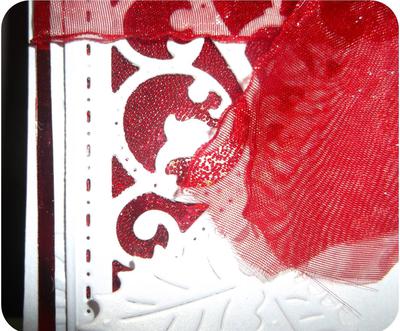
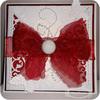
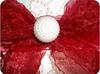
This is one that I created using Spellbinders Nestabilities 5 x 7 Elegant Labels 4.
I just worked with this one die to see what I could come up with and this is how it turned out.
The photograph unfortunately looks as if the card is beveled, but it isn't it is obviously just my photographic skills.
I tried taking the pic on numerous occasions, but it just kept coming out like this.
I matted the card on pearlescent card, red card and then pearlescent card. I worked on a panel first before matting it onto the final piece of white pearlescent card.
I cut out two of the main frames of the die one in white and one in red. I put the red one behind the white one just to create another level.
I then die-cut the full oval part of the die and stuck that down using foam pads, I cut out the inner oval and the outside frame part and stuck them down.
I then used the smaller piece to heat emboss Happy Birthday and 3 hearts, the colour of the embossing didn't work too well, so I will probably try out a different colour next time. I attached ribbon round the two sides of the small panel.
I then stuck 4 pearls on each corner and attached a red ribbon (originally white, but dyed with red Promarkers), and finished it off with a dazzler and two stick pins.
Christina says ...
What a really startling card and the red is fabulous. All the embellishments that you have added make it stand out even more.
I love the ribbon and the big bow. Don't you just love that die set it is so elegant and I play with this die a lot.
The cards it makes are so lacy and this is an excellent die to use to create the Filigree Hinged cards with.
You will find a video on how to do the technique in the Spellbinder Series in the NavBar to your left.
Click here to read or post comments
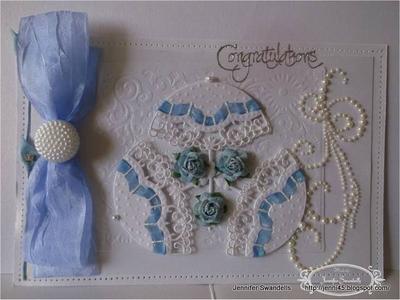
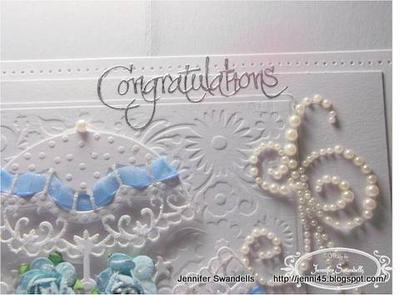
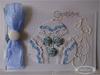
Congratulations
by Jen (Jennifer Swandells)
(Renfrew, Scotland)

|


|


|


|
I didn't make this card for anyone in particular, so it is just going to go into my 'box' of cards.
This card is a 9 x 6 the whole way round.
I used an embossing die (although I can't remember what it is called) which is much smaller than the panel that I used to start off with.
I am not too happy with it, but I had already started the card and I thought I would finish it off to see what it looked like.
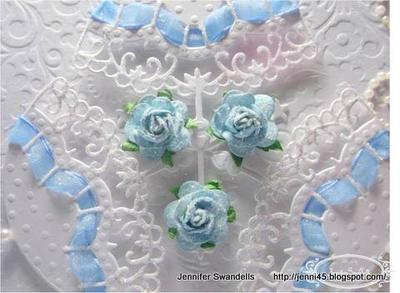
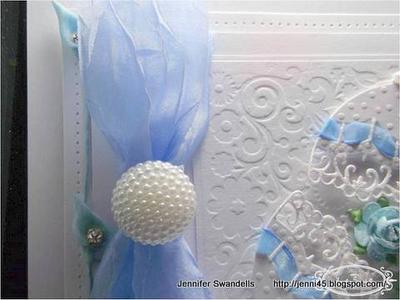
I then die cut 3 parasols and put sky blue ribbon through the holes on the parasols. I attached 3 light blue roses (coloured with promarkers), then attached a pearl swirl to the right of the card.
I created a large bow to put on the left hand side of the card with the ribbon going all the way round the card. On the left hand side I put 2 (blue) lilies again coloured with Promarkers.
I finished it off with a silver Congratulations at the top of the card. It is not perfect, but these are the ones that need to be worked on.
I do hope that you like my card.
Christina says ...
Now I know many people are going to love this card and it is really beautiful. I love the parasols and the blue is just the right shade and whoever is lucky enough to get it is going to love it.
I would be very happy to be on your card list any day.
But yet you aren't happy with it ... which just goes to prove my point of us all being our own worst critic.
Not many people know how to make a card and even more are just not interested in doing so.
To them the cards that we ... as card makers come up with are absolutely thrilling.
Be proud of this card Jen it is inspirational to many, many people.... including me.
Click here to read or post comments
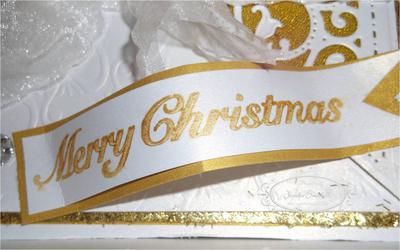
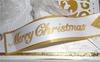
Gold Christmas Card
by Jen (Jennifer Swandells)
(Renfrew, Scotland)


|

|

|

|
I matted and layered gold and white paper, I used gold flecks (which were hidden in my stash)round the edges of the gold paper.
I then cut out two of the triangles from the Gold Elements One dies. I embossed the white layer with Cascading Hearts, and put micro beads underneath the two triangles.
Once this was done, I put the triangles onto the card on each side. I then put on two joined hearts at the top right hand side and two and the bottom left hand side.
To finish off the card, I put a large white bow and a silver dazzler. I also put a 'Merry Christmas' sentiment at the bottom of the card in the shape of a pennant.
Christina says ...
This is another very beautiful Christmas Card from Jen and I love this Gold one. It looks rich and elegant and would be perfect on MY mantleshelf at Christmas .... can I go on your card list ???
Red Christmas Card
by Jen (Jennifer Swandells)
(Renfrew, Scotland)


|


|

|
I matted and layered red mirri card and white card. I embossed the white layer and put red micro beads underneath the dies. I then put the dies on top of the card along with a piece of red ribbon.
I attached white bead flourishes (although I didn't do this correctly, I will do this again), and attached die cut white leaves. I attached a red bow and finished it off with a pearl dazzler.
Christina says ...
This is a very striking card and a perfect colour combination for Christmas.
I love the die that you have used ... it is one of my favorites and the effect it produces is so delicate.
This Si going to look so good on someones mantelshelf for Christmas and is sure to take pride of place.
Click here to read or post comments
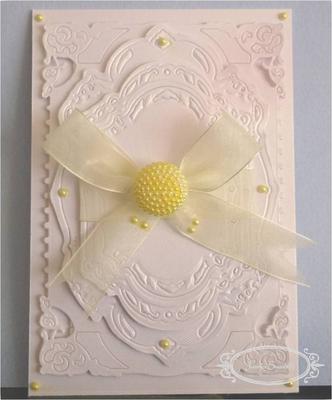
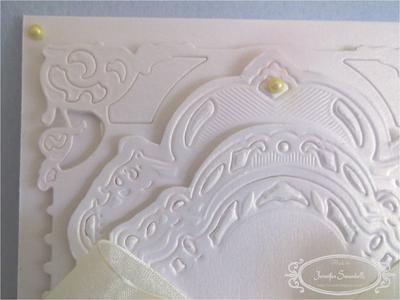
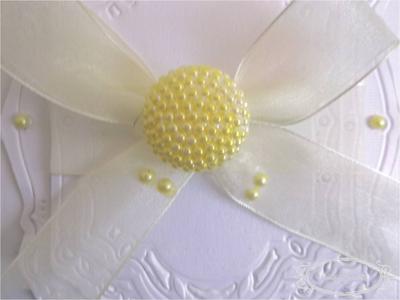
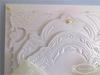
Yellow Pearl
by Jen (Jennifer Swandells)
(Renfrew, Scotland)


|

|

|
Here is a very quick card that I put together using 5 x 7 Enchanted Labels 28 and Decorative Labels 28.
All I did was emboss the large die from Enchanted Labels and then put on top the largest and the second largest of the Decorative Labels 28.
I tied a yellow ribbon round the smallest of the decorative labels 28 and then tied a ribbon and put that on top.
I then attached a pearl dazzler, which I coloured in yellow with my Promarkers and I attached a few smaller pearls, again coloured with Promarkers.
This card was not made for anyone in particular, so it will just be put into my box for extras.
Christina says ...
This is such a pretty card and the color combination makes it look really fresh.
Making those Spellbinders work for you is the way to get your monies worth from them... and there is so much that can be done with them to produce the most amazing cards.
Even if you use the same design several times then just by varying the card color can make that design look different each time.
And I know the dies are expensive but there are bargains to be had if you shop around and I promise you will not be disappointed with your purchase or the cards that you can make.
For lots more ideas on ways to use Spellbinders take a look in the Video Tutorials in the NavBar to your left and scroll down .... there is a whole section on Spellbinders and other related designs.
Click here to read or post comments
Blue card
by Jen (Jennifer Swandells)
(Renfrew, Scotland)


|


|

|

|
I created this card using Spellbinders Shapeabilities Medallion One.
I followed making this card with Christinas' tutorial... but she used Medallion Seven.
As I don't have Medallion Seven, I thought that I would try it out with Medallion One. I must admit I was quite pleased with how it turned out.
I used a 5 3/4 x 5 3/4 card (odd size I know, but this was a set of blank cards that I got from one of the craft fairs that I went to).
I cut out a smaller piece of pearlescent card to act as a layer for the card, I then tied ribbon round each corner and then stuck down this piece of card onto the main card.
I then embossed the main die onto a (nearly) 10cm x 10cm piece of blue card and then die-cut a full piece so that I could put this behind the embossed (cut out) piece of paper.
I die-cut a white piece of card and die-cut a full piece so that I could put this behind the white card.
Once I had stuck these pieces down to where they were going, I added a blue crystal to the white die-cut and white pearls to the blue embossed pieces.
To finish of the card, I attached 9 smaller pearls down the left hand side of the card and a small sentiment in blue and white card, 'For You'.
This card didn't take all that long to make and it was a pleasure finishing it so that I could see what it looked like.
Christina says ...
This is such a pretty, quick and simple card to make and you can use any of the Medallion dies that you have in your "Stash"
As long as the die can be cut out in two separate parts then it will work for this design. And the color that Jen has used here is beautiful.
You will find a tutorial on how to make the card in the Video Tutorials in the NavBar to your left and it is one of many in the Spellbinders section.
This style would be suitable for any occasion and by using different colors the it will change the look of the design.
Have fun with your dies and always always think outside the original use and see what you can come up with.
Click here to read or post comments
Dad's Birthday
by Jen (Jennifer Swandells)
(Renfrew, Scotland)
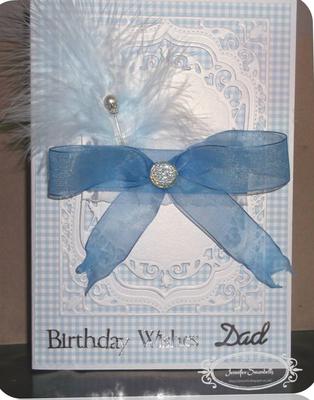

This card, I made for my Dad for his birthday.
I didn't want to put too many flowers and bling on his card as he is definitely not a flowery man.
So I thought it best to keep it as plain and simple as possible.
I used a blue and white gingham paper and then put on the 5 x 7 Elegant Labels 4 die.
I attached one white feather and one blue bow with a dazzler set in the middle. I put a stick pin in at the back of the feather.
Christina says ...
Very pretty card and I am sure that your dad loved it simply because you made it for him with love.
Click here to read or post comments
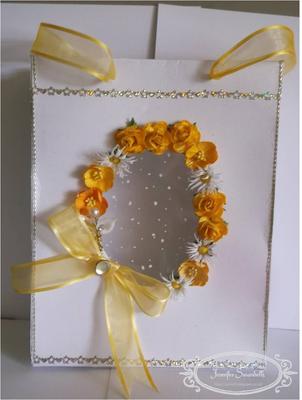
For Dannah - Flowery, girly card
by Jen (Jennifer Swandells)
(Renfrew, Scotland)


|

|

|

|
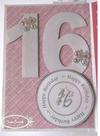
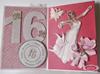
I made this card for a young girl who is just about to turn 16 years of age.
Her mum had a great deal of input into this card and basically told me exactly what she wanted on the card.
She wanted it very pink with loads of flowers and bling.
On the first page of the card I used the Venetian Accents Border die and cut this out twice. I then plaited pink ribbon through the holes in the die and put a pink bow and pink dazzler on the bottom.
There were pink Diamante put at the top of the card and I then spelled out her name with clear Diamante.
On the second page I cut out the number 16 and placed this onto the page along with a 16 badge.
The third page was Fairy Wishes which was bought from Crafts U Print and decoupaged onto the page.
I sprinkled Glamour Dust onto the image just to give it a bit of sparkle.
Christina says ...
I would say that this beautiful sparkly card more than fits the bill for a sixteen year old girl.
It is so pretty and you have put a lot of work into this design. I am sure that Dannah is going to love it and treasure it for a long time to come.
I know I have a card that was sent to me for my 21st and I am now a fossil and I still keep it safe
Click here to read or post comments
Christmas baubles
by Jen (Jennifer Swandells)
(Renfrew, Scotland)


I decided it was about time to start making Christmas cards as I haven't made any at all so far this year.
I have lost my 'mojo' somewhere, and it hasn't decided to come back.
So I thought it is time to go to Christina's site and see if I can get some inspiration.
I followed the tutorial on the Christmas Bauble card and I found it easy enough to follow, although, when I took the picture the baubles came out all 'wonky'.
They really do not look like this in real life - honest!
So follow the tutorial and you will get something similar.
Christina says ...
The Christmas Bauble Tutorial is such a simple way to make a card for that special season.
And it was made for people who don't have Spellbinders or any other dies and yet still want a card to look different.
It is handmade from start to finish and so it doesn't matter if it is "Wonky" ... all that matters is that it is your creation and the people who are lucky enough to get a card that you have made will treasure it.
The video tutorial for this style is in the NavBar to your left ... Look under Video Tutorials and there it is ...
Click here to read or post comments
Silver Bauble Card
by Jen (Jennifer Swandells)
(Renfrew, Scotland)
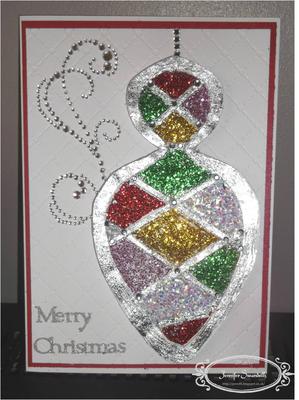

I followed the majority of this tutorial although I did do a couple of things differently.
I matted and layered the card with red and white card, embossed the white card with Creative Expressions A4 Embossing Folder - Heart Lattice, I put a crystal swirl on the left hand side of the card.
I cut out a full bauble shape and a bauble shape with the inside cut out. I then used strips of paper to put across the bauble in order to mimic diamonds on the inside.
I used different colours of glitter in each of the separate sections. On the outside of the bauble I used Flitter Glue and Silver Mega Flakes to colour the outside of the bauble silver.
I used a Merry Christmas sticker to put at the bottom left hand side of the card.
Christina says ...
This tutorial has proved to be very popular and is a fun way to get some Baubles for your cards.
You don't need any fancy die cuts or special skills to make a card as pretty as Jens'
Just follow the steps in the Christmas Bauble Card
You will find that tutorial and some other un ideas for Christmas cards in the Tutorials Section in the NavBar to your left.
Just have fun and get the kids involved too as they will really enjoy making these decorations that can also be doubled and glued back to back to add to your tree.
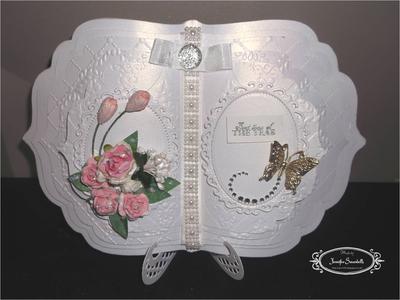
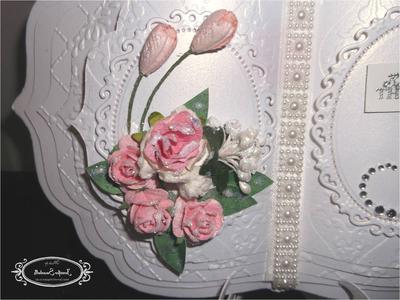
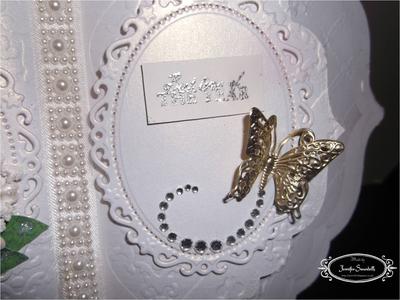
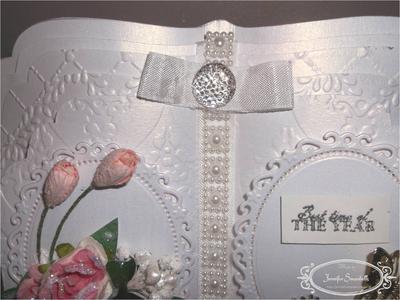
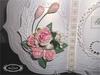
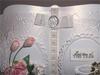
My First Book Card
by Jen (Jennifer Swandells)
(Renfrew, Scotland)


|

|

|

|
I visited the SECC Christmas Craft Fair yesterday and two of my purchases were a Spellbinders Labels Four die, a Card Stand die, so that I would be able to make my card stand up properly.
I purchased these items as I wanted to make the book card made with the SPELLBINDERS FOUR DIE.
As this was the first time that I tried this card out, I thought I would just go with white to see how it turned out. I must admit, I was rather pleased with myself.
I created a small corsage for this side of the card and introduced a bit of colour with the pink tulips and roses, again Christina sells these on her own site, however, you could try making your own as I did.
Not perfect but passable for my first try at doing a corsage.
Embossed sentiment 'Best Time of the Year', due to the flash and angle that I was trying to take the picture at, it didn't come out exactly as I would have hoped.
Down the centre of the card I used white seam binding and over the top I used a beautiful embellished ribbon of pearls, I also put a small piece of ribbon on top and a silver dazzler to finish off.
I do hope that you like my card.
Christina says ...
This is a very elegant card and I love the flowers.
You made some good choices with your purchases there and if there is one thing I enjoy it's a bargain at a good craft show.
If you would like to make this card as Jen has done and you don't have the dies then you can find the Book pages and the Corsages for sale in "My Shop" in the NavBar to your left.
Click here to read or post comments
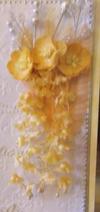
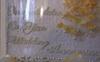
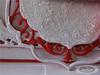
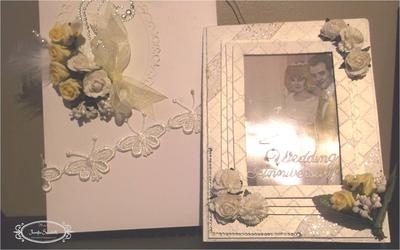
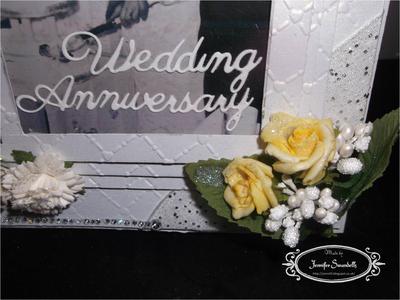
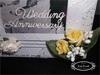
Mum and Dad's Anniversary
by Jen (Jennifer Swandells)
(Renfrew, Scotland)


|


|

|

|
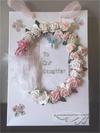
If you follow the tutorial on Christina's blog, you will get the same or similar type of card. I put silver ribbon with flecks of silver on the top left hand and the bottom right hand corner of the card.
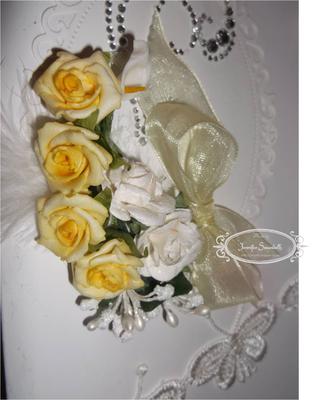
This picture also shows the envelobox that I used for the card. There are roses and carnations used on the card and to put a little colour I used yellow roses as my Mum loves them.
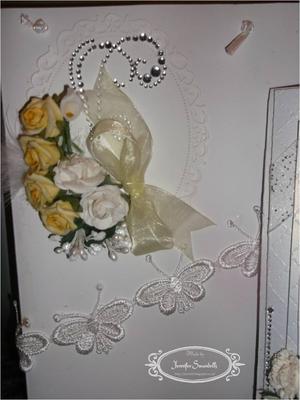
This is a segment of the envelobox that I made for the card and I put a little corsage with yellow and white roses.
Another segment of the envelobox showing the beautiful butterfly ribbon which I got from Wild Orchid Crafts.
There were a few errors made in this card, which will be corrected the next time that I do a framed card, at least I will always learn by my mistakes.
I hope that you like the card I made for my Mum and Dad, I know that they loved it which is the best that I could have asked for.
Christina says ...
This is such a beautiful card and I bet it brings a tear to your mums eyes.
It is special because of all the work that has gone into it and it is made with love which is the most important ingredient.
The yellow roses are gorgeous and I am sure that they will treasure it fro a long time to come
Click here to read or post comments


Recent Articles
-
Memory Book
Oct 15, 22 09:17 AM
 Make a memory book, fun to make and even lovelier to give.
 -
Die cut letters.
Jul 19, 21 10:12 AM
 Add that personal touch with die cut letters, add names or sentiment as you please.
 -
Diaper Fold Card.
Jul 19, 21 09:34 AM
Create this fun Diaper Fold Card...and no need for a pin!
Search
