Trellis Card
by Rinda
(The Netherlands)


Trellis card
Hello I am Rinda, I live in the Netherlands. I have made cards for a long time. I do it with different techniques, like dots (peel off), embroider, 3-D pictures (layers).
For a short time I have used ribbon and bows and flowers. I make them just for myself, I like to make them. I want to send them but I forgot it always so I have a lot of them.
I have made your card trellis. The picture I used is from Yvonne Creations. The size of my card is 14 cm x 14 cm. I do not know the English size.
In the Netherlands we make not the big cards, but I am going to do that next time it is something I have to get used to.
It is an off white thick paper. the background I do not know, just I had it. I used a glue pen and some glitter from mireille, silver.
The flowers I make with paper punches, they are very old. you can see them on my photo. I have put them together like a tutorial from here.
I know there are some mistakes, but for the first card it is not so bad I think?
I spend 2 and a half day to make it. most of the time trying to get the strips on the right place and drying the flowers.
It is a card for friends of my daughter, they are expecting a baby. so I do not know if they will like it, my daughter likes it.
So, a lot to tell. please Christina feel free to correct my English!
I loved to make this card!!
Christina says ...
This is such a pretty card Rinda so well done for your first attempt. The flowers are so pretty and add that little bit extra to any card.
The bird looks really cute and the beauty of this size card is that it fits into a standard envelope and won't cost the earth to post.
Click here to read or post comments
Spectrum Noir Card
by Rinda
(The Netherlands)


This card is my result from your Spectrum Noir card on your blog.
The inside card is white, the card is layered with thick purple, and then a little shiny lila (?)thin paper, a circle thin green paper.
Then the picture is one layer. The picture is from Little Diva's from The Hobby House.
The big flower is from a paper punch, same colour as the purple paper. On the big flower I have put a glitter glue.
The small flower is also a paper punch, the paper is the same green paper as the circle around the picture.
The ribbon is a peel off.
The card size: 21 x 15.5 cms ... it was very nice to make this card.
Christina says ...
Such a cute image and I love the attitude. It would be suitable for any occasion especially any friends that you may have that also have attitude....
Click here to read or post comments
Rinda Gift Envelope
by Rinda
(The Netherlands)

|

|
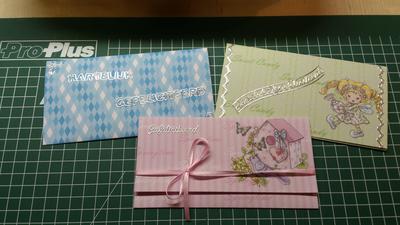
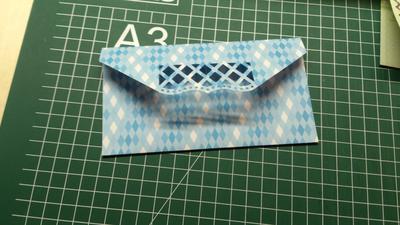
These envelopes I have made with your tutorial on making Gift Envelopes.
It is nice to give them to someone with some money in them. I liked making them, with your good explanation!
The papers I already had and they come from a book with papers. The size for all of them is 15 X 21,5 cms.
I have used a punch from Martha Stewart, a peel off with Happy Birthday in Dutch, and some peel off at the corners.
To close it I have put a ribbon. A peel off saying Happy Birthday complete the card.
The green one is folded at 8 cm and 16 cm. at the side I have put some peel off. and a peel off Happy Birthday.
It takes me just an hour, quick (?) but nice to do!
I think it is nice to put money in and for the person who gets it, it is a better way than just money.
Christina says ...
These are such a pretty way to give the gift of money when you are stuck for what to buy someone for any occasion.
They are very easy to do and can be personalised in any way you wish. Rinda has made them different by adding some ribbon to one and a little image to another
If you wanted to make some of these for your gifts then you will find the tutorial in the Easy Projects section in the NavBar to your left ... just look for Gift Envelope for full instructions
Click here to read or post comments
Tri-fold card
by Rinda
(The Netherlands)

This card I made from the tutorial Tri-fold cards on this bwebsite. It was very nice to make, I must say I am proud of the result!
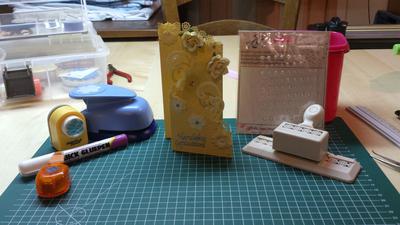
I started with a yellow thick paper from Bazzil and I fold it like your tutorial. On top I have punched with Martha Stewart punch flowers.
With different old flowers in different sizes I have punched the flowers. The big roses are from a store in the Netherlands.
The flowers left on top and right are from Wild Orchid Crafts. yes yes I have bought their flowers, they are very pretty!
I have used my new Cuttlebug, for making the swirls.
I decorated the flowers and the card with peel offs, pearls and some flower layers put together with special pins, metal, and at the back of the flower you split the two legs. I hope you understand what I mean ;).
There is a peel off that says Congratulations.
there is only one problem, the roses are to big for the card to put in an envelope! well, I will give it by hand.
It takes me two days to make it, most drying of the flowers and swirls.
I am waiting for the right occasion to give it. I really do not know what to do with all my cards! :)
I think it has become a very nice card, and the lesson was easy to follow Christina!
Christina says ...
The card is lovely in the sunny shade of yellow and I am sure it will be much loved by whoever is lucky enough to get it.
Click here to read or post comments
Card box by Rinda
by Rinda
(The Netherlands)


|

|
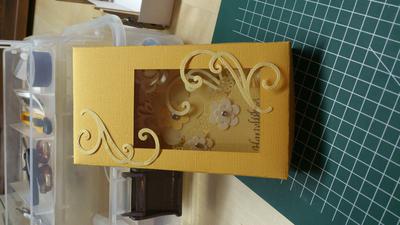
And then, after lots of thinking, I found a card box tutorial on this site!! so I have made one for the yellow card above.
I have used a slightly different yellow, because I did not have the same anymore.
The swirl from the card I have put also on the box and I have done some cutting to make it you can see in the box.
I do not know the name of the thing where you can see inside of the box.
I have done lot of measurements for the box because my card is a different size then Christina's one
Christina says ...
Always a nice idea to create a box that matches your card ... gives it that really special feeling and one that I am sure your recipient will appreciate.
There are tutorials on quite a few different box sizes on the website ... you just need to have a look in the Sitemap that list every page that is available to you.
Then if you click each title it will take you to the page that you require.
Click here to read or post comments
Side Step Card
by Rinda
(The Netherlands)
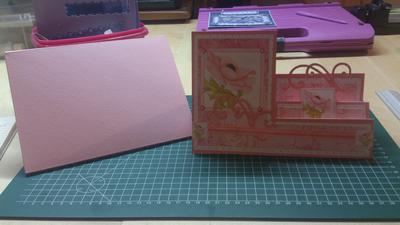

I enjoy making cards from your tutorials so I have made this one, also from a tutorial here.
The paper is Bazzil, a pink color, 21 x 29 cms.
I have fold it like the tutorial.
The paper with dots and the paper with the flower is from Marjoleine, an artist from the Netherlands.
The other paper is from my stack. The swirls I have made with a die.
I have put a ribbon on the card, but it is not so good, there are some folds (?) in it. I do not know how to change that. The pearls are self adhesive and from a shop here.
I have made an envelobox with my new Ultimate Pro to go with the card.
It takes me 2 days to make the card, but it was very nice to do, the card and a boxes with it.
Christina, your tutorial was very good
Christina says...
Stepper cards are just that little bit out of the ordinary and stop you getting bored with just simply folding card in half.
Then how you decorate it can make it look special to suit your recipient.
I am thinking that you mean the ribbon has creases in it when you say folds Rinda.
If you have some old hair straighteners they will make an excellent iron to run down the length of a ribbon ... but make sure that they don't get too hot so as not to damage the ribbon.
Try a little test piece first and be very careful with organza ribbons ans that can shrivel up.
Click here to read or post comments
Double Side Step Card
by Rinda
(The Netherlands)
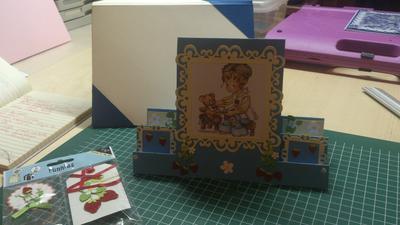

I really like to make this kind of cards! So, another one, and again you can find the tutorial on this website.
The paper is from Bazzil, blue, size 21 x 29 cms. the yellow is from my stack.
The picture is from The Hobby House, not to color but ready to work with.
I have used a die for the yellow squares. The strawberry and flowers are from a tag, you can see it on the picture.
I have take them off the tag and I have put some self adhesive diamante on the card.
It was very good to make this card, it takes me one day and a very clear tutorial as always!
Christina says ...
This is a very pretty card and the image is so cute. The Hobby House is a good website for pre - colored images that can be decoupaged into delightful cards.
They also have a good range of embellishments to ad to your designs that will make them even more special.
If you would like to try some of these Stepper cards that Rinda has mad then you will find the instructions in the Sitemap to your left
Every page on the website is listed there so take your time and browse through it to see what it is you want to do... then click the link to go to that particular page
Click here to read or post comments
Easy Stepper Card
by Rinda
(The Netherlands)
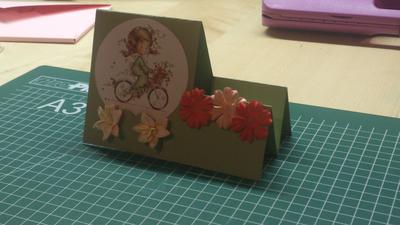

This one is also from a tutorial on this site.
The paper is green cardstock from Bazzil, 21 x 15 cms. I have fold it like the tutorial.
The flowers under the picture are from a shop from here in the Netherlands, on the side are from wild orchid crafts.
The picture is from The Hobby House, not a picture to color but a ready picture.
It take me an hour to make it I think. It was very nice to do, and a clear tutorial from you Christina!
Christina says ...
Pretty card and the tutorial is very easy to follow so anyone new to cardmaking can follow along and create a card that is a little different.
There are many tutorials on the website ... both in written format and videos that will take you step by step to get the look you want and you will find every page on the website in the Sitemap in the NavBar to your left
Take your time and browse around
Click here to read or post comments


Recent Articles
-
Memory Book
Oct 15, 22 09:17 AM
 Make a memory book, fun to make and even lovelier to give.
 -
Die cut letters.
Jul 19, 21 10:12 AM
 Add that personal touch with die cut letters, add names or sentiment as you please.
 -
Diaper Fold Card.
Jul 19, 21 09:34 AM
Create this fun Diaper Fold Card...and no need for a pin!
Search
