Cupcake fairy
by Judy
(Alberta, Canada)


Cupcake spring fold card
I made this card following Christina's video (spring fold card) and used the sizes quoted in the video. I'm very pleased the way it turned out.
Recipe:
Bazzel yellow cardstock for base
Stamp - Lilli of the Valley " Never Too Old for Cupcake" coloured in with Promarkers
Background paper was a freebee from a UK cardmaking magazine
Spellbinders Netabilities Petite Scalloped circles (LG)
Stickles glitter glue
Roses by Prima Flowers, Michael's mini rosettes ribbon flowers in yellow.
Christina says ...
Thank you so much for sending in this card and it really makes me feel happy to know that I have helped you with the design and that you are happy with it too.
Lili of the Valley have some gorgeous stamps and this one is really cute and those flowers make it special.
Click here to read or post comments
Easter Bunny Diamond card
by Judy
(Alberta, Canada)


Easter Bunny
I saw this card and watched Christina's video and decided to try it.
I followed Christina's instructions and the folding was easy! The Easter paper I used was free with a UK cardmaking magazine, as was the rabbit stamp.
Bazzill card stock was used for the base. I used Spellbinders Nestabilities "Splendid Circles" in yellow cardstock and coloured the rabbit using Promarkers.
Christina says ...
I always think that this card looks more difficult than it is and many people are surprised once they try it.
It is one of those that get your recipient guessing as to how you did it ... and the secret is ... don't tell 'em, keep them guessing.
It can be dressed up for any occasion and will look good whatever you add to it.
If you would like to try this card for your self then you will find the tutorial Diamond Top Card in the NavBar to your left.
And are those Spectrum Noir pens I can see in the background ????
There is a "Give Away" to win the full six pen sets on the blog at present until the 19th March.
Pop over to Flowers Ribbons and Pearls for your chance to win them ... the link to the Blog is in the column to your right.
Click here to read or post comments
Dress Form Card
by Judy
(Alberta, Canada)


Dress Form Card
Well, Christina, here is the infamous (!) card at last.
When I first made the dress form, it was too big and I emailed Christina asking what size she used.
We had a Doh! moment (she said use a smaller dye). Now why didn't I think of that!
Anyway, I followed Christina's excellent video. I used plain white cardstock for the base and then added a panel of pink polka dot paper (freebee from a card making magazine - don't you just love those?)
I added another matt of cream card, two pink feathers from Michael's, and a flower mat cut from a Cricut cartridge and used Tim Holtz distress ink in Spun Sugar to colour it.
I embossed the dress form with a Cuttlebug dye and used the same distressing ink to highlight it. I added flowers and pearls from Michaels, and here it is!! Hope you like it.
Christina says ...
Once you got over the "Doh" moment Judy you came up with a stunner. This is just gorgeous and I love the colour.
It is such a lovely card to send to any of your female friends and they are sure to love it.
And it is much easier to make than you think. All the instructions are in a video format for you to follow and you will find the Dress Form Card in the Tutorials in the
Click here to read or post comments
Mini Book Card
by Judy
(Alberta, Canada)


Mini book card
I wanted to make the book card from Christina's Spellbinders video but I don't have the Labels 4 dies. So I though "I wonder..."
I used the three largest dies from Labels Eight and the third smallest die from Floral Ovals.
I cut a faux nestie in yellow cardstock for the back cover and then used different cardstock in yellows from my stash.
I followed Christina's instructions, but used double sided tape instead of wet glue. I cut one floral oval from mirror card in copper and one from the same cardstock as the faux nestie.
I used sticky pads to add them to the front page. Then I added ribbon roses to the right side plus some yellow pearls. What do you think?
Christina says ...
This is excellent Judy and just what I am always pleased about ... if you like the idea then take it and change it to suit what you have.
Making the most of the dies that you already have in your own "stash" is perfect for getting your monies worth from each one.
And there are many of the sets that can be adapted to create the book card as Judy has shown here.
This is just gorgeous and well done to you for thinking outside the ox with the dies you have.
Click here to read or post comments
Easter Puppy
by Judy
(Alberta, Canada)
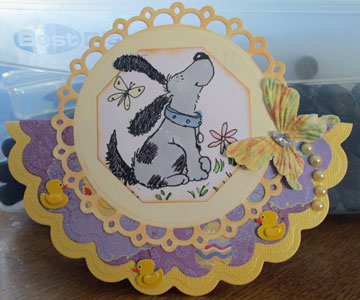

I made this card for a friend at work. I'm very pleased with the way it turned out!
I cut the base with Spellbinders Grand Nestabilities Scalloped circles with yellow Bazzil card stock, then cut a smaller scalloped circle with paper from Karen Foster Designs.
I folded both in half and glued the smaller circle on top of the yellow. I then cut a picot edge circle from Spellbinders in the base yellow. I coloured the edge with Dried Marigold, Tim Holtz distressing ink.
I used a Margaret Sherry Cut-out (dog) which was a freebie with Cardmaking and Papercraft magazine, February 2012 issue and coloured it in with Promarkers.
I cut it out with Spellbinder Small Octagon and glued it to the Picot edge circle. The chicks are from Jolee's boutique and the butterfly was from a pack I bought from Michael's.
Hope you like it!!!
Christina says ...
This is such a pretty card and in lovely spring colours that your friend can't help but be delighted with it.
If you would like to make a card this shape as Judy has done then you will find the video for the Rocking Card Tutorial in the NavBar to your left.
It is very easy to make but as you can see from this beautiful example how effective it can look.
Click here to read or post comments
Lattice card
by Judy
(Alberta, Canada)
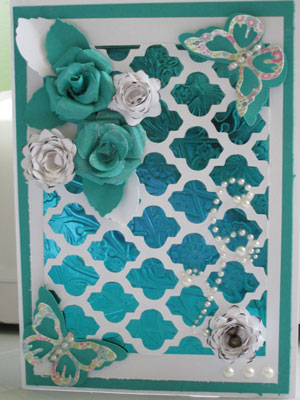

Having recently been laid off from my job, two things have happened - More time to make cards (!) and the loss of an income. Time to use my stash!!
I have a Cricut Expression 2 and decided to have a look see if I had any cuts that were similar to the Spellbinders I can no longer justify buying.
I found the lattice one on a cartridge called Paper Lace and the flower cuts on Flower Shop. I embossed a sheet of Reflections foil paper with Spellbinders "butterfly" Impressabilities, cut the lattice from white cardstock.
I layered this onto some turquoise cardstock and then onto a plain white card. The butterflies were also from a Cricut cartridge - as were the roses and leaves. The pearl swirl was from Michaels. Hope you like it!!
Christina says ...
I do like it ... very much. The lattice looks so effective with the turquoise back drop and the whole effect is very pretty.
There are many ways to get the look of the lattice and if like Judy you need to save some pennies then please take a look at the trellis Card Tutorial in the Video Tutorials to your left.
To create that card you don't need Spellbinders or any thing other than a sharp craft knife or some scissors.
Click here to read or post comments
Country Doorway
by Judy Rose
(Alberta, Canada)


Country Cottage Door
I recently got a stamp set from Art Impressions called English Countryside and decided to use the doorway stamp along with the flower tub.
After colouring them in with Promarkers Aqua pens, using a brush dipped in water to imitate a watercolour, I felt it needed "something".
I have a Cricut cutting machine and, using their Spring Cottage cartridge, "stretched" their gateway and fence image and cut it out in grey cardstock. I added the gateway using sticky foam pads. The gate opens, so you can see the doorway.
I then added Jolee lilac stickers and Michael's ribbon mini rosettes to decorate the gateway, and added some bling at the top with flower pearls.
The background papers were from my stash.
Christina says ...
This is s a very pretty card and there are many cottage doorways in England dressed just like this in Summer with the flowers around the edge.
The card is well laid out and the colours are soft and it would be ideal for any occasion.
Click here to read or post comments
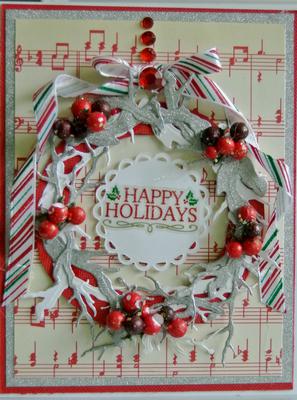
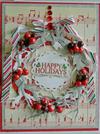
Christmas Wreath card (my version of Christina's)
by Judy Rose
(Alberta, Canada)

|

|
I loved the card Christina posted today on her Blog ... Flowers, Ribbons and Pearls and so I decided to make my own version.
I used printed music paper instead of embossing, and used fine glitter paper and red cardstock. I used striped ribbon and berries instead of holly.
I used what I had in my stash!
Inside, I lined the card with red cardstock and used a glitter branch I had left over from the wreath. I also added a Spellbinders circle to add greetings.
Hope you like it, Christina!!
Christina says ...
I DO like it and it is so pretty. It is really nice to see what other people come up with as they interpret the ideas that I share both here on Card Making Magic and on the daily blog that I do on Flowers, Ribbons and Pearls.
We all change things around and put our own spin on the idea and come up with something that is totally different.
I really like the music sheet that you have used instead of the embossing and that has to be the sign of a true crafter ... using what one has already got in that ever growing "Stash"
A girl after my own heart ... lovely
Click here to read or post comments
Hinged Filigree Christmas Card
by Judy Rose
(Alberta, Canada)

Merry Teddy Christmas


|


|
I loved the hinged filigree cards Christina had made, and as I had one more Christmas card to make.....! This one is for my doctor and his wife (hence the stamp inside).
I used the largest Spellbinders Timeless Triangles to make the card and layered the inside with Merry Christmas paper from BoBunny.
On the outside I used Holly paper also by BoBunny, rounding the corners. On to this I used Spellbinders decorative labels 28 and cut the 2nd smallest size in red shiny cardstock and one in plain red for the inside.
I used the second smallest dye from Timeless Triangles cut in white and stamped a PSX stamp (D-2360) and coloured it with Spectrum Noir, and matted it onto the shiny red using foam tape.
On the inside, I placed the plain red Spellbinder and stamped using Doctor's Orders by My sentiments Exactly
This stamp was sent to me by my sister who lives in England! The Merry Christmas sentiment on the front is a sticker from my stash. I'm very happy with the outcome!
Christina says ...
Making cards in the hinged style is such a lovely way to make them and is one I use time and time again.
And using the filigree dies that you may have in your collection takes them to another level.
This is such a pretty use of that idea and I am sure your doctor will be thrilled with his card.
The tutorials for both styles of card are in the Video section in the NavBar to your left and the you to will be able to make cards as pretty as the one Judy Rose has made here.
Click here to read or post comments
Acetate Rose Card
by Judy Rose
(Alberta, Canada)
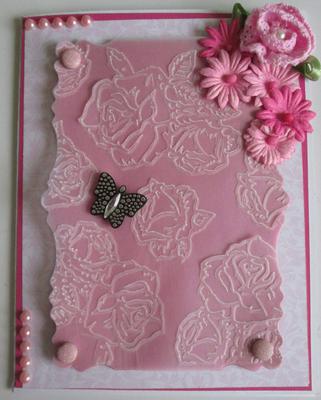

I loved the card Christina made using embossed parchment paper and wanted to try it.
Unfortunately the parchment paper here is too opaque, the colour did not show through. So I tried acetate, not the really clear, but it worked!
The cardstock I used is from my stash, and the rose embossing folder is from Goosebumps, Courtyard.
The flowers and silver butterfly are from Reflections. I do think it needs just a little "something" more, what do you think?
Christina says ...
I am sure that everybody will agree with me when I say it is a lovely card as it is. The color is a very pretty shade of pink and your flowers finish the corner off to perfection.
Once you have added your sentiment it will be someones delight to receive it and keep it as a treasure for a long time.
Click here to read or post comments


Recent Articles
-
Memory Book
Oct 15, 22 09:17 AM
 Make a memory book, fun to make and even lovelier to give.
 -
Die cut letters.
Jul 19, 21 10:12 AM
 Add that personal touch with die cut letters, add names or sentiment as you please.
 -
Diaper Fold Card.
Jul 19, 21 09:34 AM
Create this fun Diaper Fold Card...and no need for a pin!
Search
