Christmas Card
by Chris Wilson
( Carindale Brisbane Australia)


Christimas Card
This is a Christmas card I made.
The flowers are from Christinas' video Poinsettia flowers.
I used a red ribbon with white stitching on it and cut two ovals from Spellbinders, one red and one white, as a background for the sign "Merry Christmas"
The background paper was from pdp_2peas_ornamentalframe
Hope you like it.
Christina says ...
The Poinsettia flowers look really good on this card and they are very easy to make. You will find the instructions in the Tutorials section in the NavBar to your left.
They can be made in red or white and very easily adapted to pastel colours to be added to your summer cards too.
Just play and experiment with them and see what you come up with. Flowers are always a wonderful addition to all your girly creations.
Click here to read or post comments
Faux Book Birthday Card for Helen
by Chris Wilson
( Carindale Brisbane Australia)


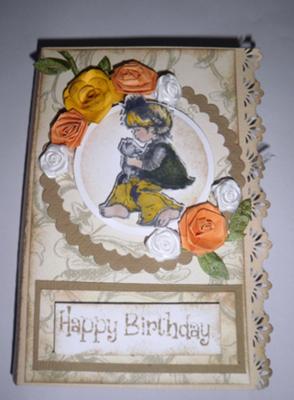
Faux Book Card
I was really impressed by Christina's Faux Book Birthday card, the directions were just great.
Here is the version that I have made to give to my girlfriend for her birthday in Dec.
The purple background is from a freebie rainbow spots (basic spots purple) and some foil card for the binder and peel offs for the pages. (not very straight)
I made the roses from Christinas video making Paper Roses. I used a small flower punch which I had in my stash, however the roses are fiddly to make so small, but as I make quarter cards most of the time I need the roses to be quite small.
The bookworm was from a clipart off the net and the text was done using my pse.6 program.
I have just started making handmade cards again after several years of making scrapbooks for my Children and grandchildren.
I really appreciate all the help and inspiration from Christina's website, and am truly enjoying the experience again.
Christina ssys ...
The Faux Book Card is a really easy fun projects to try, and it can be as intricate as you want to make it.
You will find that and many more in the
I hope you will give as many of them a go as you can and don't forget to add your photos to the Gallery Page
Click here to read or post comments
Tea light Card
by Chris Wilson
(Carindale Brisbane Australia)


|

|
This T light card was copied from the video from StampArtic's website. I also used spellbinders dies and patterned paper from my stash.
The flowers for the card was made following Christinas video on Making Roses.
Both this and the Trellis Card are A6 size using A4 card cut in half.
The little pearls on my 2nd card (Trellis Card) were coloured using a technique which Christina advised me of via e-mail by using my Bic Markers to colour the pearls to match my colour scheme (thanks again Christina for this advice.)
I think it is brilliant now I can match any colour scheme.
Christina says ...
This is an ideal project to try if you are short of a small gift to give to someone and time is short.
The candles I used are from Ikea and are not expensive. They come in lots of different colours and there are lots in a pack, which makes them really economical to give in this way.
The roses on the front are lovely and make the gift extra special and I am sure they were well received by your recipient.
You will find a video on this project if you would like to have go in the Video Tutorials and see the reaction when you give this gift.
Trellis Card
by Chris Wilson
(Carindale Brisbane Australia)

The Trellis card is from Christina's video, I made it this morning it took me approximately one and half hours to make (mainly because the roses had been pre made)
I really enjoyed making this card and will give it to a very dear friend of mine who's birthday is next month.
The little pearls on this card were coloured using a technique which Christina advised me of via e-mail by using my Bic Markers to colour the pearls to match my colour scheme (thanks again Christina for this advice.)
I think it is brilliant now I can match any colour scheme.
Christina says ...
The Trellis Card is really one very special card and is easy to make even if it looks complicated.
It is sure to give the recipient pleasure and they will know that you made it especially for them.
I also like the colour way you have decided to use and it is very fresh and bright and the Roses are gorgeous. Glad you liked the little tip for colouring the pearls.
Chris could only get pink or blue pearls in her part of the world and they wouldn't match her colour scheme.
Her question was how she could make them fit what she wanted. So if you have the same problem BUT you have marker pens then they will give you the effect you want without any fuss at all.
If you would like to make this lovely card then you will find the instructions in the NavBar to your left and there is a video for those who prefer to watch in the Tutorials
Click here to read or post comments
Pink Lattice, Red Fancy, and Yellow Flower
by Chris Wilson
(Carindale Brisbane Australia)

pink lattice card


|


|


|
Here are three of my latest cards. The pink lattice card was made for a very dear couple of friends who are celebrating there 60th wedding anniversary in August.
I used a Spellbinders die (Labels 5) to cut the shape. A Gina K stamp for the centiment and followed Christinas video to make the roses and a daisy punch for the pink and white flower, Spellbinders Folliage die was used for the leaves.
The Red fancy card base I bought from the craft show in Sydney, it was called Fancy Cut Out Card.
I backed it with red card stock from my stash and added Spellbinders Folliage die for the leaves in red and white card stock and of course Christinas' roses were made using two retro punches. I finished it off by adding pearls inside each scalloped edge.
My yellow flower card I used stripey backing paper (a freebie) then I applied a white strip of card stock across the middle which I embossed using a Cuttlebug folder with little flowers on it.
I then cut two strips of gold foil and used a Fiskars punch to place on the top and bottom of the strip and attached a gold edged white ribbon to these.
The flower was made using a Cottage Cutz Die (flower,Layered) which was edged with Distress Ink (Mustard Seed).
Not sure who will receive these cards I just love making them.
Hope you like them
Chris
Christina says ...
What a beautiful collection of cards and I am sure that whoever receives them will be thrilled with the result.
Spellbinders are amazing dies that come in many different shapes and sizes and they make all your designs look truly wonderful.
If you are new to them but you want to start collecting them to make cards as lovely as Chris then take a look at the Spellbinder Series of videos in the Tutorials section in the NavBar to the left.
You will find some useful information to help you choose which dies to buy first to give you a good start from the very base card to the toppers that you need for a focal point.
And then you can move on to some of the shapes and designs that you will be abale to achieve with your new purchases.
If you already have some Spellbinders then use what you have and look at them in a different way to make them work for you.
Click here to read or post comments
Four New Cards Pink, Red, Yellow and Brown and Cream
by Chris Wilson
(Carindale Brisbane QLD)

Pretty in Pink


|


|


|


|
These are just a few more cards I have made to add to my collection.
Pretty in Pink
Pretty in Pink is made from A4 pink cardstock cut in half. I have added a pink and white stripped background then a strip of pink card across the middle.
I cut an oval in pink using Spellbinders die and white oval from a die in my stash... not sure who the maker of this one is as I have had it for years.
I used a Fiskars border punch in white and attached it to the bottom of the pink strip.
The flowers were made using a daisy punch then I added a self adhesive pearl in the centre.
Stunning Red
This red and white card I made following one of Christinas videos using Spellbinders dies from my stash, as I don't have the dies that Christina recommends as a starter set.
The roses I made following another of Christinas fabulous videos and I think they are just stunning in the red cardstock on the white background.
This card is also A4 size cut in half and I used a Fiskars border punch for the lacey border. The greeting was from a stamp purchased from Gina K designs and the ink was red Momento Dew Drop.
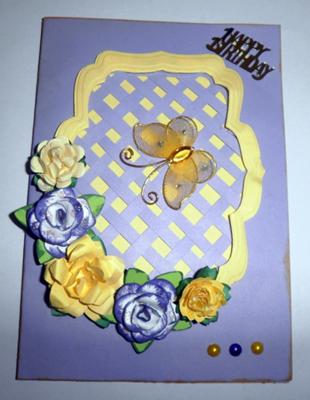
Yellow Butterfly
This card I made from a serviette which was given to me by a friend.
I placed white cardstock on my ironing board then a piece of gladwrap and put my serviette on top.
I then placed some paper over the top and gently ironed over it all with a dry hot iron for a few seconds.
And then hey presto, the serviette adhered to the card stock which I then decorated with yellow leaves and flowers made with a small flower punch (punch Bunch)
I edged the petals with Momento Dew drop yellow ink.
Cream and Brown
This was my first attempt at Christinas Spellbinders video using my new Parisian Motifs die.
I made this using Brown A4 cardstock and embossed the inside using an embossing folder and my Cuttlebug machine.
I used a fiskars border punch on cream card for the border and decorated it with roses {made with a retro punch) and leaves using both cream and brown cardstock.
I also finished off by adding Kindy Glitz to the flowers to add sparkle.
Christina says ...
What a stunning collection of cards. Each and every one of them is very special and my favotire one is the first in pink.
I would be delighted to get one of those for any occasion.
I am so happy that you are using many of the techniques and ideas that are on the website ... and adding in your own special blend of magic to get the look that you want.
I have just added a new Spellbinder video to the Turoaisl and it uses the Ovals that are such a useful addition to any collection of these fabulous dies.
The video creates frames to surround your focal point.
Click here to read or post comments


Recent Articles
-
Memory Book
Oct 15, 22 09:17 AM
 Make a memory book, fun to make and even lovelier to give.
 -
Die cut letters.
Jul 19, 21 10:12 AM
 Add that personal touch with die cut letters, add names or sentiment as you please.
 -
Diaper Fold Card.
Jul 19, 21 09:34 AM
Create this fun Diaper Fold Card...and no need for a pin!
Search
