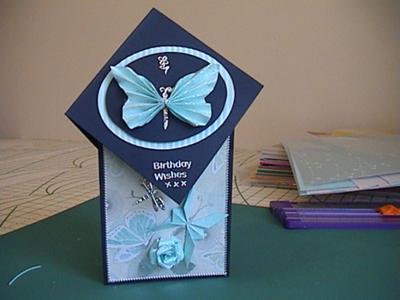
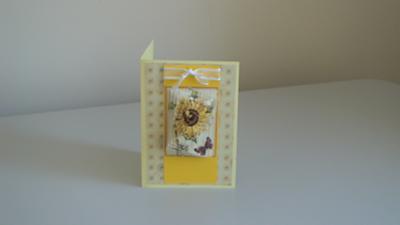
Stamped Butterflies
by Lindsay
(Perth Western Australia)

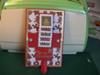
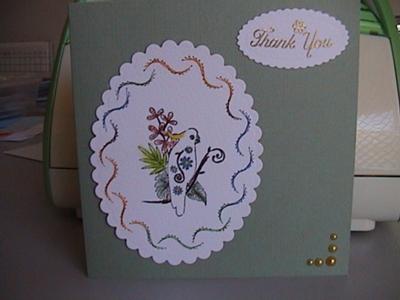
Pink Butterfly card


|


|


|


|
These 2 Butterflies have been made in exactly the same way and that is: stamped with Stazon onto Water colour paper, painted with Tom Bow (I think the same as Promarkers) and then scored every 1.2cm. and then "Faux tiled" (see Christina's video). I then cut the shape with my Nestabilities.
The pink card is a Squash Fold. I have used a printed card 21cm x 21cms and on the wrong side (or non printed side) folded in half turned and folded in half again forming 2 mountain folds on the printed side of the card. So now you have 4 squares. I then put the printed side up and scored from the top corner through to the bottom corner, these are valley folds and when folded in makes a 10.5cm square. I cut a piece of ribbon 21cm long and place it under my topper. The sentiment is inside and I have made both of my cards a 'Thank You' card.
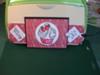
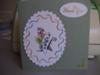
The yellow card is a straight forward card measuring 15cm x4.5cm. It is on white card stock layered with patterned paper and a ribbon added. The sentiment is a Nesties die cut label with a 'Thank you' sticker.
The next pink card is also 15cm x 4.5cm but in pink card stock and layered with pink patterened paper. The ribbon is from Christina's tutorial. The topper is stamped and painted but not Faux tiled. They are for my daughter to give away.
I am not sure how long they took me to make but are fairly quick and simple.
Christina says ...
This wonderful collection of cards show many of the techniques that can be found in the Easy Projects section in the NavBar to your left.
They can give you some of the loveliest effects and make your cards stand out from the crowd.
Many of them are also in video format and can be found in the Tutorials
None of them are difficult to do but you too can get the same wonderful results as Lindsay has with her beautiful cards.
Click here to read or post comments
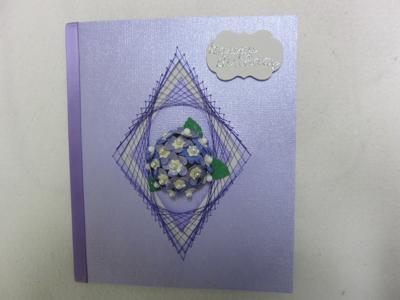
2 More stitched Xmas cards
by Lindsay
(Perth, Western Australia)


|


|
Thanks to Edith I was able to do these stitched cards. The candles I added are beads.
Christina says ...
Embroidering on card is lovely and the results can be amazing.
This is a technique that we used to call Spirelli when I was at school and we made all kinds of images from the thread.
Maybe it is still called the same thing, but I haven't done this for years and probably very rusty at it now.
It takes patience and practise to get a good result as Lndsay has done here and I would be more than happy to get a card like this for any occasion.
The use of the beads to create the candle is great and a good way to use up any that are left over from another project.
It is very kind of Edith to send you some patterns and you have put them to excellent use Lindsay.
Click here to read or post comments
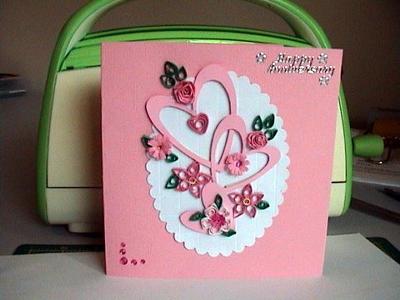
A birthday card for my friend.
by Lindsay
(Perth Western Australia)

This card I gave to my friend for her birthday. She was absolutely thrilled with it. The stitching technique I got from a magazine called Stamping & Papercraft.
The flower in the center is 1/2 a styrofoam ball, painted with punched flowers pinned on to it.
I think it is very effective. The magazine shows a decoupage flower in the middle which is also very effective. I think I may have submitted a pink one before.
Christina says ...
What a very pretty card and the stitching is lovely. Who wouldn't be pleased to receive a card like this.
I remember learning how to do this kind of stitching when I was younger and used it on all kinds of things.
The patterns that could be created where endless and the results very pleasing. It may be something I need to re-visit.
Click here to read or post comments
Stitched card for my Daughter-in-law
by Lindsay
(Perth, Western Australia)


I stitched on a Die cut card and then traced around the outside of the scalloped die cut to give a small border. I did the same with the sentiment.
Thanks Edith
Christina says ...
Stitching on cards is becoming more and more popular and on this website particularly so because of the beautiful work that Edith submits.
The "Thanks" to Edith is in reference to the patterns that she has very kindly sent to Lindsay and Lindsay has then interpreted it in her own wonderful style.
I just love the way it is finished and I am happy that more and more crafters are willing to share their own knowledge with others and help wherever and whenever they can.
My thanks go to both you ladies for the support you continue to give to me and the website.
Click here to read or post comments
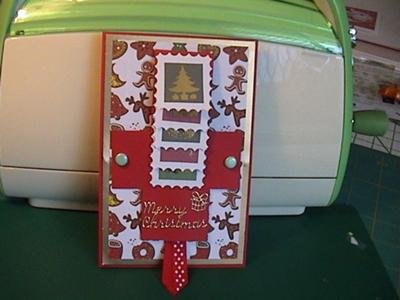
2 Xmas cards & 1 birthday card.
by Lindsay
(Perth, Western Australia)


|

|

|
For the first Xmas card I tried quilling a pointsettia and added a stitched border.
The second card is a waterfall card. The images on waterfall part are cut from a sheet of paper and stuck onto some small die cut shapes.
The birthday card is a push pull card. The topper is using a diecut circle and I stamped and painted the cup cake.
The theme of the card is black, red and white.
Christina says ...
Christmas comes but once a year ....but it seems to last for months on end these days, and if you make lots of cards then the earlier you start the better.
Lindsay has made a good start on hers already and these are going to take pride of place on someones mantleshelf.
The quilled Poinsettia is beautiful and always a popular addition to cards for the festive season.
You can also get the flower in white and that looks really elegant too.
You will find more ideas for Christmas cards in the Ideas section in the NavBar to your left.
Try different colours and ring the changes. The traditional red and green is lovely but for another look try pastel colours and see how that looks.
Add lots of sparkle to your cards with glitter and gems, and the addition of ribbons will finish off the look to perfection.
Click here to read or post comments
A few more cards.
by Lindsay
(Perth Western Australia)


|


|


|


|
The Black, Red and White card is called a Gap Card, the TB card was inspiration from Christina's video (Double Tag Card)
The IF one are all my challenges at COC for October.
The fourth one is stitched with a Hydrangea flower made from punched flowers and pinned on 1/2 a styrofoam ball. Fun to make.
Christina says ...
Another wonderful collection of cards show casing Lindsays' talents.
I am glad you found inspiration in the
It is very easy to make and the instructions are in the Video Tutorial in the NavBar to your left.
I love the fourth card and the flowers attached to the polystyrene ball. It really makes for an unusual look.
Click here to read or post comments
Tealight card
by Lindsay
(Perth Western Australia)


Christina you have been busy. On getting back from our holiday I found your instructions for the Tealight Card and couldn't resist making it. It is pretty much a copy of yours but it is my first one.
We have been invited out for dinner on Friday evening so I thought this card would do very nicely.
Christina says ...
The Tealight Candle Card is such a pretty project to try and the results are lovely.
Your interpretation of it is excellent Lindsay and I love the Quilled flowers you have added too.
And what a really nice way to say thank you to someone for their dinner party. I bet they invite you again soon.
It is well worth making a few of these as they make a special kind of gift.
And with Christimas coming up soon you could always keep some in stock for that unexpected gift that lands in your lap.
If you don't want to add tealights to the box then add some thin taper candles, or as I have done on one of the cards .....chocolates!! Mmmmm!!
Bath cubes are another idea and I am sure you can come up with lots more once you start making these easy little gifts.
Click here to read or post comments
Teabag medallion - August challenge for COC
by Lindsay
(Perth Western Australia)

The challenge is a plain paper tea bag fold. This one is an octagonal fold. I used my cuttlebug to cut out the octagon.
I made a lattice card with vellum insert, and made some flowers from the same paper as the medallion.
The sentiment will be added when needed.
Christina says ...
No matter what the occasion this
The lattice work looks really intricate... but it isn't hard to do.
This card by Lindsay is lovely and the technique is shown off to it's best. The addition of the peel offs accentuates it even more.
You will find a video on how to make this Trellis Card in the Tutorialssection in the NavBar to your left.
But if you prefer to read them then look at Make A Trellis Card in the More Projects
Click here to read or post comments
Stitched Alphabet 'E'
by Lindsay
(Perth, Western Australia)
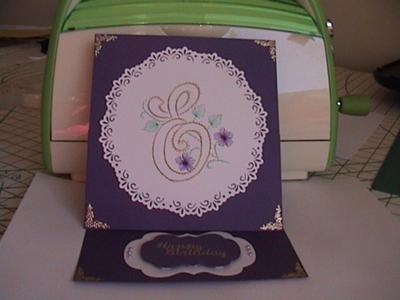

Thanks to Edith I was able to do this birthday card for my friend.
I used a Fiskars doily punch, die cut lables for sentiment and a verse and Christina's video for the easel card.
Christina says ...
A beautiful card is always a pleasure to recieve and one that is personalised with somenones initial makes it even more special.
There are many patterns available to you and some you can get for free from the internet.
The Easel Card is always effective and is very easy to make. You will find several variations of it on the website.
From twisted to double ones and triples too. But the latest one to be added is the Quad Easel Card and that really has the "Wow" factor.
You will find the instructions to make it in the Easy Projects" section and a video in the Tutorials section in the NavBar to your left.
Click here to read or post comments
Birthday Card for 1 year old
by Lindsay
(Perth, Western Australia)
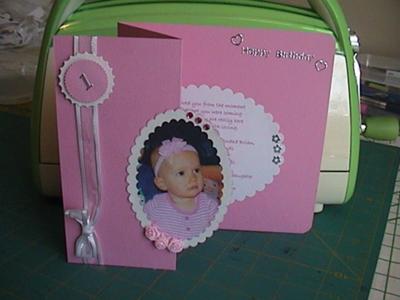

I was asked to make this card for my friend's great grand daughter who is just turning 1.
She gave me a photo which I copied and then cut out using my cuttlebug. She was thrilled with it.
Christina says ...
Adding photos to your cards always gives them a personal touch.
They can be about anything that the recipient holds dear ...just like this beautiful baby.
It is always a good idea to use a copy of the photo and not the original, that way you won't risk losing it if something goes wrong.
Storing your photos in Picasa is an excellent way to keep them safe, and from that programme you can edit them as you wish.
It is FREE and you can access the download from Software in the NavBar to your left.
Just scroll down to the bottom of the page and click the link to open a new window for
"Free software from Picasa"
Click here to read or post comments
Sweet Pea Decoupage Sympathy Card
by Lindsay
(Perth Western Australia)


Sweet Pea Decoupage
I had no sympathy cards on hand so thought I would make this one.
I used a border punch for the sides, embossed and die cut the oval and then mounted the sweet pea decoupage.
Very easy.
Christina says ...
Sympathy cards are something we don't like to keep a lot of becuase we hope we won't have to send them .....but the need for such a card does come round.
I always feel that it is better to keep the card simple and elegant and Lindsay has done this one to perefection.
A single flower can be just the right touch.
You will find more Sympathy Cards in the Cardmaking Ideas section in the NavBar to your left.
Click here to read or post comments
Iris Fold Anniversary Couple
by Lindsay
(Perth Western Australia)
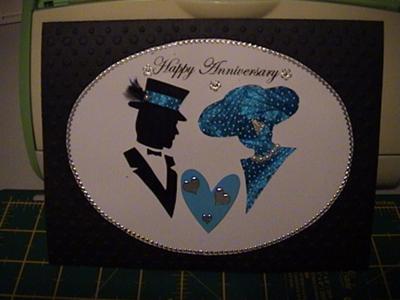

I liked this pattern very much but my first attempt was not too successful.
It was too thick with the paper, so after some advice from Valerie I redid the card using ribbon and it worked very nicely.
I used a rub on sentiment which left black marks which I managed to cover with peeloff flowers and a black feather in the man's hat.
Christina says ...
The use of the ribbon has really made this effect different and it is a technique that can work with many patterns.
It is also a good way to use up odd lengths that you may have left over from another project, as long as they are long enough to finish the job completley.
I love the matching strip in the top hat as it brings the design together beautifully.
I also like the clever way you hid the black mark on the card with the feather in his hat.
Crafters don't make mistakes .... we just have Happy accidents. It is amazing what a peel off or a flower can hide!!
You will find other ways to use ribbons in the NavBar to your left.
And if all you have are white ones then consider dieing them your self to match your colour scheme.
Altering Ribbons in the Techniques section will show you an easy way to do this, and that way you will always have ribbon to match your design.
Click here to read or post comments
Great Dane
by Lindsay
(Perth, Western Australia)
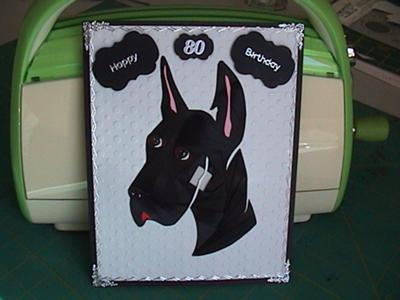

My friend ask me to make an 80th birthday card for a friend who likes big black dogs.
It is an Iris Fold pattern and I used 2 different widths of black satin ribbon.
I paper pieced the mouth, nose, eyes and inside of ears. Mounted on an embossed white card and die cut labels for the sentiment.
Christina says...
Iris folding is always a very pretty result and using fabric instead of paper strips is really giving a opulent look to the card.
The dog pattern is wonderful and very lifelike, and just the thing for a pet lover.
Just make sure that the tape, or glue, you use to hold the fabric in place is strong.
The last thing you want is for the whole lot to come unravelled as you are giving it to your recipient.
Click here to read or post comments
Tea Bag with Stitching
by Lindsay
(Perth Western Australia)

This card I made for a challenge at WOC. I framed the tea bag with stitching.
Christina says ...
Teabag folding is something that has been around for many years and is becoming popular in the card making arena.
There are many different ways to make folds and each one will give a different effect.
Two of the folds are in the in the Video Tutorial section in the NavBar to your left.
One will show you how to create a flower and the other a beautiful butterfly to adorn your cards. Both are easy to do.
The stitching can also alter the look of a card and can be achieved either with a machine or by hand.
Embroidery is a technique that can be applied for any occasion and you will find more ideas from Edith in the Gallery
If you aren't confident with stitching though then give Faux Stitching a try and there are some ideas in the Technique section.
Click here to read or post comments
Iris Fold Parrot
by Lindsay
(Perth Western Australia)

This card I made for a challenge in COC. I stamped the leaves on the white card and used a half butterfly punch.
I will add the sentiment when needed.
Christina says ...
There are so many patterns that can be used for Iris Folding that you never need to be stuck for an idea.
Many of them you can find for FREE on the internet and after a little practise you can come up with some stunning creations.
They can be used for any occasion, and the additon of other items from your "Stash" can make them stand out from the crowd.
Lindsay and Valerie Anne make it look so easy, but I am sure that you can get good results if you give it a try.
Take a look at their contributions in the Gallery for more inspiration and then send in your own designs to show us what you have done.
Click here to read or post comments
Lady in Blue
by Lindsay
(Perth Western Australia)
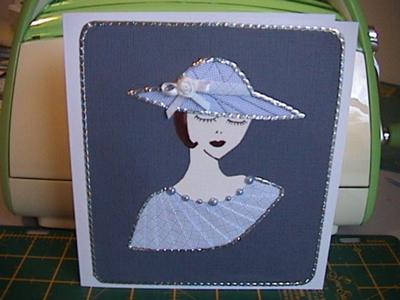

I made this card for this months IF challenge at WOC.
It is made from the inside of envelopes I added pearls at the neck, a bow on the hat and peel offs border.
Christina says ...
An unusual way to use up old envelopes and a very effective card that would suit a number of occasions.
Another wonderful Iris folded card.
Crafters never throw anything away and this of course is how your "Stash" gets bigger and bigger.
But putting things together in a different way can give you some of the coolest cards.
For more ideas on Recycling take a look in that section in the NavBar to your left.
All kinds of things can be re-used ... you just need to think outside the box.
Click here to read or post comments
A few new cards
by Lindsay
(Perth)

Just for you..... Tea Bag Medallion


|


|


|


|
I have entered the first card into a competition this month. The teabag was the challenge.
Needed a get well card for a friend and made the second card
Bought a decoupage sheet for weddings and decided to try some stitching in the corners to brighten it up a bit.
Just loved the look of this Iris folded card and thought I would try it.
I enjoy doing Iris Folding.
Christina says ...
This is real mixture of styles here and some very lovely cards. The teabag one is gorgeous Lindsay.
It is always exciting to try new ideas and it keeps cardmaking fresh and interesting. That way you will never get bored with your new hobby.
There are many talented people in the cardmaking arena and they are more than willing to share with you how to make a particular card.
Don't be afaid to try some of the more challenging ones.
The Trellis Card and the Filp Card are some that will keep you going and you will find them in the Projects section.
Then add them to the website, as Lindsay has done, and let the world see your talent.
Click here to read or post comments
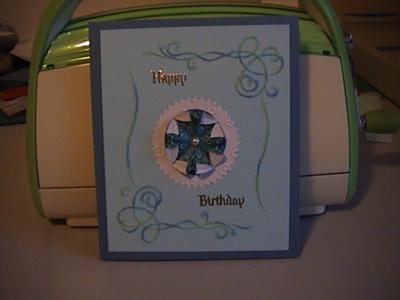
Anniversary Card
by Lindsay
(Perth, Western Australia)

This is a card I have made for a friend. I haven't given it to her yet, even though it was her anniversary last Wednesday.
I was away so made it this morning (got home yesterday afternoon).
I used my new cuttlebug to cut out the hearts, and then did a faux tile background, as shown by Christina on her video.
(Unfortunately it is not showing up well on the photo)
I made some quilled flowers (which I managed to do while I was away).
Christina says ...
The Faux Tile Effect is always much better in real life than it is in a photograph.
And it aleays surprises people when they see it.
It is easy to do and you can do it too. You will find the instructions in the Tutorials section in the NavBar to your left.
That will take you step by step to getting the results that you want and then you can add any thing to the top of it that your heart desires.
Lindsay has made hers very sophisticated for her friend and the colour is lovely. She has a ralent for the gorgeous quileed flowers and she has added them to this card.
It would be a real pleasure to receive a card like this, especially one made with love, from your friend.
Click here to read or post comments
Punched Rose & Quilled daisy Card
by Lindsay
(Perth, Western Australia)


Punched Rose & Quilled Daisy Card
I bought 6 cut out cards from a craft show and was a bit stumped for ideas. But since watching Christina's video on Trellis Cards I came up with the idea for this one.
I inserted a piece of Vellum, unfortunately it doesn't show too well on the photo, and I decorated it with quilled daisies.
I made the roses from the 4 leaf clover punch.
I will most probably use it for a Sympathy Card if the occasion should arise - which is very possible as I am well into my sixties and so are friends.
Christina says...
What a beautiful Trellis Card this is and the flowers are just gorgeous. I am glad you found the video and had a go at this card for your self.
There are lots more tutorials in that section in the NavBar, and all are short and easy to follow so you won't get bored!!
The Quilling is as usual exceptional Lindsay and thank you for sending this photo in to the website.
Click here to read or post comments
2 Side Step Cards, Easel Card & Flower Card
by Lindsay
(Perth, Western Australia)

Fairy & Roses Happy Birthday Step Card


|


|


|


|
The Side Step cards are my first attempt, and I got the instructions off this website.
The "Happy Birthday" one I will keep for my daughter's birthday in May. The flowers on it I learned from a magazine using a 4 leaf clover punch.
The Flower Get Well Card I copied from a magazine as a trial run so is not my original.
Christina says...
The Stepper Card is in Video and can be found in the Tutorials section.
I am glad the you found the instructions useful, as it does produce a really lovely card.
The flowers and the ribbon added can all make the effect much more feminine.
It can be adapted for your male cards, and they are notoriously difficult to make a card for.
There are several other different folds in the tutorials, and they will make your cardmaking more interesting and are sure to delight the recipents.
Your cards are lovely and I am sure your daughter will be delighted with hers.
Click here to read or post comments
Iris Fold Heart, Peel off Dragonflies, Peel off Medallions in 2 colors on Acetate, Japanese Quilting
by Lindsay
(Perth, W Australia)

Iris Folded Heart


|


|


|


|
These cards are Inspired by Valerie's Iris Folding.
The Japanese Kit was given to me for my birthday last year.
No special occasions for any.
I like to keep some without sentiments on so I have a stock for emergencies.
Christina says...
Thank you so much for these beautiful cards.
And what a compliment to Valerie, who has contributed many of her creations to the website.
You are both very talented cardmakers and I love all the cards you send in, so a heartfelt thanks to both of you.
Click here to read or post comments
Various Cards
by Lindsay
(Perth, Australia)


|

|


|
With the first card I cut out pieces of similar shades, stuck them on a card then stitched them on the sewing machine. Then added them to my card.
The second card I stamped and painted the image then did a pin stitching border and cut an oval with my new cuttlebug.
The third one is an Iris Fold Gown. The large flower (from Christina's tutorial) in the corner is made from the same paper as the dress.
Christina says ...
All these cards are beautiful and demonstrate the various techniques that you can achieve for your self.
Cardmaking is so addictive and yet at the same time relaxing and the cards that you make will be something to be proud of.
There are lots of techniques, ideas and folds for you to try on the website and all the pages can be found in the Sitemap in the NavBar to your left.
Try those in the Easy Projects first and then as your confidence grows do some of the others. Don't forget there are other projects in the Papercrafts section too.
It won't be long before you have the confidence to try all kinds of things ... and if you don't like the results first time then try again.
After all it is only a bit of card and paper and practise makes perfect so they say....
Consider also the use of Sketches. This concept is explained on both the website and in the Free Booklet on offer.
Just leave your email address and get your copy.
Click here to read or post comments
Iris Folded Evening Gown, Black & White Diamond Top Card
by Lindsay
(Perth)

Iris Folded Evening Gown


|


|
For the Iris folded Evening gown I used a foil wrapping paper, and I added some pre-made roses and peel off border.
The diamond top card I used a white bodice peel off.
The bottom 2 layers of the flowers I punched from the paper used on the card and the top layer was a bought paper flower pack.
I added a black pearl to the middle.
Christina says...
Iris folding is such a lovely technique and can produce some really stunning effects.
It is acheived by using thin strips of paper and adding them, usually by following a pattern, to produce the shape that you want.
You will find lots of patterns online and a lot of them are for FREE..... yeaaaaa! I love free stuff.
These very feminine cards would be well recieved by most girls and they can be "Blinged" up as much or as little as you want.
Click here to read or post comments
Japanese card with japanese paper, Japanese card with Teabag flower
by Lindsay
(Perth Western Australia)

Gold Japanese Lady


|


|
The Japanese card was made with Japanese paper and a peel off Japanese lady in gold.
The second card was made with a peel off Japanese lady in Silver and a teabag flower was added - sentiment still to be added when needed.
Christina says...
The Oriental theme for cards is always very popular and there are some lovely papers around.
The colours are very rich and a real pleasure to work with.
Take a look online for some downloadable images and add them to your creations.
Click here to read or post comments
Japanese Quilting Card, Quilling Card,
by Lindsay
(Perth)

Quilling Card


|


|


|
A friend introduced me to Japanese Quilting by giving me a pack for a present.
Japanese paper is really lovely to work with.
The Quilling I learnt from "PCA Corner" website and made my first quilling card.
Christina says...
This is a lovely technique Lindsay and thank you for sending the pictures in. Perhaps you would like to tell us more on how you achieved the look.
Click here to read or post comments
Butterfly Teabag Fold Card
by Lindsay
(Perth, Western Australia)

I made this Teabag Fold card to enter into a competition ...( which I won:) It had to have a teabag folded butterfly on it.
I also made one of Christina's roses out of the backing paper and the butterfly on the diamond top is a folded shape - don't remember where I got it. Hope you like it!
Christina says ...
Teabag folding has been around for a long time and there are lots of different folds and each one creates a different look.
The butterfly one is very effective and I will add a tutorial on how to create this in the coming weeks.
The Paper Rose looks wonderful and they have been such a hit on the website. You will find a video on this in the Tutorials
You will find the instructions to make the Diamond Top Card just like Lindsays in the More Projects section to your left.
And although it looks complicated ...it really is quite easy to do.
There are many folds on the wesbite and if you browse through the Sitemap you will see every page listed to help yopu find what you need.
Click here to read or post comments
Iris folding evening gown
by Lindsay
(Perth, Western Australia)


This is the card I have decided to give my swimming friend instead.
The colours are the same, as our group are giving her a new swimming towel, which is navy & turquoise.
Christina says...
Iris folding is as always very popular and the colour combinations of the Evening gown are lovely.
You can make your own thin strips from all kinds of paper and thin card.
Pearl papers produce a shimmery effect that is very pretty on dresses of any kind, using this Iris folding technique.
You can get many templates to try this for yourself and a lot of them are free on the internet.
Iris fold Lamb with Faux Tile background
by Lindsay
(Perth, Western Australia)


Iris fold Lamb with Faux Tile background
I have entered this Iris folded card for a competition this month.
I wanted texture to the image and I used crepe paper for the iris folding. I discovered this was difficult as it stretches.
The background card was a much lighter pink but when I did the Faux Tile effect it made the card a much darker pink which I wasn't too happy with - where did I go wrong?
Christina I love this effect and I want to try the leather look.
Christina says ...
Iris folded cards always look so good to me and I love the effect that can be achieved from strips of paper.
As for the Faux Tile Effect Lindsay I don't think you did anything wrong, but adding the clear embossing powder brings out the colour more.
Sorry you aren't happy with it ...but it is a novel effect! and your card is as always lovely. Thanks for sharing.
If you would like to add your cards to the website then please go to the Gallery Page.
You can add four photos at any one time and it is easy to do. Show the world your creations and build your own page on the website.
Click here to read or post comments
Diamond Top Card
by Lindsay
(Perth, Western Australia)


Diamond Top card
The colours on this Diamond Top card are slightly different to the last one I sent in - brown instead of black.
I made a medallion from the same paper instead of flowers.
Very happy with the result.
Christina says...
The Diamond Top card is alaways a very popular fold and all the instructions to make this card are on the website.
You will find them in the More Projects section in the NavBar. There are many other folds for you to try in that and the Easy Projects section too.
I have tried to keep them easy to follow so that you too can produce this lovely card, and although it looks intricate it is quite easy to do.
You can dress it up any way you like from the "stash" you have, but remember you will need a larger envelope to post it in, because of the irregular shape.
Click here to read or post comments
Diamond top card with paper rose
by Lindsay
(Perth, Western Australia)


This card was for a swimming friend who is turning 70, but I decided not to use it.
It is difficult to write on the left hand side of the card (about 15 people will be writing messages) due to the embellishments.
It has the paper rose that is one of Christina's new video tutorials only I made mine half the size.
I have made paper roses previously with a 4 leaf clover punch but I think this method is easier.
Christina says...
The Paper Roses can be found in the Video Tutorials section in the NavBar to your left.
There you will find lots of ideas to keep you busy. All the videos are short and easy to follow.
The roses them selves are a lovely addition to your cards and they are so easy to make.
You can take them one step further by Enamelling them too and the tuturial for that is in the same section.
Bird in a Cage
by Lindsay
(Perth, Western Australia)


Bird in a Cage
I bought a pack of paper and had the original card papered but did not know what topper to use.
Inspiration! two of the papers had the birdcage on which I cut out & 3D it.
I then stamped & embossed a bird in gold and stuck it on. Rather pleased with the results.
Christina says...
What a good bit of inspiration Lindsay and your cards is lovely.
Click here to read or post comments
Sunflower Twisted Pyramage Card
by Lindsay
(Perth Western Australia)

I bought a pyramage card book from a craft fare in Perth. It was all in Dutch but as I was born in South Africa I managed to understand it.
I must say that I am not sure if I like doing them. They seem to have too many layers so the card is quite bulky and definitely not a card for posting.
I am also not sure how many foam pads to put on - mine always seem to collapse!
Christina says....
Oh boy do I know the feeling of a collapsed card...sure do ...many times.
There are a few reasons why it collapses...maybe the paper or card is too thin.
In that case you could mount the image onto some thicker card for support.
Another way is to use bigger foam pads on the the card, or alternatevly to use foam tape which will cover a larger area and so stop the card from collapsing in on you.
The amount you use will depend on the size of the card and the pads you use, but as guideline I add mine quite liberally around the edges and in the middle too.
You could also try a silicone glue or Pinflair Glue Gel...all are available online.
If you like the look of Pyramage cards then take a look at the others ways too.
Decoupage and Invertage are all different slants to the same theme.
And Twister Cards are featured in the Cardmaking Ideas section in the NavBar to your left.
Click here to read or post comments
Popcorn Bear Wedding, Pyramage Birthday, Because You're Special
by Lindsay
(Perth Western Australia)

Popcorn Bear Wedding


|


|


|
While cleaning up my cupboard I found Popcorn the Bear which came in one of the magazines.
Christina says...
This is such a cute bear and I too have this character on a CD. He is from Crafters Companion and has a whole host of friends that can also be added to make up the party.
The CD provides you with backing papers, envelopes, inserts and verses. All which will give you the complete package to make the card from start to end.
There are some really cute images that woyld be ideal fro baby cards but of course there are other CD's and stamps for every occasion you may need.
They are well worth a look and the Christmas range is lovely. I am sure there will be new stamps released later in the year, and CC have a lot of other goodies on their website too.
Thry are a UK based company but they ship all over the world.
Click here to read or post comments
Decoupage Ballet Dancers
by Lindsay
(Perth, Western Australia)


Decoupage Ballet Dancers
For this Decoupaged card I used a patterned Vellum for the doily and the flowers.
I then Heat embossed Happy Birthday and used distressed ink around the sentiment.
I added glitter to the dress and the flowers.
Christina says...
Another lovely card Lindsay. I am so happy to have you share your talents with us.
Decoupage can produce some really lovely results and the amount of layers added is a personal touch.
Why not try the other "---ages" that are on the website too.
Pyramage and Invertage are both featured on their own pages.
And don't forget the Twister Pyramage too.
Click here to read or post comments
Decoupage Fairies
by Lindsay
(Perth Australia)

Pink Decoupage Fairy


|


|


|
Fairies make a cute card for all occasions and age groups.
I found this cute page of fairies and couldn't wait to try them.
I still have to add sentiments but will do this at a later stage when the occasion arises.
Christina says...
Little girls ....and big ones...love fairies and some of the lovliest cards can be produced using these images.
And all kinds of embellishments can be used to add the finishing touches for a really feminine look.
Click here to read or post comments
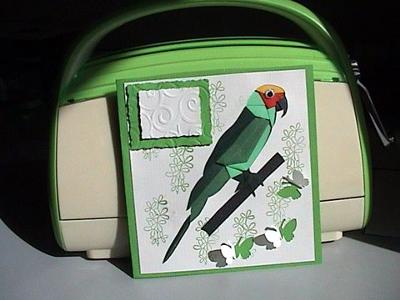
Twisted Easel Card
by Lindsay
(Perth Western Australia)

As promised here is my Twisted Easel Card.
I used Papermania 'Birdsong' stack and stamps.
I stamped the parrot on the water paper and painted it.
The flowers were made from the paper in the stack and I rubbed some glue glitter on the petals.
I also stamped some leaves and small flowers from the stamp set with staz-on.
I will be putting a sentiment on the bottom. I don't think I will embellish the bottom as the paper is quite busy.
Christina says...
Easel cards are very much in vogue this year and they are not a difficult card to make.
You will find a video tutorial on how to go about it in the Tutorials section.
But once you get the hang of them why not be more adventurous and try the other variations on the card too.
In the Easy section you will find all the instructions for the ...
Twisted Easel
Double Easel
Double Twisted Easel
Triple Easel
Twisted Triple Easel
So you will have lots of ways to make this lovely card. All the links are in the NavBar to your left.
Click here to read or post comments
Retro Betty
by Lindsay
(Perth Western Australia)


Retro Betty
Bought some new stamps and with the paper I got in a magazine I made this card.
I followed Christina's video on making the Flip Card.
Christina says...
Glad to be of assistance Lindsay and the card has turned out really well.
Click here to read or post comments
Bear Pyramage and Trellis card with quilling flowers
by Lindsay
(Perth, Western Australia)

Teddy Bear Pyramage


|


|
I tried the Pyramage again with only 4 layers.
I rubbed a bit of blue stamping ink around the edges and curved them.
I also tried the silicone glue and I think it is much better.
The idea of the Trellis Card I got from Christina's video and I had to try it!
Christina says...
Glad to have inspired you Lindsay with the Trellis Card
It is so impressive and would be perfect for that "Special Birthday"
It really is well worth trying, and Lindsays card will vouch for how beautiful it is.
And in case any one has missed it you will find step by step Video Instructions in the Tutorials section on the NavBar.
Another really stunning card is the Bow Front Card and that, and many more cards can be found in the More Projects section.
Browse around and if you get lost then refer back to the Sitemap and find every page on the website.
There is a link at the bottom of each page to View all Pages and Topics
Click here to read or post comments
3 Different Diamond Cards
by Lindsay
(Perth Western Australia)

Diamond Get Well Card


|


|


|
I just had to try the Diamond Cards and here are the results which I am quite pleased with.
The Diamond Get Well card was for a friend's husband.
The Diamond Pyramage Card still needs a sentiment. Even though the Pyramage is very high I think it has turned out quite well.
The Diamond Top card was also quite easy to do.
The paper on the bottom I unfortunately put on upside down - it is glitter paper which doesn't show up on the photo though.
Next card to try is the twisted easel card.
All from Christina's tutorial videos
Christina says...
The Diamond Top card is easily one of my favourites and yet seems so difficult when first viewed.
Beginners to cardmaking think they will never be able to do it but it is really esy once you start.
I tried to keep the instructions easy to follow so that it wouldn't be too daunting and if you make a template of the measurements first then it will save your best card as you practise.
There are lots of cards and folds on the website and all with step by step instructions. I hope you will give them all a try eventually.
Some you may like are in the Easy Projects section, and there you will find lots of variations on the Easel Card
Then have a try at the Magic Slider Card ...that is sure to fascinate the kids.
In the More Proects you will find the beautiful Bow Front Card And the
All these links are in the NavBar to your left ...have a browse around you are sure to find something that you like.
Click here to read or post comments


Recent Articles
-
Memory Book
Oct 15, 22 09:17 AM
 Make a memory book, fun to make and even lovelier to give.
 -
Die cut letters.
Jul 19, 21 10:12 AM
 Add that personal touch with die cut letters, add names or sentiment as you please.
 -
Diaper Fold Card.
Jul 19, 21 09:34 AM
Create this fun Diaper Fold Card...and no need for a pin!
Search
