Tri-fold cards...
are an easy effect to achieve
Tri-fold cards, or Zig Zag cards as they are sometimes called, must be the easiest effect to create
Just grab your trusty metal ruler, a sharp craft knife and your imagination and away we go
This little tutorial is here to help you get the results you want and there are many ways to decorate this card once you have the basic shape.
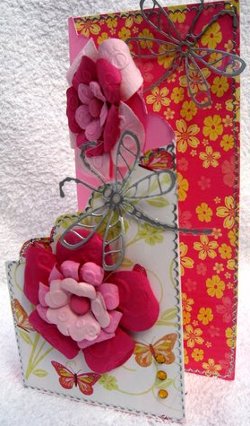
I have used silver peel offs around the edges of the shape to acentuate it.
And the dragonfly is also a peel off and it is attached to acetate.
Bend the wings up to give movement and add to the card with a small blob of silicone.
How to make Trifold Cards
Take your A4 piece of card,
21 x 29.7cms
(8 1/4 x 11 3/4")
in any colour, pattern or finish you desire and lay it out on your cutting mat.
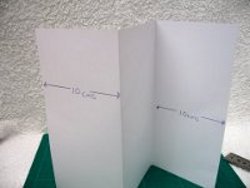
Then from the short edge, measure in 10cms (3 7/8") score and fold the card either way.
Turn the card around and measure the same distance from the other short edge, but this time fold the opposite way.
Your card will now have folds in it as in the photo.
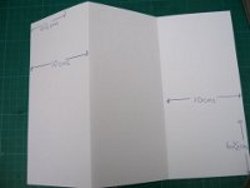
From the left edge measure in 6.5cms (2 1/2") and make a small pencil mark at the top of the card.
From the bottom right hand side of the card measure up 6.5cms (2 1/2") and make another small mark.

Get the trusty metal ruler out and place it along the card.
Join up the two marks you have just made, and with your sharp craft knife cut through the card.
But wait......
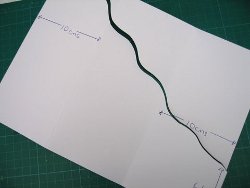
If you want a different look to your cards then make a swirly cut instead and see what a difference that makes.
It is done free hand and as long as you go from the top left mark to the bottom right one it will look good.
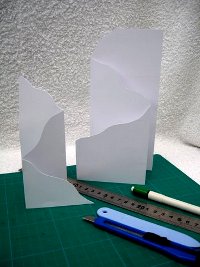
You should now have two pieces of card. The large one is your base to decorate, but the smaller one could be another card.
Use it as a gift card or a small "Thank you" card, but don't throw it away.....remember crafters waste nothing!
Maybe you would prefer to decorate the top with your punches for another look.
How you finish the card is open to your imagination and the embellishments you have to hand.
You can keep it quite plain or jazz it up.
And don't forget to decorate the inside or add an Insert to your tri-fold cards, to give them a professional finish.
Another option for your is to make it into something really special by adding in some Fancy Folds
Or perhaps you would like to see the Video Tutorial on how to make this Tri-fold card into a Double Zig Zag Card
Another magic touch!
Easy cardmaking projects
More cardmaking projects
Papercrafts
Novelty Cards
Kinetic Cards
Shaped cards
Cardmaking Occasions
Tutorials
Useful Resources
View all Pages and Topics
Return from Tri-fold cards to Homepage


Recent Articles
-
Memory Book
Oct 15, 22 09:17 AM
 Make a memory book, fun to make and even lovelier to give.
 -
Die cut letters.
Jul 19, 21 10:12 AM
 Add that personal touch with die cut letters, add names or sentiment as you please.
 -
Diaper Fold Card.
Jul 19, 21 09:34 AM
Create this fun Diaper Fold Card...and no need for a pin!
Search
