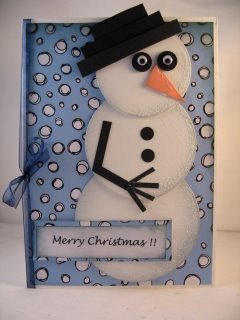
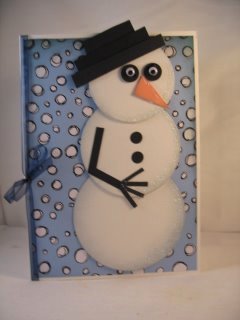
A Seasonal treat....
Make this Snowman Card.
This Snowman card can be the first make of the season.
Search

How about sending this cheeky Snowman Card to your friends this Christmas.
He is another easy Novelty card, that can be made from punched or die cut shapes, and any odd bits of card you have left over.
Step 1
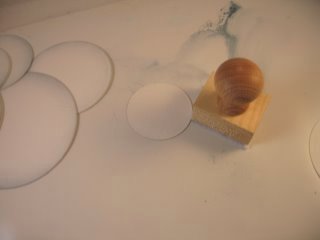
You will need three circles in three different sizes.
I haven't given you particular sizes as it depends on what you have available to you.
Just make sure that they will fit the front of your card when they are stacked.
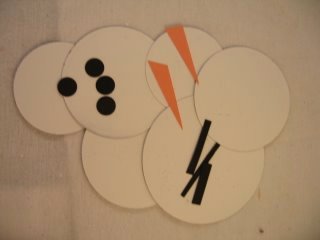
Punch several small black circles, and from an odd bit of orange cut a triangle shape for his carrot nose.
From the black card cut two straight strips for the arm, and several smaller and thinner strips for the fingers.
For the hat cut three oblongs to fit the top of the head and make each one slightly smaller.
Step 2
Ink all the edges with a grey ink and your Blending Tool.

Step 3
Add your chosen paper to the base card, making it slightly smaller to leave a thin border around it.
I have used the snowball paper from the Free Blue Xmas kit from Funky Fairies.
Then add each of the punched circles to the card keeping the smallest one for the head.
Add two of the small black circles for the eyes and the orange triangle for the nose.
Step 4
I have used my favourite Googly eyes and built up the oblong shapes to form the hat. (As shown)
The arm is done by adding two of the thin black strips to the front and the even smaller bits for the fingers.
Two more circles make the buttons.
I have added some Glamour Dust to the right hand side of each of the circles and along the top of his nose. (Though the photo doesn't show it very clearly)
Some navy blue ribbon on the spine....
...and the sentiment of your choice for the Seasonal greeting.
The sentiment here is done on the computer and inked around the edges, then added to a small piece of the backing paper.
It is attached to the card with some foam pads to raise it up a little.
You can add any more embellishments you would like, and you're done.
Easy enough to let the children make this Snowman Card to send to their friends.
Magic!
Return from Snowman Card to Homepage
Search


Recent Articles
-
Memory Book
Oct 15, 22 09:17 AM
 Make a memory book, fun to make and even lovelier to give.
 -
Die cut letters.
Jul 19, 21 10:12 AM
 Add that personal touch with die cut letters, add names or sentiment as you please.
 -
Diaper Fold Card.
Jul 19, 21 09:34 AM
Create this fun Diaper Fold Card...and no need for a pin!
Search