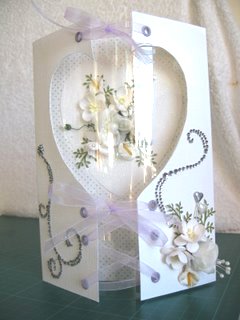
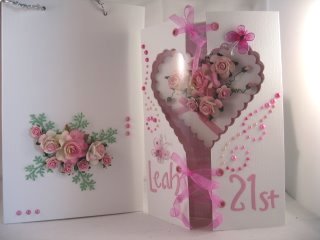
A beautiful Bow Front Card...
...What a stunning card to make
Make this Bow Front Card ... it really stands out from the crowd.
This beautiful card is such a showstopper and is sure to get the comments from your recipients
It is made using Acetate to create the raised effect to the front.
You will need A4 card, scored and folded to produce an equal Gatefold card
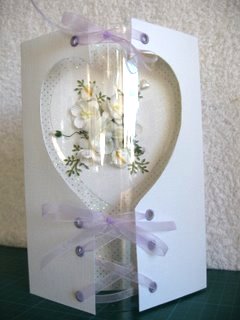
Then if you follow these instructions you will be able to create the Heart Shaped Front to the basic card.
You can of course, create any opening that you want for your Bow Front Card, by using any everyday object to draw around, that will give you the desired effect.
Ribbon has been threaded through the eyelets and lots of gemstones add to the theme.
Before you attempt to make a new card for the first time I would always advise you to practise first on some cheaper card or paper until you build your confidence.
Then if you keep these safe you will be able to refer back any time you need too to your Template
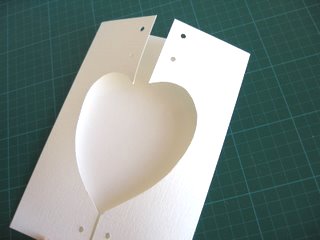
Step 1
Once you have the basic card we can now start to add the dressing to our Bow Front Card.
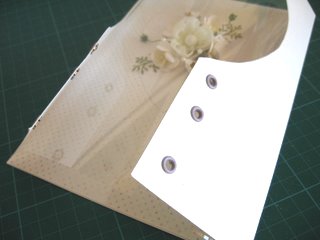
Mark each side of the flaps with dots to indicate where you will want to punch the holes for the ribbon.
I've punched two at the top and one at the bottom.
Step 2
I have added eyelets, but it looks just as good without, just make sure they are even.
Make a panel to fit the back of the card and glue in place.
This will be visible through the acetate so make it pretty.
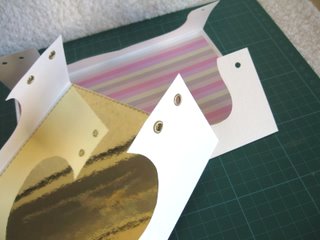
Step 3
Whatever the theme to your card, it will need to be decorated inside now,before the acetate is added, and allow it to dry before you go any further.
Remember that silicone and Pinflair glue may need to be left overnight to set properly.
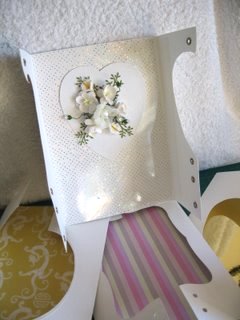
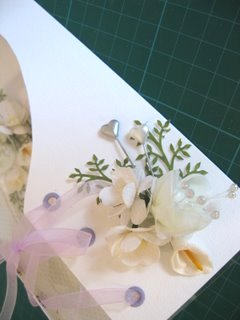
On the featured card I have layered leaves and flowers onto some glitter card and adhered it so that it lies central in the opening.
Step 4
Cut a piece of acetate slightly larger than the back panel, to make it bow a little.
On the inside of the flaps you are going to add some double sided tape.
Fix one side of the acetate to the tape, and then press it together.

Step 5
Take the other side of the actetate to the other flap.
Make sure that there is a bow and adjust the acetate.
Press this into place also, when you are happy with the degree of the bow.
The photograph just shows the result that you are looking to reproduce.
Step 6
We are now ready to lace the holes with the ribbon.
The eyelets and the ribbon are lilac on this card, in keeping with the wedding theme.
Step 7
The flowers have been carried through to the front of the card, and I have also added some Decorative Hatpins.
Step 8
The Diamante swirls are the finishing touch to this beautiful Wedding card.
They are from Want2Scrap
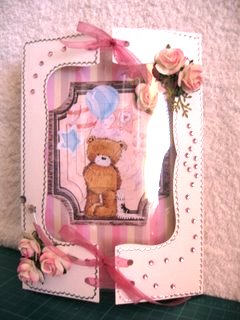
This style of card can be made for any theme and dressed up as you wish.
This baby card is using the image of "Popcorn the Bear" and he is from Crafters Companion
But it really isn't difficult to do and I hope you will give it a try.
Because of the size and shape of this Bow Front Card it is more suitable to being hand given, rather than posted.
You will also find it awkward to squeeze in to an envelope...
and so I have given you the
instructions for a...
Matching Box.
Return from Bow Front Card to Homepage


Recent Articles
-
Memory Book
Oct 15, 22 09:17 AM
 Make a memory book, fun to make and even lovelier to give.
 -
Die cut letters.
Jul 19, 21 10:12 AM
 Add that personal touch with die cut letters, add names or sentiment as you please.
 -
Diaper Fold Card.
Jul 19, 21 09:34 AM
Create this fun Diaper Fold Card...and no need for a pin!
Pretty Embellishments
PopShops™ affiliate storesSearch
