Fancy Tri-fold Card
This Fancy Tri-fold Card may look a little more challenging but it is easier than you think.
This unusual card looks very impressive and can be dressed anyway you want.
You will benefit from making a Template on some cheaper card to help you with the measurements...at least until you feel confident with your good stuff.

I have been asked quite a lot recently to give the measurements in inches (") as well as centimetres (cms) and so I am now adding both to the website.
They are an approximation, but I hope that this will aid my North American visitors.
But please remember that you can only use one or the other when making cards ... don't try to use both on one design... it won't work out for you if you do !!
Step 1
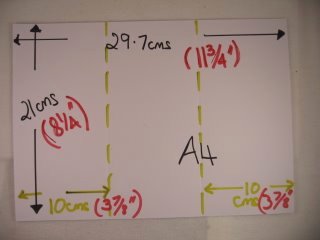
So the first step is to take your A4 card
21 x 29.7cms
(8 1/4 x 11 3/4 ")
Fold and crease it from each end by 10cms (3 7/8").
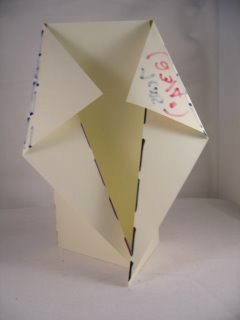
The basic idea is to make the Tri-fold card.

Step 2
Once you have done this then lay your card flat on your worktop.
Form the top of the card, and working on the green crease lines, measure down the outside edge by 7cms (2 3/4") and make a little mark.
With a metal ruler make a score line from the inside to this outside mark. (The top dashed line)
Then from the same fold score all the way down the card to the outside edge. (The bottom dashed line)
Step 3
Now with a bone folder (or the back of a spoon) fold the top part towards you.
(This will make the fold go backwards and is called a Valley fold)
On the second crease line fold the card away from you.
(This will make the fold come towards you and is called a Mountain fold)
Step 4
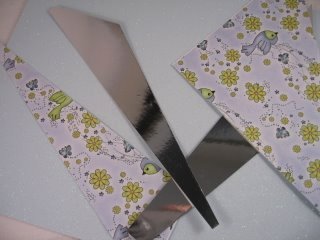
To decorate the panels I have used some Mirror Card and some patterned paper.
You can take the size from your card and make these added panels slightly smaller each time, to leave a small border around the edges.
This is Matting and Layering.
Step 5
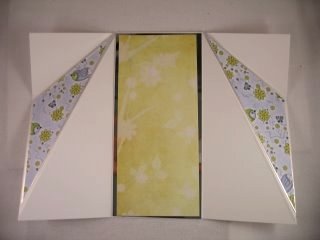
I have decide to decorate the middle panels and the back inside of the card.
Step 6
The centre of the card has had some shaped toppers added onto mirror card and fixed in place with foam pads.
The outside of the card I have added punched paper flowers and sparkled them up with gemstones and glitter.
I hope you enjoy making this card, and once you get used to the folds it's a breeze.
Keep the template for your Fancy Tri-fold Card for future reference
Tri-fold Cards
Easy Cardmaking Projects
More Projects
Papercrafts
Novelty Cards
Kinetic Cards
Cardmaking Ideas
Cardmaking Occasions
Return from Fancy Tri-fold Card to Homepage


Recent Articles
-
Memory Book
Oct 15, 22 09:17 AM
 Make a memory book, fun to make and even lovelier to give.
 -
Die cut letters.
Jul 19, 21 10:12 AM
 Add that personal touch with die cut letters, add names or sentiment as you please.
 -
Diaper Fold Card.
Jul 19, 21 09:34 AM
Create this fun Diaper Fold Card...and no need for a pin!
Search
