Try making a Shutter Card...
another easy to create look.
Make this Shutter Card form the steps below, and "WOW" your recipients
This pretty card looks really intricate, but it is easy to re-produce. Just follow the steps to get the end result.
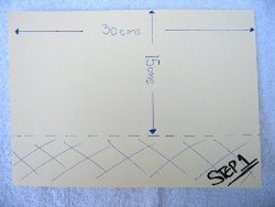
Step 1
Take an A4 card, and measure down for 15cms and cut off the bit at the bottom.
Step 2
At the top and bottom of the card measure at 5, 10, 20 and 25 cms.
On the 10 and 20cms lines you will score the card from top to bottom.
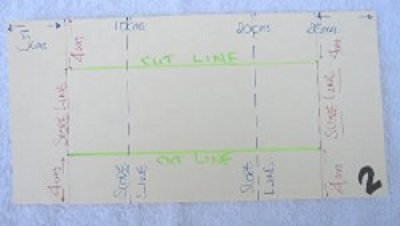
At the 5 and 25cms lines measure 4cms from the top and bottom and make a feint mark.
Then score the card between these two marks. (Not from top to bottom as with the other line)
Where the horizontal green cut line is, this is the only place you will cut.
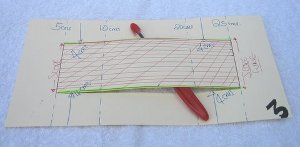
Step 3
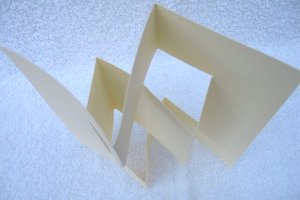
I have inserted a pen into the opening to show you where the cuts are made, and your card should look the same as in the picture.
Step 4
Now comes the folds to the score lines. Lets deal with the central panel first.
At the 5cms score line fold the card to create a mountain fold.
At the 10cms score line fold the card to create a valley fold.
At the 20cms score line fold the card to create a mountain fold.
At the 25cms score line fold the card to create a valley fold.
At the top and bottom of the card the folds are the same at the 10 and 20 cms score lines.
At the 10cms score line fold the card to create a mountain fold. (Opposite to the centre panel)
At the 20cms score line fold the card to create a valley fold. (Opposite to the centre panel)
And your Shutter cards will look as in the picture. I have left this one blank so that you can see how the front of the card will be when you have finished the folds.
It's a bit fiddly and you may need to play around with it until you get the hang of the folds, but once you have mastered it, then it becomes easy.
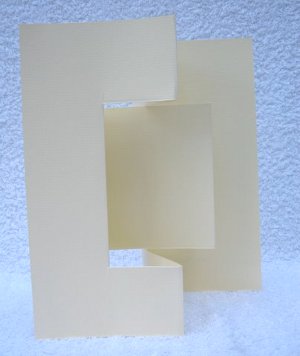
Your card should look as the card in the picture, and if you have made a practise run at it first then all your measurements will be on this template.
You can fine tune it from there until you are happy with the results.
When you feel confident making the Shutter Card then try decorating the panels as you wish, or you could make the card from glitter, mirror or textured card for even more interest.
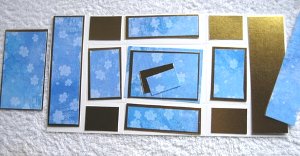
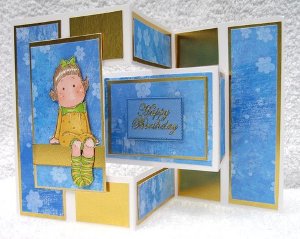
Here I have measured all the panels and made gold ones slightly smaller than the card.
Then repeated the process, going smaller again with the flowery blue panels, and layered them on top of the gold.
Then to finish the card I have sat Tilda on a border to the front of the card, then added a "Happy Birthday" sentiment to the inside.
I could add gemstones or flowers next as the mood takes me.....
Add your own toppers or images to finish your kinetic cards, and make them for any occasion.
They will fit into a standard size envelope or make some boxes especially for the cards and send them with love to the recipient.
Then stand back and glow when they praise you for being so clever.
Magic!
Return from Shutter Card to Homepage
Search


Recent Articles
-
Memory Book
Oct 15, 22 09:17 AM
 Make a memory book, fun to make and even lovelier to give.
 -
Die cut letters.
Jul 19, 21 10:12 AM
 Add that personal touch with die cut letters, add names or sentiment as you please.
 -
Diaper Fold Card.
Jul 19, 21 09:34 AM
Create this fun Diaper Fold Card...and no need for a pin!
Search