Spellbinders Door Card
Giving someone the key to the door is easy with the Spellbinders Door Card... Perfect for all your "Coming Of Age" Birthdays.

This is the first in the Fun Cards with Spellbinders series and this will give you the written instructions to make this card.
I have also made the video version of this Spellbinders Door Card for those of you who prefer to learn by watching.
The link will be added shortly
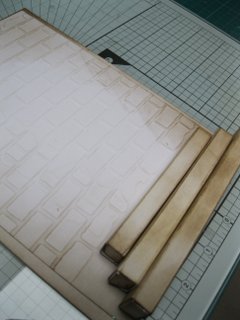
I have started with three pieces of plain white A4 card in a 270gsm weight.
But you could use a patterned or coloured card for yours.
But my intention is to use Distress Inks to get the look that I want.
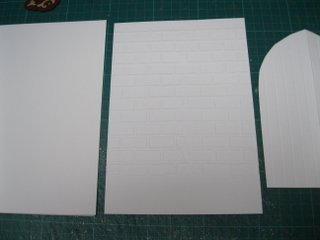
With the first of those pieces of card score and fold it in half and this will be the base of the design.
The second peice will be cut in half.
One half will be for the wall and I have embossed this in the Brick effect embossing folder.
The other half will be for the door itself.
The third peice will be divided up and used to create the three steps leading down from the door.
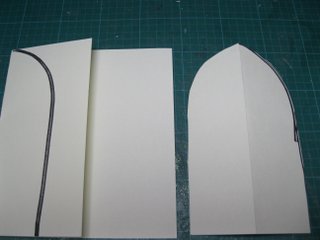
To form the door you can use any template that you have.
Or you can make a new one ... by folding some scrap paper in half, drawing half an arched shape and then cutting around it.
Once you open that out you will have a full arched shape.
That will be your template and then use this on your good card for your Spellbinders Door Card.
I have then added score lines every centimetre on either side of the centre fold to add the impresion of panelling.
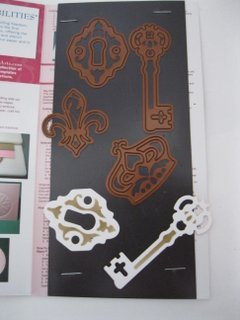
To form the keyhole and the key I have used the dies from the Antiquites from Spellbinders.
I have then inked the card while it is still in the die to accentuate the embossing on both.
And when you add it to the door please make sure it is the correct way up and not upside down ....
How do I know this ?? Been there ... done that !!
Lets move on and create the steps to this Spellbinders Door Card.
For this I have cut the third A4 peice of card into three 9cms pieces using the width of the card.
I have used a Scoring Board to measure it out.
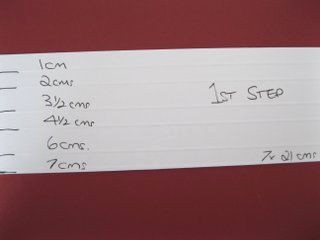
The 1st Step
The card has been scored at 1cm .. 2cms .. 3.5 cms .. 4.5 cms .. 6 cms .. and 7cms ..
The rest of the card is surplus and can be removed... but your peice should now be 7 x 21 cms
Crease and fold this all sharply with a bone folder.
Set to one side while we make the other two.
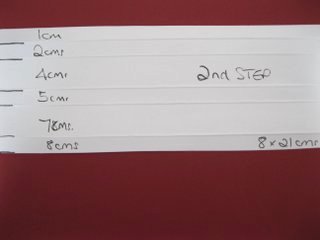
The 2nd Step
This is measured out at 1cm .. 2 cms .. 4 cms .. 5cms .. 7 cms ..8 cms ..
Crease and fold, discard the extra and place on one side.
Don't worry about the width of them at this stage.
This step should be 8 x 21 cms and nothing has been glued as yet.
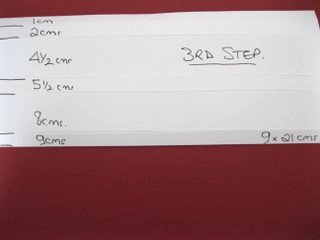
The 3rd Step
Measure this at 1 cm .. 2 cms .. 4.5 cms .. 5.5 cms .. 8cms .. and as the card was cut to 9cms this is now complete.
Score and fold as you did the other two.
We are ready to ink everything in the colour of your choice.
The Brick Wall and all three steps I have inked in Antique Linen and Walnut Stain with a Blending tool ... how you colour the door to your Spellbinders Door Card is a matter of choice.
I have used red, blue or brown for my doors and they all look good.
Ink the steps so that the folds in them are prominent and once they are dry fold them back into the step shape and glue in place.
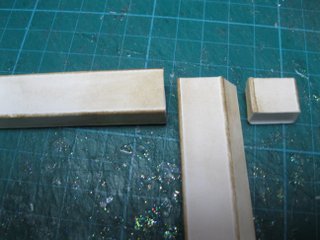
Take the 1st step and measure it level with the width of the door that you have cut... it will be easier if you press the step flat to do this.
Trim off the surplus and this is the bit that will make the side to your step to give it a neat finish.
Hold it alongside the side of the first step and trim to fit.
Add a little glue to the top and bottom, and slot into the side of the step, on both sides.
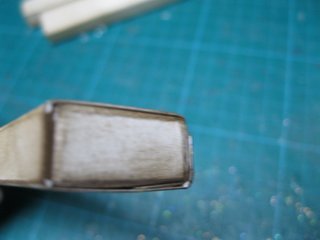
Measure the second step to be about 1 cm wider than the first step and repeat the process with the extra so that this step is also lined at the sides.
Repeat this process again for the third step... and this will give a very neat finish to your steps.
Then glue all the steps together with smallest at the top and all the joins to the back of them.
This is how your steps should look and now they are ready to be added to the card.
Glue the inked Brick wall to the inked base card and line the steps up to be level with the bottom of the card...
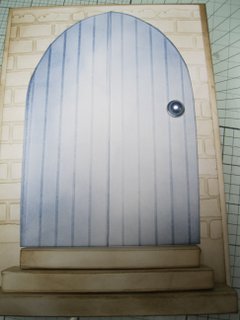
Add a Brad as a doorknob and then glue the door in place just above the steps...
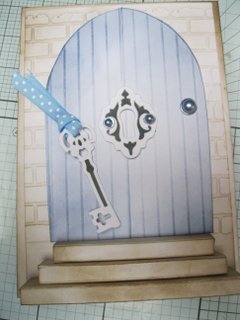
Add smaller Brads to the keyhole and thread ribbon through the top of the key and glue both to the door.

Add in the number that you wish and decorate with flowers and Ivy around the door frame for a really pretty effect to your Spellbinders Door Card.
Return from Spellbinders Door Card to Homepage


Recent Articles
-
Memory Book
Oct 15, 22 09:17 AM
 Make a memory book, fun to make and even lovelier to give.
 -
Die cut letters.
Jul 19, 21 10:12 AM
 Add that personal touch with die cut letters, add names or sentiment as you please.
 -
Diaper Fold Card.
Jul 19, 21 09:34 AM
Create this fun Diaper Fold Card...and no need for a pin!
Search
