Spotlight stamping...
...when time is short
and you need a special card
When you need a card in a hurry, try "Spotlight Stamping" for quick results, and especially if you don't like coloring in.
Step 1
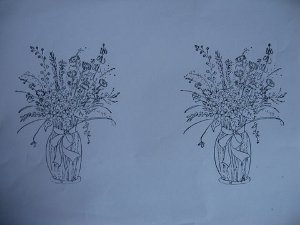
For this simple technique you will need to choose the image you want to use and stamp it twice onto some white cardstock.
I used a black ink pad for a crisp impression.
(For some reason one of these prints looks bigger than the other...but I promise you it was only the one stamp for both)
One of these images will be used in full size and the other will be cut into a section to make the spotlighted area.
Step 2
I have used my "Spellbinders" die cuts to shape the full image and a smaller one for the spotlight.
And I have placed it at an angle for a little more effect.
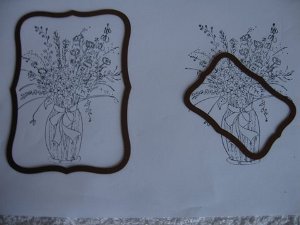
You could use other ways to shape your cards, or just cut freehand a strip across the second image and use it that way.
Punch out a star, oval, circle or oblong shape, just keep the spotlight one smaller than the main image, whatever you decide to do.
Step 3
Ink the edges of both pieces to add definition to your shape, but the larger image stays un-colored.
Color in the smaller shape in your chosen medium.
I have used
"Sakura Gellyroll"
pens for mine.
But it could be watercolored or chalked...your choice!
When the coloring is dry it can be attached to the main image using foam pads to raise it up.
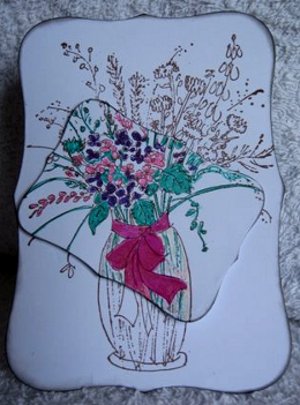
Make sure that you line up the elements of the images to complete the card.
(Try not to make them wonky...like mine!!)
Step 4
And the final step is to add the finishing touches to your creation.
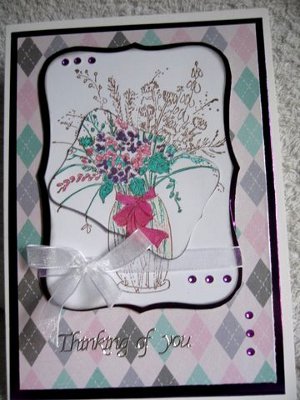
Choose the backing paper to match your card and colors.
I matted and layered my papers, and the stamped image with a purple mirror card.
I wrapped a white organza ribbon around the layer.
(Hides the wonky bit...)
Gemstones, Glitter, buttons and bows, or any embellishment you care to use can all make this card something really special.
And Spotlight Stamping is an excellent technique to use if you aren't that keen on coloring in
A new tool on the market will help you even more to get perfect results every time
MISTI ... Most Incredible Stamping Tool Invented
Return from Spotlight Stamping to Homepage


Recent Articles
-
Memory Book
Oct 15, 22 09:17 AM
 Make a memory book, fun to make and even lovelier to give.
 -
Die cut letters.
Jul 19, 21 10:12 AM
 Add that personal touch with die cut letters, add names or sentiment as you please.
 -
Diaper Fold Card.
Jul 19, 21 09:34 AM
Create this fun Diaper Fold Card...and no need for a pin!
Search
