Hand Written Text...
... Not as hard as it seems !
Need a sentiment in a hurry...then hand written text will solve the problem.
Search

Do you lack confidence in your own handwriting? I know I did and I tried to avoid it wherever possible.
It looked like spiders had crawled over my pages and I couldn't keep in a straight line.
But instead of trying to keep it neat, I decided to play with my weaknesses, and enhance the fault instead of trying to hide it.
The secret is not to try and keep it neat, because the more you try the more untidy it becomes.
Perhaps you don't have a suitable Peel Off, or a die cutter, and not even an alphabet stamp set....so what can you do?
Well here is what I do.
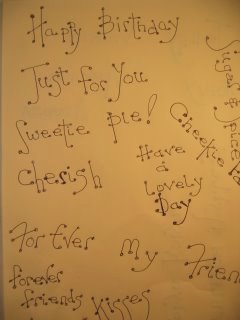
This hand written text is not supposed to look neat or straight, those are the things we are going to work with instead.
The first thing I do is take a sheet of lined paper and, with a black marker pen and a ruler, I go over the lines to accentuate them even more.
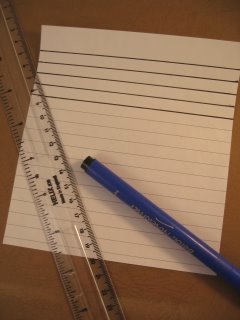

Use this as your template and place it under the piece of paper you are using for your sentiment.
You can see from the photograph that the lines are just visible through my paper.
It is just an ordinary piece of copier paper, and the lines underneath are my guidelines for the text.
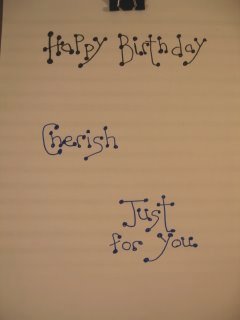
Use your coloured pens to write the letters.
I have some sparkly Sakura pens that add glitter to the word and it looks very pretty.
Start writing the letters in different sizes and on different levels.

The black lines underneath, which you can just see in the photograph, will be your guide.
Don't try to keep them uniform, just higgledy piggledy will do.

Then go back to each letter and add a large dot to the end of the stroke.
The picture shows you what I mean.
But just this simple little trick will alter the look of the word.
So it doesn't matter if it isn't straight or tidy...it's not supposed to be!
Complete the word or phrase that you want, adding the large dot to each downward stroke of the letters.
The only thing you need to be aware of is the size of the card it is going to adorn.
The words will, of course, need to fit onto the front of that.

Use different coloured pens to vary the look.
Match them to the card you are adding them too.
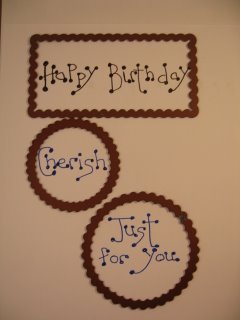
I have added several sentiments to my piece of paper, but leave enough space between each one so that you can cut them out completely.
The guide lines are visible in the phot0graph and these will help you to space out your words too.
Using whatever method you have cut them out.
That can be punches of various shapes, or as I have done here with Spellbinders.
By leaving enough space around each word means they can be cut out completely for you to use.
Adding several hand written text phrases to the paper at one time will give you some in reserve for the next card.
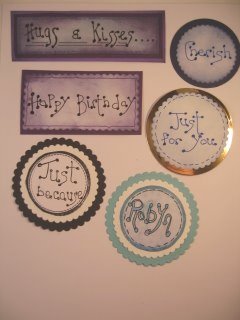
Once they are cut out ink all the edges.
I have used distress inks and with my Blending tool I gone over the centre of each piece to blend out the whiteness of the paper.
Then all you need to do is Mat and Layer each one to go with your colour scheme.
Use glitter card or any of the lovely Special Card to make them really interesting.
Add Faux stitching around the edges, and then add them to your cards.
They look especially neat with a cartoon character type card, and the hand written text will make it special.
I find my self doodling phrases and words just to practise the technique.
Try longer phrases and don't worry about the spacing for this as it is only a practise sheet.
But I hope you will give this a try as it is really easy to do, and will make your cards as individual as you are.
Return from Hand Written Text to Homepage
Search


Recent Articles
-
Memory Book
Oct 15, 22 09:17 AM
 Make a memory book, fun to make and even lovelier to give.
 -
Die cut letters.
Jul 19, 21 10:12 AM
 Add that personal touch with die cut letters, add names or sentiment as you please.
 -
Diaper Fold Card.
Jul 19, 21 09:34 AM
Create this fun Diaper Fold Card...and no need for a pin!
Search