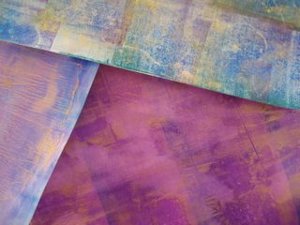
Brayered Paper
Brayered Paper can be used to wrap your presents in, make gift tags, and as beautiful backing papers for you card making creations.
It is easy to achieve and only your imagination will limit you.
Experiment, have fun and see what you produce.
It is supposed to be a very simple technique but I admit I am not very good with one.
So here is what I have come up with and I am quite pleased with the result.
These lovely papers where created using a brayer tool and they where very easy to do.
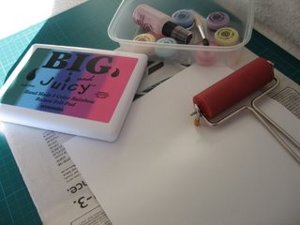
Step 1
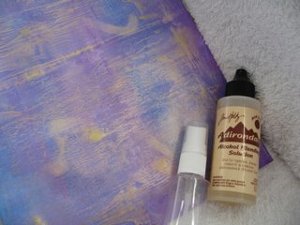
I have used.... Glossy photo paper,
Cosmic Shimmer iridescent Mica pigments.
Big and Juicy Ink pad and of course
the Brayer.
I have used an old newspaper under my photo paper, to aid the brayering, and to protect the mat.
It can be a messy technique...(well I make it messy!)
You will see that the ink pad I have used has several Colours to it, and using the different areas can produce different backings.
Roll the Brayer up the Colours rather than across them and that way they won't get mixed.
The Brayer will cover several areas of the ink pad, and this is what gives the paper it's uniqueness.
(This colourway is from the central area of the pad with the blue and purple)
Step 2
Roll the Brayer firmly up the pad, to load it, and then roll it from one side of the glossy paper to the other, several times to blend the ink.
Keep the roller in the same area on the paper as you do this blending.
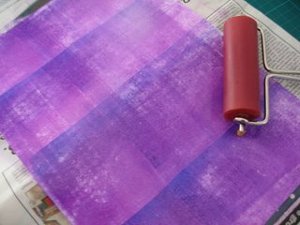
Then roll another row the same way until you are at the bottom.
Work on each area as you go down the paper.
When you have done that horizontally then repeat the ink up and re-load process in a vertical direction.
You can see from the picture the kind of effect you will get, and the different colours on the pad are clearly shown.
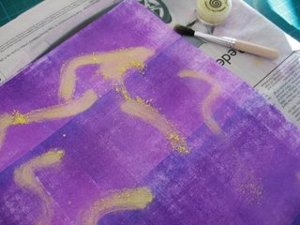
Step 3
With the small brush add random streaks of the gold "Cosmic Shimmer"
Mica Powders onto the brayered paper...
...and then spritz it with some water to keep it moist.
Roll the Brayer again through the ink and the Cosmic Shimmer to spread it around the glossy paper.
Keep working it until you have a blend that you like, and if the ink dries out, then just spritz it again.

Once the paper is dry then give it a quick spritz with cheap hairspray to seal it.
It is then ready for you to use.
The picture does not do the brayered paper justice.
Because once the paper is dry the gold shimmer will be even more visible, and the result is sure to please you.
After all, you have just created your own special backing paper that no one else will have.
These three examples are made with the one ink pad, but rolling the Brayer through the different color areas gives the change in the blend.
The roller is removeable which means you can add other materials, such as elastic bands, bubble wrap and cling film, to it to create some stunning effects.
It also makes it easy to clean.
Have a play and experiment with your own brand of Brayered Paper.
For Brayers and inks and some really good tutorials on how to use the tool visit Clarity Stamp
Return from Brayered Paper to Homepage


Recent Articles
-
Memory Book
Oct 15, 22 09:17 AM
 Make a memory book, fun to make and even lovelier to give.
 -
Die cut letters.
Jul 19, 21 10:12 AM
 Add that personal touch with die cut letters, add names or sentiment as you please.
 -
Diaper Fold Card.
Jul 19, 21 09:34 AM
Create this fun Diaper Fold Card...and no need for a pin!
Search
