Baby Bootees a lovely gift ...
...for a New Baby
Make these pretty Baby Bootees as a lovely gift for a New Baby... and make them extra special by adding in the box to match them.
Pink for a girl and blue for a boy ... and if you don't know what the baby will be then try more subtle colours such as pale lemon or turquoise
This pretty little gift makes a really lovely change from sending a card.
They are unusual but easy to make and I am sure the parents would be delighted if they received these to welcome their new addition.
Make them in any color, and add the embellishments of your choice.
I have used lace around the tops, and a pearly Brad to close the front of the bootees.


Here's what you need to make your own
2 disposable Polystyrene cups.
The sort you buy for parties to save you washing up....
I bought a pack and they are really cheap and you get loads so you can practise several times.
Then you will need to cut it down.
This is a rough guide for you to follow.
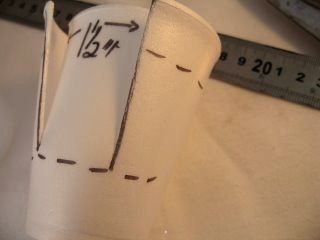
Make two slits into the cup about 4cms (1 1/2ins) apart, from the top rim to about 2.5cms (1in) from the base. (The bottom black dashed line)
Remove the top 2.5cms (1in) from the top of the cup. (The top dashed line)
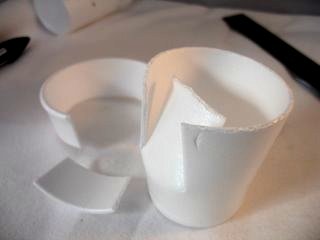
And this is what it should look like when you have done that.
The centre part, that you first cut, becomes the tongue and should be pushed slightly backwards.
The two sides are pushed inwards to form the front of the boot.
Decorate the bootees any way you want.
I have glued some ribbon around the top and the bottom of this one...


...when all the glue is dry push the sides together.
Bend the tongue down a little out of the way, and then make a small hole through the two sides and fasten them together with a brad.
Delightful...Yes?
These have been decorated with some glitter glue spots, Promarker stripes and some beautiful lace to edge the top of the boot.
Don't forget you will need to make two for a matching pair.
And then you will need something to put your Baby Bootees in...so how about making a Special Box for them and they are sure to be a "Keepsake" for many a year

Return from Baby Bootees to Homepage


Recent Articles
-
Memory Book
Oct 15, 22 09:17 AM
 Make a memory book, fun to make and even lovelier to give.
 -
Die cut letters.
Jul 19, 21 10:12 AM
 Add that personal touch with die cut letters, add names or sentiment as you please.
 -
Diaper Fold Card.
Jul 19, 21 09:34 AM
Create this fun Diaper Fold Card...and no need for a pin!
Pretty Embellishments
PopShops™ affiliate storesSearch
